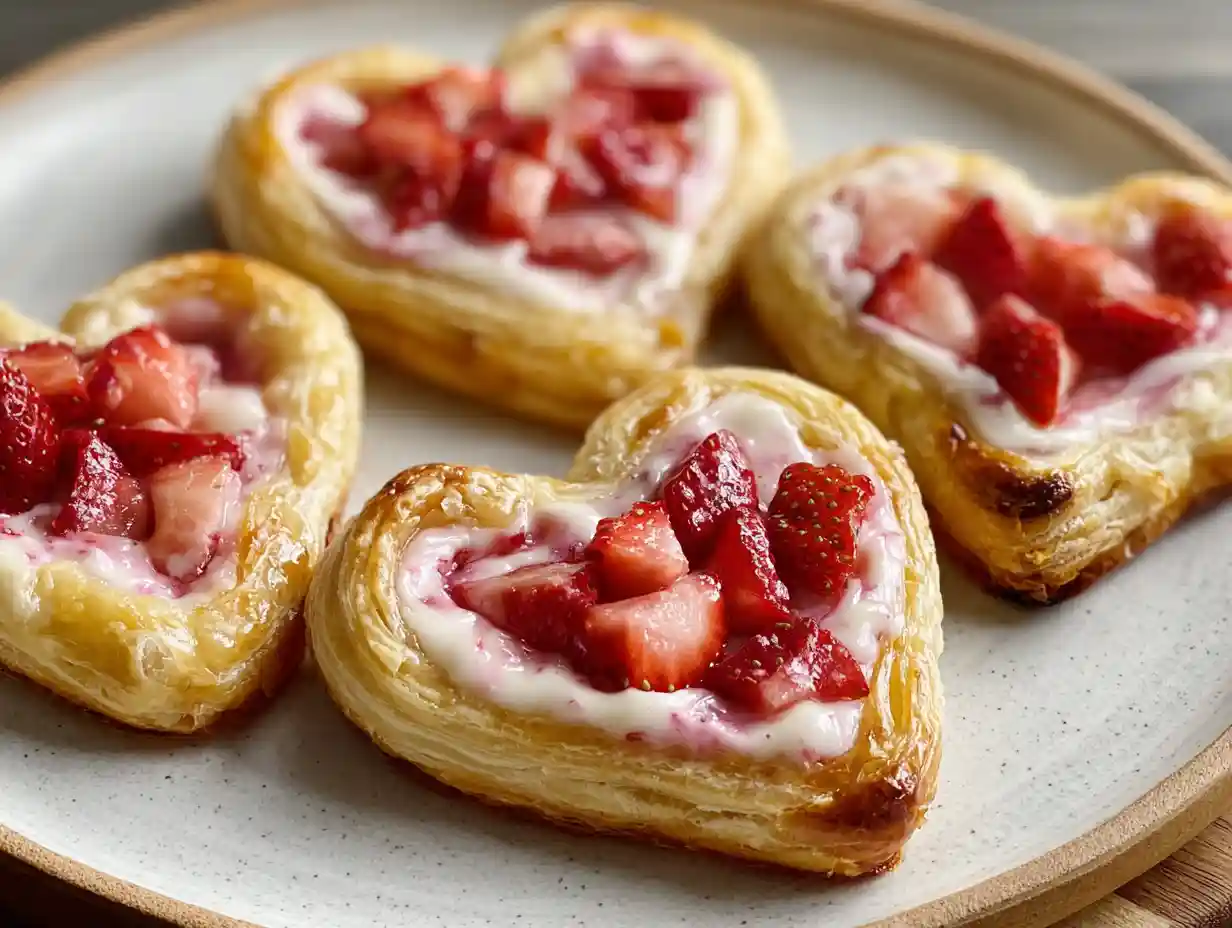
Why You’ll Love These Strawberry Cream Cheese Heart Danishes
I know you’ll adore these danishes for so many reasons, but here are a few that truly stand out in my kitchen:
- Effortlessly Elegant: They look incredibly impressive, but I promise the process is super simple, thanks to store-bought puff pastry.
- Visually Stunning: The heart shape and vibrant strawberries make them absolutely perfect for special occasions, or just to make an everyday moment feel a little more festive.
- Irresistibly Delicious: The flaky pastry, creamy, sweet filling, and fresh strawberries create a symphony of textures and flavors that are hard to resist.
- Quick to Make: From start to finish, you can have these warm, golden pastries ready for your family and friends in under 40 minutes.
Table of Contents

Irresistibly Delicious Strawberry Cream Cheese Heart Danishes
Ingredients
Equipment
Method
- Thaw the puff pastry sheet as per packages directions. Some say thaw on the counter for 2 hours or you can leave it to thaw in the fridge over night.
- Preheat oven to 400 F and line a large baking sheet with parchment paper.
- In a medium sized bowl mix cream cheese, sugar, and vanilla together until light and fluffy. Add in a few drops of red food colouring. Set aside.
- Unfold the thawed puff pastry. Using a 3 inch heart cookie cutter cut out 7 heart and place them on the baking sheet 1 inch apart. (You may be able to get 9 depending on the size of your puff pastry and the size of your cooking cutter)
- Using a sharp knife or smaller heart shaped cookie cutter score a border about 1/4 inch from the edge (see picture above). Be careful not to cut all the way through, you just want to create a shallow cut.
- Spoon about 1/2 tbsp of the cream cheese mixture on to each heart and spread it inside the border.
- Then divide the diced strawberries evenly amongst the danishes by sprinkling them on top of the cream cheese. Try to keep inside the outlined border.
- In a small bowl mix egg and cold water together to create an egg wash. Using your finger or a small baking brush apply the egg wash on the outside border.
- Bake for 15-17 minutes or until edges are starting to turn a golden brown.
- Cool on the pan for 5 minutes before enjoying these danishes warm.
- Enjoy!
Notes
Tried this recipe?
Let us know how it was!The Magic of Puff Pastry: Handling for Ultimate Flakiness
Working with puff pastry is one of my favorite shortcuts for creating gourmet-tasting treats with minimal effort. The key to its incredible flakiness lies in proper handling, especially when it comes to thawing. I always say, don’t rush this step!
You have a couple of excellent options for thawing your puff pastry sheet. You can leave it on your kitchen counter at room temperature for about 2 hours, or for a more hands-off approach, simply let it thaw overnight in the refrigerator.
Proper thawing is absolutely crucial because it makes the pastry pliable enough to work with without tearing, but still cold enough to maintain those delicate layers that give puff pastry its signature rise and flakiness. I always make sure not to overwork the dough; handle it gently to keep those precious butter layers intact.
Ingredients You’ll Need
I love how simple the ingredients are for these delicious danishes. Here’s exactly what you’ll need:
- 1 sheet store bought puff pastry (thawed to package directions)
- 4 oz cream cheese (at room temperature)
- 2 tbsp white sugar
- 1/2 tsp vanilla extract
- red food colouring
- 1/2 C diced strawberries
- 1 large egg
- 1 tbsp cold water
See how easy that is? I truly believe that fantastic food doesn’t always require a long list of exotic ingredients. Fresh strawberries and a few pantry staples are all it takes to create something truly special.
Equipment for Perfect Pastries
Having the right tools always makes baking more enjoyable and efficient. Here’s what I reach for when I’m making these lovely danishes:
- 3-inch heart cookie cutter: This is essential for getting those perfect shapes. I find a 3-inch size works wonderfully.
- Large baking sheet: You’ll need this to bake your danishes evenly.
- Parchment paper: I always line my baking sheet with parchment to prevent sticking and make cleanup a breeze.
- Medium and small mixing bowls: These are for preparing your cream cheese filling and your egg wash.
- Sharp knife or smaller heart-shaped cookie cutter: For scoring the border on your pastry hearts.
- Small baking brush or your finger: Perfect for applying the egg wash precisely.
Step-by-Step Guide to Making Strawberry Cream Cheese Heart Danishes
I’m so excited to walk you through the process of creating these beautiful pastries. Just follow these simple steps, and you’ll have warm, golden danishes in no time!
- Thaw the puff pastry sheet as per packages directions. Some say thaw on the counter for 2 hours or you can leave it to thaw in the fridge over night.
- Preheat oven to 400 F and line a large baking sheet with parchment paper.
- In a medium sized bowl mix cream cheese, sugar, and vanilla together until light and fluffy. Add in a few drops of red food colouring. Set aside.
- Unfold the thawed puff pastry. Using a 3 inch heart cookie cutter cut out 7 heart and place them on the baking sheet 1 inch apart. (You may be able to get 9 depending on the size of your puff pastry and the size of your cooking cutter)
- Using a sharp knife or smaller heart shaped cookie cutter score a border about 1/4 inch from the edge (see picture above). Be careful not to cut all the way through, you just want to create a shallow cut.
- Spoon about 1/2 tbsp of the cream cheese mixture on to each heart and spread it inside the border.
- Then divide the diced strawberries evenly amongst the danishes by sprinkling them on top of the cream cheese. Try to keep inside the outlined border.
- In a small bowl mix egg and cold water together to create an egg wash. Using your finger or a small baking brush apply the egg wash on the outside border.
- Bake for 15-17 minutes or until edges are starting to turn a golden brown.
- Cool on the pan for 5 minutes before enjoying these danishes warm.
- Enjoy!
Elevating the Filling: Cream Cheese & Strawberry Perfection
The heart of these danishes, quite literally, is the luscious cream cheese filling and the fresh strawberries. I start by ensuring my cream cheese is at room temperature. This is a small but mighty tip; it allows the cream cheese to mix smoothly with the sugar and vanilla extract, creating a light and fluffy mixture without any lumps. I then add a few drops of red food coloring, which gives the filling a lovely, subtle pink hue, making it even more appealing, especially with the strawberries.
When it comes to the strawberries, I recommend dicing them finely. This ensures they fit neatly within the scored border of your danishes and cook perfectly without making the pastry soggy. I always try to keep the pieces small and uniform, which not only looks beautiful but also helps to distribute that wonderful fruity flavor evenly.
Scoring and Assembling Your Heart Danishes
Once your puff pastry is perfectly thawed, I carefully unfold it on a lightly floured surface. Using my 3-inch heart cookie cutter, I cut out as many heart shapes as I can; usually, I get about 7-9 depending on the brand of pastry I use. I arrange these hearts an inch apart on my parchment-lined baking sheet.
Next comes the scoring, which is a clever little trick for perfect danishes. I use a sharp knife or a smaller heart-shaped cookie cutter to gently score a border about 1/4 inch from the edge of each pastry heart. The key here is to make a shallow cut, just enough to create a line, without cutting all the way through the dough. This scoring helps to define the center where the filling goes, and it encourages the outer edges of the pastry to puff up beautifully around the filling, creating that classic danish look and preventing leaks. After scoring, I spoon about 1/2 tablespoon of the cream cheese mixture onto each heart, spreading it carefully within the border.
Then, I sprinkle the diced strawberries evenly over the cream cheese, trying to keep them mostly within that scored outline. For those interested in the nutritional benefits, research indicates strawberries are a source of Vitamin C and fiber, among other nutrients [1, 2].
The Golden Touch: Egg Wash and Baking
For that irresistible golden-brown finish and a lovely shine, an egg wash is my secret weapon. I simply whisk one large egg with a tablespoon of cold water in a small bowl. Using a small baking brush, or even just my clean finger, I carefully apply this egg wash only to the outer border of each danish. This ensures the edges get beautifully browned and glossy, while the center remains untouched to let the filling shine.
I preheat my oven to 400°F (200°C), and then I bake the danishes for 15-17 minutes. You’ll know they’re ready when the edges are starting to turn a beautiful golden brown and the pastry has puffed up wonderfully. I look for crisp edges and a visible golden hue all around.
Finishing and Serving Your Delicious Danishes
After pulling these beauties from the oven, I let them cool right on the baking pan for about 5 minutes. This cooling time allows the pastry to set slightly and the filling to firm up just a touch, making them easier to handle.
These danishes are truly at their best when enjoyed warm. The warmth enhances the flakiness of the pastry and the creaminess of the filling, creating such a comforting experience. I love serving them with a cup of coffee or tea for a perfect morning treat.
Creative Variations and Adaptations
I always encourage experimenting in the kitchen, and these danishes are so versatile! Here are a few ideas I love:
- Flavor Boosts: Try adding a pinch of fresh lemon zest to the cream cheese filling for a bright, citrusy note, or a tiny drop of almond extract for a subtle, nutty undertone.
- Different Fruit: While strawberries are wonderful, I sometimes experiment with other fresh berries. Raspberries or blueberries would be absolutely delightful in this recipe.
- Sweet Glaze: For an extra touch of sweetness, I sometimes drizzle a simple icing glaze (made from powdered sugar and a touch of milk) over the cooled danishes instead of just powdered sugar.
- Shape Shifting: Don’t limit yourself to hearts! This recipe works beautifully with other cookie cutter shapes, like circles or squares, or even cut into small rectangles for mini danishes.
Troubleshooting Common Danish Dilemmas
I know baking can sometimes come with a few challenges, but I’m here to help you navigate them!
- Pastry Not Puffing: If your pastry isn’t puffing up beautifully, I find a few things could be at play. Your oven temperature might be too low, the pastry might have gotten too warm, or perhaps you’ve overfilled the danishes, weighing down the layers. I always ensure my oven is properly preheated and that I’m working with chilled, but thawed, pastry.
- Filling Leaking: This usually happens if the border isn’t scored deeply enough, or if the danishes are overfilled. I make sure my score is distinct, and I try not to add more than 1/2 tablespoon of filling per heart.
- Danish Sticking to Pan: I always ensure I use plenty of parchment paper to line my baking sheet. It creates a non-stick surface and makes for easy cleanup every time.
Make-Ahead Tips for Busy Mornings
I know mornings can be hectic, so I always appreciate a recipe that offers make-ahead options! For these danishes, I often prepare the cream cheese filling a day in advance. I simply mix it up as directed, then cover it tightly and store it in the refrigerator. The diced strawberries can also be prepped ahead of time and kept in an airtight container in the fridge. This way, in the morning, all I have to do is cut the pastry, assemble, and bake!
Nutritional Insights
While I focus on comfort and flavor, I also appreciate understanding the components of what I’m making. These Strawberry Cream Cheese Heart Danishes offer a lovely mix. You’ll find carbohydrates primarily from the puff pastry and sugar, which provide energy. The cream cheese contributes protein and fats, making the danishes satisfying.
And of course, the fresh strawberries add a wonderful boost of vitamins, like Vitamin C, along with natural sweetness and fiber. It’s a treat that balances indulgence with a touch of fruity goodness!
Pairing Perfection
I always think about how to best enjoy a dish, and these danishes have some wonderful pairing partners. For beverages, I love them with a freshly brewed cup of hot coffee, a comforting mug of herbal tea, or even a cold glass of milk. If I’m serving them as part of a larger breakfast spread, I often pair them with something savory, like scrambled eggs or a simple fruit salad, to create a well-rounded and delightful meal.
FAQs about Strawberry Cream Cheese Heart Danishes
I often get questions about recipes, and I love answering them! Here are some common inquiries about these heart danishes:
How do I properly store Strawberry Cream Cheese Heart Danishes?
I find these danishes are truly best enjoyed the same day they are baked for peak crispness and flavor. If you do have leftovers, I store them in an airtight container at room temperature for up to 1 day, or in the refrigerator for up to 2-3 days. A quick warm-up in a toaster oven can help restore some of their crispness!
Where can I buy puff pastry dough?
You can easily find puff pastry dough in the freezer section of most grocery stores, usually near the frozen pie crusts or desserts. It’s important to note that puff pastry is different from phyllo dough; puff pastry bakes up into distinct, buttery layers, while phyllo dough is much thinner and more delicate.
Can I double this recipe?
Absolutely, you can certainly double this recipe! Just make sure you have enough puff pastry sheets and adjust your ingredient quantities accordingly. I often use two large baking sheets to give the danishes enough space to bake evenly without crowding. If you bake two sheets at once, you might need to rotate them halfway through baking for even browning.
Conclusion and Your Delicious Creations
I hope you’re as excited as I am to try these Strawberry Cream Cheese Heart Danishes! They are such a delightful treat, perfect for adding a touch of sweetness and charm to any day. The flaky pastry, creamy filling, and fresh strawberries come together to create something truly special, and I know you’ll love how easy they are to make.
I truly can’t wait for you to experience the joy of baking and sharing these beautiful pastries. Please, give this recipe a try in your kitchen! When you do, I would absolutely love to hear about your experience. Feel free to leave a comment below with your thoughts, ask any questions you might have, or even better, share a photo of your own delicious creations! Happy baking, my friends!
For more recipes, follow us on Pinterest.
Printable Recipe Card
Want just the essential recipe details without scrolling through the article? Get our printable recipe card with just the ingredients and instructions.