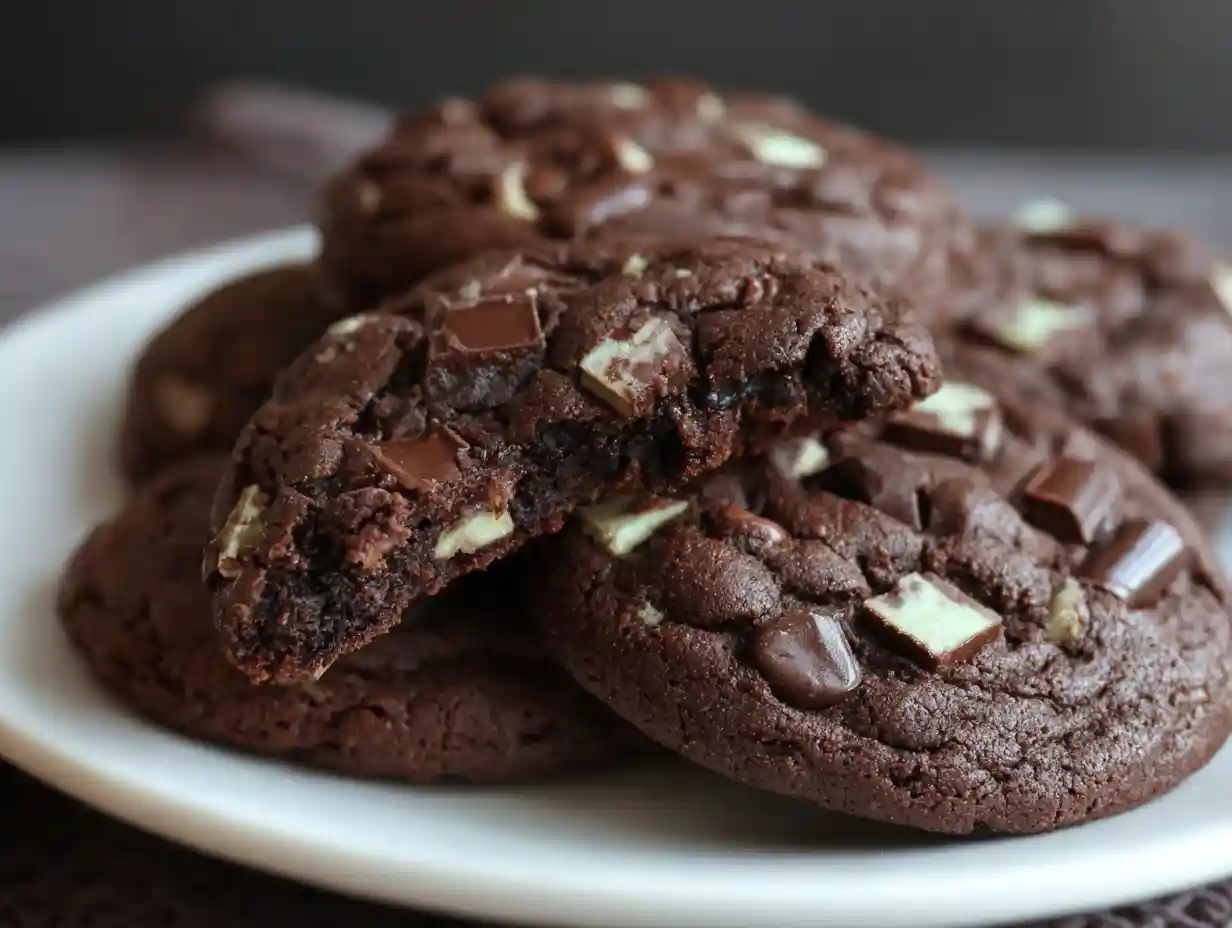
I have to tell you, there are some flavors that just instantly transport me back to childhood. For me, Andes Mints are absolutely one of them. That perfect whisper of cool mint nestled in smooth chocolate has always been a favorite treat. It’s no surprise then that I spent some time in my kitchen developing what I truly believe is the ultimate Andes Mint Chocolate Cookie recipe.
These cookies are everything I dreamed of: deeply fudgy, incredibly soft, and packed with that intense mint-chocolate flavor I adore. With about 30 minutes of active time, you can whip up a batch of these beauties that will vanish faster than you can say “Andes Mint.” Get ready to impress everyone, or simply treat yourself to a little piece of minty heaven.
Table of Contents
Why You’ll Love These Andes Mint Chocolate Cookies

I’ve made countless batches of these cookies, and I can confidently say this recipe hits all the right notes. Here’s why I know you’ll fall head over heels for them:
- Perfect Balance of Chocolate and Mint: I’ve carefully crafted the recipe to ensure neither flavor overpowers the other. You get that rich chocolate base with a delightful burst of cool mint in every bite.
- Easy to Make with Simple Ingredients: You won’t find any obscure items here. I use everyday pantry staples to create something truly extraordinary.
- Soft and Fudgy Texture: These cookies boast a truly melt-in-your-mouth texture that stays soft for days, if they last that long!
- Two Delicious Options: I’m giving you the choice to either mix in the Andes mints for an even distribution or press them on top for a delightful melted “cheater’s frosting.”
Andes Mint Chocolate Cookies: Two Delicious Methods
One of the things I love most about these Andes Mint Chocolate Cookies is the versatility. I’ve found two fantastic ways to incorporate those beloved Andes mints, each offering a slightly different experience. You can choose to mix the chips directly into the dough for a cohesive flavor throughout, or you can press whole Andes mints onto the hot cookies right out of the oven, creating a beautiful, melted topping.
The base cookie recipe is exactly the same for both methods. I’ll walk you through the mix-in method first, which is wonderfully straightforward. Then, I’ll explain how to achieve that gorgeous melted topping effect, which I think looks incredibly elegant and adds a beautiful visual appeal. No matter which route you choose, you’re in for a treat!
For another sweet treat, you might consider whipping up this Amazing Pumpkin Spice Hot Chocolate Recipe.
Ingredients for the Best Andes Mint Cookies
Here is everything you’ll need to make these delicious cookies. I always recommend having all your ingredients measured and ready before you start baking.
- ½ cup unsalted butter, room temperature
- ½ cup granulated sugar
- ½ cup dark brown sugar, packed
- 1 large egg, preferably room temperature
- 1 teaspoon vanilla extract
- 1 cup all-purpose flour
- ½ cup + 2 Tbsp. Cocoa Powder
- 1 teaspoon baking soda
- ¼ teaspoon salt
- 2 Tbsp. milk or heavy whipping cream
- 1 cup Andes Creme de Menthe Chocolate Baking Chips (or chopped Andes Mints) plus a little more for topping
- 1/3 cup semi-sweet chocolate chips (or Mint Chips for more mint flavor)
Baker’s Notes on Ingredients
I always like to share a little insight into why certain ingredients are important in my recipes. Understanding the role each component plays can truly elevate your baking.
- Cocoa Powder: The recipe calls for cocoa powder to give these cookies their rich, dark chocolate flavor. Generally, there are two types: natural and Dutch-processed. Natural cocoa powder is acidic and reacts with baking soda, helping with leavening. Dutch-processed cocoa is treated to be less acidic, resulting in a darker color and milder flavor. While my recipe uses baking soda, implying natural cocoa, you can use either, just know the flavor and color might vary slightly.
- Dark Brown Sugar: I love using dark brown sugar in my cookies because it contains more molasses than light brown sugar. This extra molasses not only contributes to a deeper, more caramel-like flavor, but it also adds moisture, resulting in a chewier, softer cookie texture that I adore.
- Room Temperature Ingredients: You’ll notice I specify room temperature butter and egg. This isn’t just a suggestion; it’s a crucial step! Room temperature butter creams beautifully with sugar, creating tiny air pockets that lead to a lighter, fluffier cookie. A cold egg might seize up your butter mixture, making it lumpy. If you are interested in more sweet recipes, check out our Treats & Drinks category.
How to Make Andes Mint Chocolate Cookies: Mix-In Method
This method is my go-to for ease and consistent minty goodness throughout every bite. Follow these steps for perfectly fudgy cookies.
- Prep the Oven and Baking Sheets: Preheat the oven to 350°F. Line 2 baking sheets with parchment paper or silicone baking mats. This step ensures easy cleanup and prevents sticking.
 I always start by prepping my oven and baking sheets. It makes the rest of the process so much smoother!
 - Cream Butter and Sugars: In the bowl of an electric mixer, combine the room temperature unsalted butter, granulated sugar, and dark brown sugar. Beat together on medium-high speed until the mixture is light and fluffy, usually 2-3 minutes. This process incorporates air, making your cookies tender.
Look for a pale, airy texture when creaming the butter and sugars; that’s when you know it’s perfect. - Add Egg and Vanilla: Blend in the large egg and vanilla extract. Scrape down the sides of the bowl with a spatula if needed to ensure everything is fully incorporated.
Make sure to scrape down the bowl, as you want all those delicious ingredients mixed together evenly. - Whisk Dry Ingredients: In a separate bowl, whisk together the all-purpose flour, cocoa powder, baking soda, and salt. Whisking ensures these ingredients are evenly distributed, preventing pockets of unmixed baking soda or salt.
A quick whisk of the dry ingredients makes all the difference in achieving a consistent cookie texture. - Combine Wet and Dry: Slowly add the dry ingredients into the wet ingredients in the mixer on low speed just until incorporated. Be careful not to overmix at this stage; overmixing can lead to tough cookies.
Mix on low speed until the flour just disappears; resist the urge to keep mixing! - Mix in Milk and Chips: Mix in the milk on the lowest speed. Then, fold in the Andes Mints and semi-sweet chocolate chips by hand. I find folding prevents overmixing and keeps the chips from breaking too much.
Gently folding in the chips ensures they are perfectly distributed throughout the dough. - Scoop and Top: Roll about 2 tablespoons of dough into balls and place them on the prepared baking sheets. Top each cookie with a little more Andes Mints for a beautiful finish.
A little extra mint on top makes these cookies look as good as they taste! - Bake and Cool: Bake for 10-11 minutes. Let cool on the baking sheets for about 5 minutes, then transfer them to a wire rack to cool completely. This resting time helps them set up and prevents them from breaking.
Patience is key here! Let them cool slightly on the sheet before moving them.
 I always start by prepping my oven and baking sheets. It makes the rest of the process so much smoother!
 Look for a pale, airy texture when creaming the butter and sugars; that’s when you know it’s perfect.
 Make sure to scrape down the bowl, as you want all those delicious ingredients mixed together evenly.
 A quick whisk of the dry ingredients makes all the difference in achieving a consistent cookie texture.
 Mix on low speed until the flour just disappears; resist the urge to keep mixing!
 Gently folding in the chips ensures they are perfectly distributed throughout the dough.
 A little extra mint on top makes these cookies look as good as they taste!
 Patience is key here! Let them cool slightly on the sheet before moving them.
How to Make Andes Mint Chocolate Cookies: Melted Topping Method
If you adore that gooey, melted mint chocolate experience, this method is for you. The base cookie recipe is exactly the same as above. The magic happens right after they come out of the oven!
- Follow Steps 1-5 from the Mix-In Method: Prepare your dough as outlined above, stopping before you mix in the Andes Mints and chocolate chips. For this method, I recommend using just the 1/3 cup semi-sweet chocolate chips (or mint chips) in the dough for a chocolate base.
- Scoop and Bake: Roll about 2 tablespoons of dough into balls and place on the prepared baking sheets. Bake for 10-11 minutes.
- Add Andes Mints Immediately: As soon as the cookies come out of the oven, while they are still piping hot, quickly place a whole Andes mint (or a few Andes Creme de Menthe Chocolate Baking Chips) on top of each cookie. The residual heat will start to melt the mint.
Don’t hesitate! Press those mints on as soon as the cookies are out of the oven. - Swirl (Optional): Let the mints melt for 1-2 minutes. Then, if desired, use a small offset spatula or the back of a spoon to gently swirl the melted mint over the top of the cookie. This creates a beautiful “cheater’s frosting” effect.
A gentle swirl creates a beautiful, glossy finish, almost like a frosting! - Cool Completely: Let the cookies cool on the baking sheets for about 5 minutes, then transfer to a wire rack to cool completely. The topping will set as the cookies cool.
 Don’t hesitate! Press those mints on as soon as the cookies are out of the oven.
 A gentle swirl creates a beautiful, glossy finish, almost like a frosting!
Expert Tips for Perfect Andes Mint Chocolate Cookies
Over my years of baking, I’ve picked up a few tricks that make all the difference. Here are my expert tips to ensure your Andes Mint Chocolate Cookies turn out perfectly every single time:
- Use Room Temperature Ingredients: I really can’t stress this enough! Room temperature butter creams better, creating more air pockets that lead to a lighter, softer cookie. A cold egg won’t emulsify properly and can make your dough lumpy. Plan ahead and take your butter and egg out of the fridge at least an hour before you start baking.
- Measure Flour Correctly: Too much flour is a common culprit for dry, dense, or crumbly cookies. I always recommend using a kitchen scale for accuracy, but if you don’t have one, use the “spoon and level” method. Spoon the flour into your measuring cup until it’s overflowing, then use the back of a knife to level it off without packing it down.
- Do Not Overbake: These fudgy cookies are best when slightly underbaked. They might look a little soft in the center when you pull them from the oven, but they will continue to set as they cool on the baking sheet. Overbaking leads to dry, hard cookies, and we definitely don’t want that!
- Scrape the Bowl: Make sure to scrape down the sides and bottom of your mixing bowl frequently when creaming butter and sugars, and again after adding the egg. This ensures all ingredients are thoroughly combined and prevents streaks of unmixed batter.
Variations on Andes Mint Chocolate Cookies
While I adore the classic version, I also love experimenting in the kitchen! Here are some creative ways you can shake up your Andes Mint Chocolate Cookies:
- Andes Mint Stuffed Cookies: For an extra decadent treat, try wrapping about 1.5 tablespoons of cookie dough around a whole Andes mint before rolling it into a ball. Bake as directed. The mint inside will melt into a luscious surprise.
- Add Espresso Powder: To deepen the chocolate flavor without making the cookies taste like coffee, I sometimes add 1 teaspoon of espresso powder or instant coffee granules along with the dry ingredients. It truly enhances the richness of the cocoa.
- Different Chocolate Chips: Feel free to swap out the semi-sweet chocolate chips for other varieties. White chocolate chips would offer a lovely color contrast and creamy sweetness, while dark chocolate chips would intensify the overall chocolate experience. You could even use extra mint chips for an even stronger mint kick!
For another tasty treat, learn how to make The Ultimate Cheesy Christmas Tree Bread Recipe.
Storing and Freezing Andes Mint Chocolate Cookies
I’m a big believer in making delicious things last! Here’s how I store my Andes Mint Chocolate Cookies to keep them fresh, and how to freeze them for later enjoyment.
- Storing Baked Cookies: Once completely cool, store baked cookies in an airtight container at room temperature for up to 3-4 days. I sometimes place a slice of bread in the container to help keep them soft, replacing it every day or two.
- Freezing Baked Cookies: To freeze baked cookies, ensure they are completely cool. Place them in a single layer on a baking sheet and freeze for about an hour until firm. Then, transfer the frozen cookies to a freezer-safe airtight container or zip-top bag. They will stay fresh for up to 2-3 months. Thaw at room temperature before serving.
- Freezing Raw Cookie Dough: You can also freeze the raw cookie dough! Roll the dough into individual balls as you would for baking. Place them on a baking sheet lined with parchment paper and freeze until solid, about 1-2 hours. Transfer the frozen dough balls to a freezer-safe airtight container or zip-top bag. They will keep for up to 3 months. When ready to bake, you can bake them directly from frozen, adding an extra 2-4 minutes to the baking time.
Troubleshooting Your Andes Mint Chocolate Cookies (FAQ)
I know that sometimes baking doesn’t go exactly as planned. Don’t worry, I’ve got you covered with some common troubleshooting tips for these Andes Mint Chocolate Cookies.
What to do if cookie dough is too sticky or too dry?
Too Sticky: If your dough feels overly sticky and hard to handle, it might be due to measuring errors or high humidity. Try chilling the dough for 30 minutes to an hour. If it’s still too sticky, you can try adding 1-2 tablespoons more flour, one tablespoon at a time, until it’s workable, but be careful not to add too much.
Too Dry: Dry dough often means too much flour was added. If it’s crumbly, try adding a tiny bit more milk or even water, about half a teaspoon at a time, just until it comes together.
Why did my cookies spread too much (or not enough)?
Spread Too Much: Cookies spreading too much can be caused by too much butter, butter that was too warm, or not enough flour. Chilling the dough for at least 30 minutes before baking can often help prevent excessive spreading. Make sure your oven temperature is accurate as well.
Spread Not Enough: If your cookies didn’t spread enough, it might be that your butter was too cold, you added too much flour, or your oven was too cool. Ensure your ingredients are at room temperature and measure your flour accurately.
How can I make the mint flavor stronger/milder?
Stronger Mint: To boost the mint flavor, you can increase the amount of Andes Mints to 1.5 cups, or add a tiny amount (1/8 to 1/4 teaspoon) of pure peppermint extract along with the vanilla.
Milder Mint: For a milder mint, simply reduce the amount of Andes Mints or use more semi-sweet chocolate chips instead of mint chips. You could also skip the “topping” step if using the melted topping method.
Can I make this recipe without a stand mixer?
Absolutely! While a stand mixer makes creaming butter and sugar easier, you can definitely use a hand mixer or even a sturdy whisk and a lot of elbow grease. Just make sure your butter is extra soft for easier mixing.
How do I know when the cookies are perfectly baked?
The edges of the cookies should be set, but the centers will still look a little soft and slightly underbaked. They will continue to set as they cool on the hot baking sheet. Don’t wait until the centers look fully firm, as this will lead to a dry cookie.
Creative Decoration and Gifting Ideas
I truly believe that presentation is part of the joy of baking. These Andes Mint Chocolate Cookies are beautiful on their own, but here are some ideas to make them extra special for holidays, bake sales, or gifts:
- A Sprinkle of Sea Salt: For a touch of gourmet flair, I sometimes sprinkle a tiny pinch of flaky sea salt over the melted Andes mint topping (if using that method) or on the baked cookies immediately after they come out of the oven. It enhances the chocolate flavor beautifully.
- White Chocolate Drizzle: Once the cookies are completely cool, you can melt some white chocolate chips and drizzle them artfully over the tops. It adds an elegant contrast and extra sweetness.
- Festive Packaging: For gifting, stack a few cookies in a clear cellophane bag, tie it with a festive ribbon (red and green for holidays, or a simple green for everyday!), and perhaps add a small handwritten tag. They also look lovely arranged in a decorative box with parchment paper between layers.
- Cookie Platter Star: On a holiday cookie platter, these green-and-chocolate beauties really stand out. Arrange them alongside other festive treats for a stunning display.
What to Serve with Your Andes Mint Chocolate Cookies
These Andes Mint Chocolate Cookies are a treat all on their own, but I always enjoy pairing them with something comforting. Here are my favorite companions:
- A Cold Glass of Milk: You can never go wrong with the classic pairing of cookies and cold milk. It’s simple perfection.
- Hot Coffee or Espresso: The bitterness of coffee complements the sweet, minty chocolate wonderfully.
- Warm Hot Chocolate: For a double dose of chocolatey comfort, a mug of rich hot chocolate is an excellent choice.
- Vanilla Ice Cream: Crumbled over a scoop of vanilla ice cream, these cookies turn into an instant dessert sundae. Or try these cookies with The Ultimate 5 Ingredient Hot Chocolate Recipe.
Conclusion
I hope you’re as excited as I am about these incredible Andes Mint Chocolate Cookies! They truly capture that nostalgic mint-chocolate flavor in a wonderfully fudgy, soft cookie that I know you’re going to adore. Whether you choose the simple mix-in method or opt for the elegant melted topping, I promise you a batch of cookies that tastes like pure joy.
Give this recipe a try; I can’t wait to hear what you think! Did you use the mix-in method or go for the melted topping? Did you add any fun variations? Please leave a comment below, ask me any questions you have, or better yet, share your delicious results! Happy baking, friends!
Sensational Andes Mint Chocolate Cookies Recipe
Ingredients
Equipment
Method
- Prep the Oven and Baking Sheets: Preheat the oven to 350°F. Line 2 baking sheets with parchment paper or silicone baking mats. This step ensures easy cleanup and prevents sticking. I always start by prepping my oven and baking sheets. It makes the rest of the process so much smoother!
- Cream Butter and Sugars: In the bowl of an electric mixer, combine the room temperature unsalted butter, granulated sugar, and dark brown sugar. Beat together on medium-high speed until the mixture is light and fluffy, usually 2-3 minutes. This process incorporates air, making your cookies tender. Look for a pale, airy texture when creaming the butter and sugars; that’s when you know it’s perfect.
- Add Egg and Vanilla: Blend in the large egg and vanilla extract. Scrape down the sides of the bowl with a spatula if needed to ensure everything is fully incorporated. Make sure to scrape down the bowl, as you want all those delicious ingredients mixed together evenly.
- Whisk Dry Ingredients: In a separate bowl, whisk together the all-purpose flour, cocoa powder, baking soda, and salt. Whisking ensures these ingredients are evenly distributed, preventing pockets of unmixed baking soda or salt. A quick whisk of the dry ingredients makes all the difference in achieving a consistent cookie texture.
- Combine Wet and Dry: Slowly add the dry ingredients into the wet ingredients in the mixer on low speed just until incorporated. Be careful not to overmix at this stage; overmixing can lead to tough cookies. Mix on low speed until the flour just disappears; resist the urge to keep mixing!
- Mix in Milk and Chips: Mix in the milk on the lowest speed. Then, fold in the Andes Mints and semi-sweet chocolate chips by hand. I find folding prevents overmixing and keeps the chips from breaking too much. Gently folding in the chips ensures they are perfectly distributed throughout the dough.
- Scoop and Top: Roll about 2 tablespoons of dough into balls and place them on the prepared baking sheets. Top each cookie with a little more Andes Mints for a beautiful finish. A little extra mint on top makes these cookies look as good as they taste!
- Bake and Cool: Bake for 10-11 minutes. Let cool on the baking sheets for about 5 minutes, then transfer them to a wire rack to cool completely. This resting time helps them set up and prevents them from breaking. Patience is key here! Let them cool slightly on the sheet before moving them.
- Follow Steps 1-5 from the Mix-In Method: Prepare your dough as outlined above, stopping before you mix in the Andes Mints and chocolate chips. For this method, I recommend using just the 1/3 cup semi-sweet chocolate chips (or mint chips) in the dough for a chocolate base.
- Scoop and Bake: Roll about 2 tablespoons of dough into balls and place on the prepared baking sheets. Bake for 10-11 minutes.
- Add Andes Mints Immediately: As soon as the cookies come out of the oven, while they are still piping hot, quickly place a whole Andes mint (or a few Andes Creme de Menthe Chocolate Baking Chips) on top of each cookie. The residual heat will start to melt the mint. Don’t hesitate! Press those mints on as soon as the cookies are out of the oven.
- Swirl (Optional): Let the mints melt for 1-2 minutes. Then, if desired, use a small offset spatula or the back of a spoon to gently swirl the melted mint over the top of the cookie. This creates a beautiful “cheater’s frosting” effect. A gentle swirl creates a beautiful, glossy finish, almost like a frosting!
- Cool Completely: Let the cookies cool on the baking sheets for about 5 minutes, then transfer to a wire rack to cool completely. The topping will set as the cookies cool.
Notes
- Use Room Temperature Ingredients: I really can’t stress this enough! Room temperature butter creams better, creating more air pockets that lead to a lighter, softer cookie. A cold egg won’t emulsify properly and can make your dough lumpy. Plan ahead and take your butter and egg out of the fridge at least an hour before you start baking.
- Measure Flour Correctly: Too much flour is a common culprit for dry, dense, or crumbly cookies. I always recommend using a kitchen scale for accuracy, but if you don’t have one, use the “spoon and level” method. Spoon the flour into your measuring cup until it’s overflowing, then use the back of a knife to level it off without packing it down.
- Do Not Overbake: These fudgy cookies are best when slightly underbaked. They might look a little soft in the center when you pull them from the oven, but they will continue to set as they cool on the baking sheet. Overbaking leads to dry, hard cookies, and we definitely don’t want that!
- Scrape the Bowl: Make sure to scrape down the sides and bottom of your mixing bowl frequently when creaming butter and sugars, and again after adding the egg. This ensures all ingredients are thoroughly combined and prevents streaks of unmixed batter.
Tried this recipe?
Let us know how it was!Printable Recipe Card
Want just the essential recipe details without scrolling through the article? Get our printable recipe card with just the ingredients and instructions.