There’s just something magical about a classic caramel apple, isn’t there? But let me be honest, as much as I adore that sweet, crisp treat, they can be a bit…well, messy! All that sticky caramel and apple juice dripping down your hands can turn a lovely moment into a sticky situation.
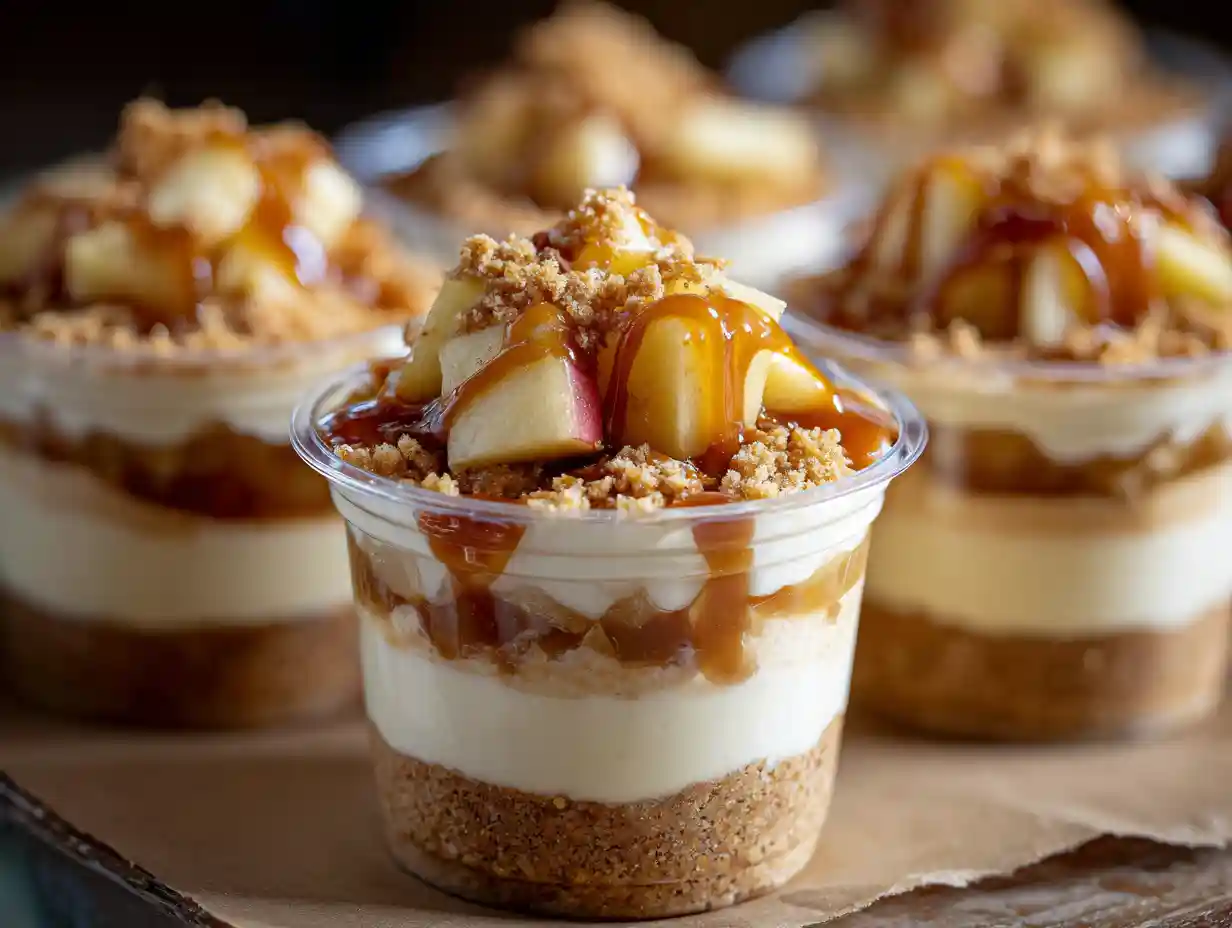
That’s why I created these adorable and delicious Caramel Apple Dessert Cups. They offer all that glorious flavor without any of the fuss, and they come together surprisingly quickly, with just a little chill time to make them perfectly set. I promise, these will become your new favorite way to enjoy all the wonderful flavors of fall, no sticky fingers required!
Table of Contents
Why You’ll Love This Caramel Apple Dessert Cups Recipe

I know you’re going to adore these dessert cups as much as I do. Here’s why I think they are absolutely perfect for any occasion:
- Effortlessly Easy: Despite their impressive appearance, these cups are incredibly simple to assemble. No complicated baking or intricate techniques needed!
- Perfectly Portioned: Each cup is a delightful individual serving, making them ideal for gatherings or for controlling those sweet cravings.
- Party Perfect: Their portability makes them a dream for potlucks, picnics, or any event where you need a grab-and-go dessert. Just seal them with a lid and you’re good to go!
- Endlessly Customizable: While delicious as is, I love how easily you can tweak the flavors or presentation to suit your taste or occasion.
Ingredients for Caramel Apple Dessert Cups
Here’s exactly what you’ll need to create these little cups of joy:
- 4 cups apples (peeled and chopped)
- ½ cup light brown sugar
- 1 tsp cinnamon
- 2 cups vanilla wafer crumbs
- ¼ cup salted or unsalted butter (melted)
- 1 pkg instant vanilla pudding mix (3.4 ounces)
- 1 cup milk
- ⅓ cup salted caramel sauce
- 1 ½ cups heavy cream
- additional caramel sauce for garnish
Ingredient Notes and Apple Selection
Choosing the right ingredients can truly elevate these dessert cups, and I have a few tips I want to share.
For the apples, I often use a mix to get a lovely balance of sweet and tart. Granny Smith apples offer a wonderful tartness that cuts through the sweetness of the caramel, while Honeycrisp or Fuji apples bring a beautiful sweetness and a crisp texture that holds up well when cooked. Feel free to use your favorite! The addition of cinnamon is classic, and even something simple like apple slices with cinnamon can be a delicious treat.
This time of year, it is always fun to find new ways to utilize pumpkin seeds and the Ultimate 4 Crunchy Roasted Pumpkin Seeds Recipes provide inspiration.
When it comes to butter for the crust, you have a choice. If you opt for unsalted butter, I recommend adding a tiny pinch of salt to your vanilla wafer crumbs. This really helps to bring out the flavors and create a nice contrast. Either salted or unsalted works beautifully, it just depends on your preference.
For the caramel sauce, any good quality salted caramel will do the trick. You can certainly use your favorite store-bought brand for convenience, or if you’re feeling ambitious, a homemade salted caramel sauce would be absolutely divine. Just make sure it’s a pourable sauce for easy mixing and drizzling.
For a truly decadent treat, consider trying the Amazing Pumpkin Spice Hot Chocolate Recipe alongside these dessert cups.
Tools & Supplies for Making Caramel Apple Dessert Cups
Having the right tools on hand makes this recipe a breeze. Here’s what I typically use:
- Medium saucepan
- Mixing bowls (one medium, one large)
- Small cookie scoop
- Electric hand mixer
- Large piping bag (I find these work wonderfully for neatly dispensing the mousse)
- 2 ounce plastic cups with lids
How to Make Caramel Apple Dessert Cups: Step-by-Step Instructions
Ready to get cooking? I’ll walk you through each simple step:
- In a medium saucepan, combine peeled and chopped apples, brown sugar, and cinnamon. Stir and cook over medium heat until the apples are soft and the liquid thickens. Set aside to cool.
- In a mixing bowl, combine vanilla wafer crumbs and melted butter. Stir until fully incorporated.
- Portion vanilla wafer crumbs into 28 – 2 ounce plastic cups. I recommend using a small cookie scoop. Use the back of one of the plastic cups to press the crumbs down to create the crust.
- In a large mixing bowl, combine instant vanilla pudding mix and milk. Whisk to combine. Chill for 5 minutes.
- Add salted caramel sauce to the vanilla pudding mixture. Use an electric hand mixer on medium speed to mix the caramel into the pudding until smooth.
- Pour in the heavy cream to the pudding mixture and whip then whip with an electric hand mixer for 3-5 minutes until it becomes thick and creamy.
- Transfer the caramel mousse mixture to a large piping bag. Pipe the mousse into the plastic cups on top of the vanilla wafer crust.
- Using a spoon, portion the cinnamon apples over the caramel mousse. Drizzle with additional caramel sauce if desired.
- Seal the cups with a lid and chill. The cups can be served immediately or stored in the refrigerator for 2 to 3 days.
Tips for Perfect Caramel Apple Dessert Cups
I want your Caramel Apple Dessert Cups to be absolutely perfect, so here are a few extra tips I’ve picked up along the way:
- Apples: To prevent your beautiful chopped apples from browning while you prep other ingredients, I sometimes give them a quick bath in a bowl of water with a squeeze of lemon juice. For consistent cooking, try to dice your apples into similar-sized pieces. If your cooked apple mixture seems a little too watery, you can always make a quick cornstarch slurry (1 teaspoon cornstarch mixed with 1 tablespoon cold water) and stir it into the simmering apples until it thickens.
- Mousse: The key to a stable, creamy mousse is proper whipping and chilling. Make sure your heavy cream is very cold before whipping. If your mousse seems too runny, don’t panic! Pop it back into the fridge for another 15-20 minutes to firm up before piping. Ensuring you whip it for the full 3-5 minutes with the heavy cream will give it that lovely thick consistency.
- Crust: If you don’t have vanilla wafers on hand, don’t worry! You can absolutely substitute graham cracker crumbs or even shortbread cookies for a delicious crust. Just crush them finely and mix with the melted butter as instructed.
- Assembly: For a truly beautiful presentation, try to pipe the mousse evenly into each cup. When spooning the apples on top, leave a little room for that final caramel drizzle to make it look extra enticing.
To add a tangy counterpoint, consider serving these after some Simple Candied Cranberries: Dazzling Sweet-Tart Pop.
Deep Dive on Caramel Selection
Let’s talk caramel, because it’s truly the star of these dessert cups! You have so many options, and each brings a slightly different quality to the recipe.
You can use a store-bought caramel sauce for ease, or if you’re feeling adventurous, a rich homemade salted caramel sauce is always a winner. I find that a good quality jarred sauce works perfectly here. When selecting, look for a smooth, pourable caramel that isn’t too thick or too thin.
For drizzling, the consistency is key. A slightly warm caramel sauce drizzles beautifully. If your caramel is too thick straight from the jar or fridge, I recommend microwaving it in short 15-second bursts, stirring in between, until it reaches a nice, flowy consistency. Just be careful not to overheat it, as caramel can burn quickly. You want it warm enough to pour easily, but not hot.
Variations for Your Caramel Apple Dessert Cups
I love how versatile this recipe is! You can easily switch things up to create new and exciting flavors. Here are some of my favorite variations:
| Variation | Description |
|---|---|
| Maple-Pecan | Substitute maple extract in the mousse, add chopped pecans to the apple mix. |
| Chai Spice | Add chai spice to the apples. |
| Vegan | Use vegan vanilla pudding mix, non-dairy milk, and vegan caramel sauce. |
| Parfaits | Layer ingredients in tall glasses for a more elegant presentation. |
| Caramel Apple Trifle | Use a large trifle dish to layer the components. |
Storage and Make-Ahead Instructions
These Caramel Apple Dessert Cups are fantastic for making ahead, which is perfect for entertaining!
Once assembled and sealed with lids, the cups can be stored in the refrigerator for 2 to 3 days. The crust might soften slightly over time, but the flavors will meld beautifully.
I do not recommend freezing these dessert cups. The texture of the mousse and the apples can become grainy or watery upon thawing, affecting the overall quality.
However, you can prepare components ahead of time! The cooked cinnamon apples can be made up to 2 days in advance and stored in an airtight container in the refrigerator. The vanilla wafer crust can also be prepared a day ahead and stored in an airtight container at room temperature. The mousse is best made just before assembly or within a few hours to ensure it’s perfectly light and creamy.
Troubleshooting: Common Issues and Solutions
Even the most straightforward recipes can sometimes throw a curveball! Here are some common issues you might encounter and how I like to solve them:
- Apples are too tart? If your cooked apples taste a bit too tart, simply stir in an extra tablespoon or two of brown sugar while they’re still warm. Taste and adjust until you reach your desired sweetness.
- Mousse is too thin? This usually means it wasn’t whipped long enough or the heavy cream wasn’t cold enough. If it’s still too thin after mixing in the heavy cream for the full time, try chilling the mixture in the fridge for 20-30 minutes, then re-whipping it with the electric mixer for another minute or two.
- Mousse is too sweet? If you find the mousse overwhelmingly sweet, you can balance it by adding a tiny pinch of salt to the pudding mixture before whipping, or by ensuring your apples are a tarter variety like Granny Smith.
- Caramel is too thick to drizzle? No problem! Gently warm your additional caramel sauce in the microwave in 15-second intervals, stirring after each, until it reaches a smooth, pourable consistency. Be careful not to overheat it!
FAQs about Caramel Apple Dessert Cups Recipe
I get a lot of questions about my recipes, so I’ve gathered some common ones for these Caramel Apple Dessert Cups here:
Can I use different types of apples?
Absolutely! I often mix sweet and tart varieties. Use your favorite!
Can I make these ahead of time?
Yes, you can. The assembled cups can be stored in the refrigerator for 2 to 3 days.
Can I freeze these?
I do not recommend freezing these dessert cups, as the texture changes upon thawing.
How long do these last in the refrigerator?
Once assembled, they are best enjoyed within 2 to 3 days when stored in the refrigerator with lids.
Can I double the recipe?
Yes, you can easily double all the ingredients to make more cups for a larger gathering.
These Caramel Apple Dessert Cups are truly a sweet little indulgence, offering all the joy of a classic caramel apple without any of the sticky mess. I adore how easy they are to make, how perfectly they’re portioned, and how simple they are to customize for any occasion.
They’re perfect for fall parties, a cozy night in, or just a sweet treat any time of year! I hope you love them as much as I do. Looking for another fall treat? The Wicked Poisoned Apple Cider Mocktail for Halloween! is another great choice.
Now it’s your turn! I’d love to hear from you. Have you tried making these? What’s your favorite apple to use? Leave a comment below, ask me any questions, or better yet, share your beautiful creations with me! I can’t wait to see what you whip up.
Follow us on Pinterest for more delicious recipes and cozy kitchen inspiration!
Delicious Caramel Apple Dessert Cups Recipe: Ultimate Guide
Ingredients
Equipment
Method
- In a medium saucepan, combine peeled and chopped apples, brown sugar, and cinnamon. Stir and cook over medium heat until the apples are soft and the liquid thickens. Set aside to cool.
- In a mixing bowl, combine vanilla wafer crumbs and melted butter. Stir until fully incorporated.
- Portion vanilla wafer crumbs into 28 – 2 ounce plastic cups. I recommend using a small cookie scoop. Use the back of one of the plastic cups to press the crumbs down to create the crust.
- In a large mixing bowl, combine instant vanilla pudding mix and milk. Whisk to combine. Chill for 5 minutes.
- Add salted caramel sauce to the vanilla pudding mixture. Use an electric hand mixer on medium speed to mix the caramel into the pudding until smooth.
- Pour in the heavy cream to the pudding mixture and whip then whip with an electric hand mixer for 3-5 minutes until it becomes thick and creamy.
- Transfer the caramel mousse mixture to a large piping bag. Pipe the mousse into the plastic cups on top of the vanilla wafer crust.
- Using a spoon, portion the cinnamon apples over the caramel mousse. Drizzle with additional caramel sauce if desired.
- Seal the cups with a lid and chill. The cups can be served immediately or stored in the refrigerator for 2 to 3 days.
Nutrition
Notes
Tried this recipe?
Let us know how it was!Printable Recipe Card
Want just the essential recipe details without scrolling through the article? Get our printable recipe card with just the ingredients and instructions.