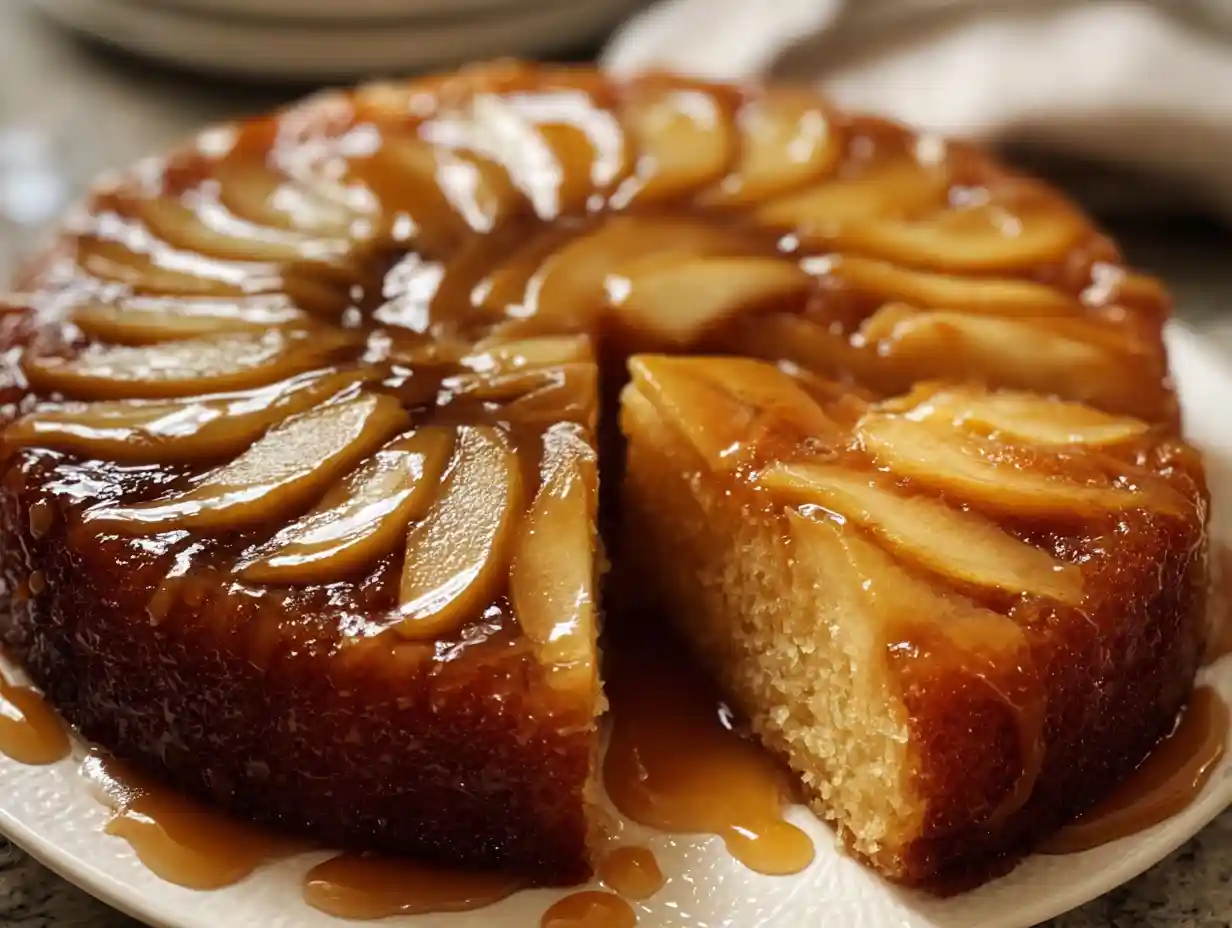
Oh, the sheer joy of a truly delicious dessert! Few things capture the essence of home, comfort, and celebration quite like a beautifully baked cake. Today, I’m absolutely thrilled to share one of my all-time favorite recipes with you, a showstopper that always gets rave reviews: my Caramel Apple Upside Down Cake.
This isn’t just any cake; it’s a masterpiece of flavor and presentation. With its glistening caramel topping, tender apple slices, and moist, spiced cake, it’s a feast for both the eyes and the palate. I promise, it’s easier to make than it looks, and I’ve designed this recipe for success, ensuring you’ll create something truly special.
You’ll spend about 30 minutes on prep and 40-46 minutes baking, for a total time of just over an hour.

Jump To
Why You’ll Love This Caramel Apple Upside Down Cake
I’ve made countless cakes in my kitchen, and this Caramel Apple Upside Down Cake holds a special place in my heart. Here’s why I know you’ll adore it too:
- Effortlessly Stunning: This cake comes out of the pan looking absolutely gorgeous every single time. The upside-down technique means the beautiful apple and caramel topping creates its own dazzling presentation, perfect for any occasion.
- Perfectly Balanced Flavors: I find the combination of sweet, buttery caramel, slightly tart apples, and a warmly spiced cake to be truly divine. It’s comforting without being overly rich, striking that ideal sweet spot.
- Moist and Tender Crumb: My recipe ensures a cake that’s incredibly moist and tender, thanks to careful ingredient ratios and the gentle baking process. It’s the kind of cake that practically melts in your mouth.
- Cozy and Inviting Aroma: As it bakes, your kitchen will fill with the most wonderful scent of caramel, apples, and cinnamon. It’s truly an aromatic experience that makes everyone feel right at home.
Essential Tools & Equipment for Your Upside Down Cake
Having the right tools can make all the difference in your baking experience. Here are a few things I recommend for making this Caramel Apple Upside Down Cake:
- 9×2 Inch Pie Dish or Round Cake Pan: A good quality, sturdy pan is crucial for even baking and easy release. I prefer one that’s at least 2 inches deep to prevent any overflow.
- Small Heavy-Bottomed Saucepan: This is ideal for making the caramel topping. Its weight helps distribute heat evenly, which is essential for preventing the sugar from burning and achieving that perfect golden caramel.
- Handheld or Stand Mixer: While you can do this by hand, a mixer makes creaming butter and sugar much easier and ensures a smooth, well-aerated batter.
- Rubber Spatula: Indispensable for scraping down the sides of your mixing bowl, ensuring all ingredients are fully incorporated.
- Wire Rack: Essential for cooling the cake evenly after it comes out of the oven. This prevents the bottom from getting soggy.
- Sharp Knife or Mandoline: For slicing apples thinly and uniformly, which ensures they cook evenly and look beautiful when arranged.
- Kitchen Scale: While I provide cup measurements, I always recommend a kitchen scale for flour, as it gives you the most accurate results for a perfectly textured cake.
Choosing the Best Apples for Your Cake
The type of apple you choose truly impacts the final taste and texture of your Caramel Apple Upside Down Cake. I always look for apples that are firm and hold their shape well during baking, rather than turning to mush. A good balance of tartness and sweetness is also key to cut through the richness of the caramel.
Here are some of my favorite apple varieties for this cake:
- Granny Smith: My go-to for its fantastic tartness, which provides a lovely contrast to the sweet caramel. They also hold their shape beautifully.
- Honeycrisp: Known for its crisp texture and balanced sweet-tart flavor, it’s a wonderful choice if you want a firmer bite in your cooked apples.
- Fuji: Sweet and very crisp, Fuji apples bring a delicate sweetness and maintain their structure nicely.
- Gala: A sweeter option that softens a bit more than Granny Smith or Honeycrisp, but still holds its shape adequately and offers a delightful aroma.
- Braeburn: Another great firm apple with a lovely sweet-tart flavor profile.
I often use a mix of apples, like Granny Smith and Honeycrisp, to get the best of both worlds in terms of flavor and texture!
Key Ingredients & Smart Substitutions
Every ingredient plays an important role in the success of your Caramel Apple Upside Down Cake. I’ve listed them here, along with a few notes, especially focusing on why room temperature ingredients are so important.
- Unsalted Butter: I use unsalted butter so I can control the salt content in the recipe. For the cake batter, softened butter is crucial for creaming properly with sugar.
- Brown Sugar (Light or Dark): This is essential for the rich caramel topping and contributes to the cake’s moisture and flavor. Dark brown sugar will give a deeper molasses flavor.
- Ground Cinnamon & Nutmeg: These warm spices are the heart of the cake’s cozy flavor profile.
- Pure Vanilla Extract: Adds depth and warmth to both the caramel and the cake batter.
- Apples: As I mentioned, firm, flavorful apples are key!
- All-Purpose Flour: Spooned and leveled is the way to go here to avoid a dense cake.
- Baking Powder: Our leavening agent, giving the cake its lift.
- Granulated Sugar: Sweetens the cake and helps achieve a tender crumb.
- Large Eggs: Essential for structure, richness, and binding ingredients.
- Whole Milk: Adds moisture and helps create a tender crumb.
The Magic of Room Temperature Ingredients: You’ll notice that my recipe calls for softened butter, room temperature eggs, and whole milk. I can’t stress enough how important this step is! When ingredients are at room temperature, they emulsify much more effectively.
This means they combine smoothly and evenly, trapping air as you beat them. This trapped air creates a lighter, fluffier batter and ultimately, a more tender and uniformly textured cake. Cold ingredients, on the other hand, can lead to a lumpy batter and a denser cake.
| Ingredient | Substitution/Notes |
|---|---|
| Unsalted Butter | Salted butter can be used; just reduce the added salt in the recipe by 1/4 teaspoon. |
| Brown Sugar | Coconut sugar can be used in the cake batter, but I don’t recommend it for the caramel topping. |
| Whole Milk | Any plant-based milk (almond, soy, oat) or low-fat dairy milk can be used. |
| All-Purpose Flour | A 1:1 gluten-free flour blend with xanthan gum can be used for a gluten-free version. |
| Ground Cinnamon/Nutmeg | Feel free to adjust amounts or add other warm spices like ginger, allspice, or cardamom. |
| Eggs | Flax eggs (1 Tbsp ground flaxseed + 3 Tbsp water per egg) can work, but cake texture may vary slightly. |
| Apples | Other firm fruits like pears or peaches (fresh or thawed frozen, well-drained) could work for a different flavor. |
Let’s Make Delish Map’s Caramel Apple Upside Down Cake!
Alright, my friends, gather your ingredients and let’s get baking! I promise, the reward of this gorgeous cake is absolutely worth every step. I’m so excited for you to try this one!
By the way, if you’re looking for another apple treat, you might want to check out this recipe for The Ultimate Apple Spice Cake Using Box Cake.
Ingredients
- 6 Tablespoons (85g) unsalted butter
- 1/2 cup (100g) packed light or dark brown sugar
- 1/4 teaspoon ground cinnamon
- 1/4 teaspoon pure vanilla extract
- 2 medium apples, peeled and sliced into 1/4-inch slices (1.5–2 cups, or 188–250g, apple slices)*
- 1 and 1/2 cups (188g) all-purpose flour (spooned & leveled)
- 1 and 1/2 teaspoons baking powder
- 1 and 1/2 teaspoons ground cinnamon
- 1/4 teaspoon ground nutmeg
- 1/2 teaspoon salt
- 1/2 cup (8 Tbsp; 113g) unsalted butter, softened to room temperature
- 1/2 cup (100g) granulated sugar
- 1/2 cup (100g) packed light or dark brown sugar
- 2 large eggs, at room temperature
- 1 teaspoon pure vanilla extract
- 6 Tablespoons (90ml) whole milk, at room temperature*
Instructions
- Prepare for Baking: Preheat oven to 350°F (177°C).
- Make the Caramel Topping: Combine butter and brown sugar together in a small saucepan over medium heat. Whisk occasionally until butter has melted. Cook, whisking constantly, for 1 minute as mixture thickens.
This constant whisking is important; it helps the sugar crystals dissolve evenly and prevents them from seizing up or crystallizing on the sides of the pan. It also ensures the sugar cooks smoothly into a beautiful caramel without burning. Remove from heat and whisk in the cinnamon and vanilla extract. Pour into an ungreased 9×2 inch pie dish or round cake pan. (Make sure the pan is 2 inches deep.
I recommend this pie dish, which is 1.8 inches deep but I never have an overflow issue.) Arrange the apple slices neatly on top, overlapping where necessary. See photo above. Place pan in the refrigerator for a few minutes as you prepare the cake batter. This helps solidify or “set” the topping’s arrangement. - Prepare Dry Ingredients: Whisk the flour, baking powder, cinnamon, nutmeg, and salt together. Set aside.
- Make the Cake Batter: Using a handheld or stand mixer fitted with a paddle or whisk attachment, beat the butter on high speed until smooth and creamy, about 1 minute. Add both sugars and beat on high speed until creamed together, about 1 minute. Scrape down the sides and up the bottom of the bowl with a rubber spatula as needed. On high speed, beat in the eggs and vanilla extract until combined. Scrape down the sides and up the bottom of the bowl as needed. Pour the dry ingredients into the wet ingredients.
Turn the mixer onto low speed and as the mixer runs, slowly pour in the milk. Beat on low speed just until all of the ingredients are combined. Do not over-mix. You may need to whisk it all by hand to make sure there are no lumps at the bottom of the bowl. The batter will be slightly thick. - Assemble the Cake: Remove topping from the refrigerator. Pour and spread cake batter evenly over topping.
- Bake the Cake: Bake for 40–46 minutes, tenting foil on top of the cake halfway through bake time to prevent the top from over-browning before the center has a chance to fully cook. The cake is done when a toothpick inserted into the center of the cake comes out mostly clean, a couple moist crumbs are OK.
Don’t be alarmed if your cake takes longer or if the cake rises up and sticks to the foil. (We serve the cake upside down anyway!) - Cool & Invert: Remove cake from the oven and cool on a wire rack for just 15 minutes. Invert the slightly cooled cake onto a cake stand or serving plate. Some of the juices from the topping will seep over the sides, that’s ok. You can slice and serve the cake warm, but the slices will be messy. I find it’s best to cool the cake completely at room temperature before slicing and serving. Do not refrigerate the cake to speed up the cooling process because it could end up tasting overly dense.
- Store Leftovers: Cover leftover slices and store for up to 3 days in the refrigerator or 3 months in the freezer. Thaw at room temperature. I don’t recommend freezing the cake as a whole because the topping arrangement doesn’t thaw very nicely. See make ahead instructions below.
Expert Baking Tips for a Perfect Caramel Apple Upside Down Cake
I want you to feel confident and successful when you bake this cake! Here are a few extra tips I’ve learned along the way:
- Pan Preparation is Key: While the recipe states the pan is ungreased, I always give my pan a quick spray with non-stick cooking spray, even if it’s considered non-stick. This acts as an extra layer of insurance for a clean flip, especially important for the caramel.
- Neat Apple Arrangement Matters: Take a little extra time to arrange your apple slices in a beautiful pattern. Once the cake is inverted, this will be the gorgeous top, so think of it as edible art! Overlap them slightly to cover the base completely.
- The Inversion Technique: The most nerve-wracking part for some! After cooling for 15 minutes, place your serving plate or cake stand upside down over the cake pan. With one quick, confident motion, flip the pan and plate together. Let it sit for a minute or two to allow gravity to do its work before gently lifting the pan.
- Room Temperature Ingredients, Seriously: I mentioned this before, but it’s worth reiterating. Cold ingredients simply don’t mix as well, leading to a lumpy batter and a denser cake. Plan ahead by taking out your butter, eggs, and milk about 30-60 minutes before you start baking.
Creative Flavor Variations & Enhancements
This Caramel Apple Upside Down Cake is fantastic as is, but I also love to play around with flavors and add little touches to make it extra special. For other tasty ideas, explore our entire selection of treats and drinks. Here are a few ideas:
- A Hint of Booze: For an adult twist, try adding 1-2 tablespoons of bourbon, spiced rum, or even apple brandy to your caramel topping after it’s removed from the heat. It adds a wonderful depth of flavor.
- Toasted Nuts: Sprinkle 1/2 cup of finely chopped toasted pecans or walnuts over the caramel topping before arranging the apples. They add a lovely crunch and nutty flavor.
- Warm Spice Medley: Beyond cinnamon and nutmeg, consider adding a pinch of ground ginger, cardamom, or allspice to the cake batter for an even richer, more complex spice profile.
- Citrus Zest: A teaspoon of orange or lemon zest in the cake batter can brighten the flavors beautifully, offering a subtle counterpoint to the sweetness.
- Crumb Topping: While it’s an upside-down cake, you could add a sprinkle of a simple oat-streusel or toasted coconut to the top of the cake batter before baking for an added texture layer on what becomes the bottom.
Troubleshooting Your Caramel Apple Upside Down Cake
Baking can sometimes present little challenges, but don’t worry, I’ve got your back! Here are some common issues and how to solve them:
| Problem | Possible Cause(s) | Solution |
|---|---|---|
| Cake sticking to pan | Pan not adequately greased, cooled too long before inverting, caramel too sticky. | Always lightly grease your pan. Invert after 15 minutes of cooling, allowing gravity and residual heat to help release. If stuck, place back on stove for 30 seconds to loosen. |
| Soggy bottom | Apples released too much moisture, cake undercooked, not cooled properly. | Choose firm apples. Ensure cake is fully baked. Don’t refrigerate to cool; cool completely at room temp for best texture. |
| Dry cake | Over-baked, too much flour, not enough fat/liquid in batter. | Use a toothpick test and remove from oven when it comes out mostly clean. Measure flour by weight or spooned & leveled. Ensure butter and milk are correct amounts. |
| Undercooked apples | Apple slices too thick, not enough bake time, wrong apple variety. | Slice apples to 1/4 inch thickness. Ensure cake bakes for the full recommended time. Use firm apples that soften well but don’t turn mushy. |
| Sunken center | Oven door opened too early, oven temperature fluctuation, over-mixing batter. | Avoid opening the oven door before 3/4 of the bake time. Ensure accurate oven temp. Mix batter just until combined. |
Serving & Presentation Ideas
Serving this Caramel Apple Upside Down Cake is one of my favorite parts! It’s already beautiful, but a few small touches can make it even more special:
- Warm with Ice Cream: There’s nothing quite like a warm slice of this cake with a scoop of good quality vanilla bean ice cream. The contrast of warm cake and cold ice cream is absolute perfection.
- Dollop of Whipped Cream: A generous dollop of freshly whipped cream, perhaps lightly sweetened with a touch of vanilla, is a classic and elegant accompaniment.
- A Sprinkle of Sea Salt: A tiny sprinkle of flaky sea salt over the caramel topping just before serving enhances the caramel’s flavor beautifully and adds a sophisticated touch.
- Spiced Cider Reduction: For a gourmet touch, gently simmer some apple cider with a cinnamon stick and a few cloves until it reduces to a syrup. Drizzle this over the cake before serving.
- Dusting of Powdered Sugar: A light dusting of powdered sugar (confectioners’ sugar) can add a delicate finish, especially if you’re serving it plain.
- Garnish with Herbs: A small sprig of fresh mint or rosemary can add a pop of color and unexpected freshness.
Storage & Make-Ahead Tips
I love a recipe that offers flexibility, and this Caramel Apple Upside Down Cake is great for making ahead or enjoying later.
- Storing Leftovers: Cover leftover slices tightly with plastic wrap or in an airtight container. They will keep for up to 3 days in the refrigerator.
- Freezing Slices: This cake freezes beautifully in individual slices! Once the cake is completely cooled, slice it and wrap each slice tightly in plastic wrap, then place them in a freezer-safe bag or container. They can be stored for up to 3 months.
- Thawing & Reheating: To enjoy a frozen slice, simply thaw it at room temperature for a few hours. You can gently warm it in the microwave for 15-30 seconds or in a low oven (around 300°F/150°C) for about 10 minutes until warmed through.
- Make-Ahead Components: You can slice your apples and keep them in a bowl of lightly salted water (rinse well before using) for up to a day in advance to prevent browning. The dry ingredients can also be whisked together and stored in an airtight container until you’re ready to bake.
FAQs about Caramel Apple Upside Down Cake
How do I get a smooth flip without breaking the apples?
I recommend letting the cake cool on a wire rack for exactly 15 minutes before inverting. Then, place your serving plate over the cake pan and, holding both firmly, quickly flip them together. Let it sit for a minute before gently lifting the pan away. Don’t cool it too long, or the caramel might seize too much.
Can I make mini cakes or cupcakes with this recipe?
Yes, absolutely! You can pour the caramel mixture and arrange apple slices in the bottom of muffin tins or individual ramekins. Adjust the baking time, as mini versions will cook much faster, likely around 20-25 minutes.
Can I use frozen apples?
I generally recommend fresh apples for the best texture and flavor. Frozen apples can release a lot of excess moisture as they thaw and bake, which might make your cake soggy. If you must use them, make sure they are completely thawed and patted very dry before using.
Can I double or halve this recipe?
Doubling the recipe works best if you plan to bake it in a larger pan (like a 9×13 inch) or in two separate 9-inch round pans. Halving can be a bit tricky with egg measurements, but it’s possible if you’re comfortable with careful ingredient scaling.
Can I use different fruits?
Yes, this recipe is quite versatile! You can substitute the apples with other firm fruits that hold their shape well, such as sliced pears, pineapple rings, or even firm peaches. Adjust baking time as needed.
Why did my cake stick to the pan?
This is usually due to not adequately preparing the pan (even ungreased pans can benefit from a light spray) or waiting too long to invert the cake. The caramel can solidify and stick if it cools down too much in the pan. Make sure to invert it after that crucial 15-minute cooling period.
Conclusion
Creating this Caramel Apple Upside Down Cake fills my kitchen with such a warm, comforting aroma, and seeing that gorgeous caramel and apple topping always brings a smile to my face. It truly is a celebration of simple, wholesome ingredients transformed into something extraordinary. I hope this recipe brings as much joy and deliciousness to your table as it does to mine! This would be perfect to serve for breakfast or brunch.
I would absolutely love to hear from you! If you try this recipe, please leave a comment below and tell me how it turned out. Did you try any fun variations? Do you have a question? I’m always happy to connect with you. Happy baking!
Craving desserts that are as stunning as they are comforting? Follow us on Pinterest for crowd-pleasing cakes, nostalgic flavors, and sweet treats like this show-stopping Caramel Apple Upside Down Cake!
Caramel Apple Upside Down Cake Recipe
Ingredients
Equipment
Method
- Preheat oven to 350°F (177°C).
- Combine butter and brown sugar together in a small saucepan over medium heat. Whisk occasionally until butter has melted. Cook, whisking constantly, for 1 minute as mixture thickens. This constant whisking is important; it helps the sugar crystals dissolve evenly and prevents them from seizing up or crystallizing on the sides of the pan. It also ensures the sugar cooks smoothly into a beautiful caramel without burning. Remove from heat and whisk in the cinnamon and vanilla extract. Pour into an ungreased 9×2 inch pie dish or round cake pan. (Make sure the pan is 2 inches deep. I recommend this pie dish, which is 1.8 inches deep but I never have an overflow issue.) Arrange the apple slices neatly on top, overlapping where necessary. See photo above. Place pan in the refrigerator for a few minutes as you prepare the cake batter. This helps solidify or “set” the topping’s arrangement.
- Whisk the flour, baking powder, cinnamon, nutmeg, and salt together. Set aside.
- Using a handheld or stand mixer fitted with a paddle or whisk attachment, beat the butter on high speed until smooth and creamy, about 1 minute. Add both sugars and beat on high speed until creamed together, about 1 minute. Scrape down the sides and up the bottom of the bowl with a rubber spatula as needed. On high speed, beat in the eggs and vanilla extract until combined. Scrape down the sides and up the bottom of the bowl as needed. Pour the dry ingredients into the wet ingredients. Turn the mixer onto low speed and as the mixer runs, slowly pour in the milk. Beat on low speed just until all of the ingredients are combined. Do not over-mix. You may need to whisk it all by hand to make sure there are no lumps at the bottom of the bowl. The batter will be slightly thick.
- Remove topping from the refrigerator. Pour and spread cake batter evenly over topping.
- Bake for 40–46 minutes, tenting foil on top of the cake halfway through bake time to prevent the top from over-browning before the center has a chance to fully cook. The cake is done when a toothpick inserted into the center of the cake comes out mostly clean, a couple moist crumbs are OK. Don’t be alarmed if your cake takes longer or if the cake rises up and sticks to the foil. (We serve the cake upside down anyway!)
- Remove cake from the oven and cool on a wire rack for just 15 minutes. Invert the slightly cooled cake onto a cake stand or serving plate. Some of the juices from the topping will seep over the sides, that’s ok. You can slice and serve the cake warm, but the slices will be messy. I find it’s best to cool the cake completely at room temperature before slicing and serving. Do not refrigerate the cake to speed up the cooling process because it could end up tasting overly dense.
- Cover leftover slices and store for up to 3 days in the refrigerator or 3 months in the freezer. Thaw at room temperature. I don’t recommend freezing the cake as a whole because the topping arrangement doesn’t thaw very nicely. See make ahead instructions below.
Notes
Tried this recipe?
Let us know how it was!Printable Recipe Card
Want just the essential recipe details without scrolling through the article? Get our printable recipe card with just the ingredients and instructions.