Whenever I have friends coming over, whether it’s for a big holiday celebration or a casual Friday night, there’s one appetizer I turn to time and time again. This classic cheese ball recipe is my secret weapon for effortless entertaining. It’s incredibly simple to whip up, packed with savory flavor, and always the first thing to disappear from the snack table.
This isn’t just any cheese ball; it’s a tried-and-true recipe that balances creamy, tangy, and sharp flavors perfectly. It looks impressive, but I promise it’s one of the easiest party foods you’ll ever make. If you need a reliable, crowd-pleasing appetizer, you’ve officially found it.
Table of Contents

Cheese Ball Recipe for Any Party
Ingredients
Equipment
Method
- Mix cheeseball ingredients: Place cream cheese in a mixing bowl then mix until smooth. Add cheese, green onion, Worcestershire sauce, hot sauce, parsley, garlic powder, oregano. and pepper then mix well to combine.
- Form into ball: Use a rubber spatula to scrape the sides of the bowl and gather the mixture into one lump. Lightly grease your hands and form the mixture into a round ball.
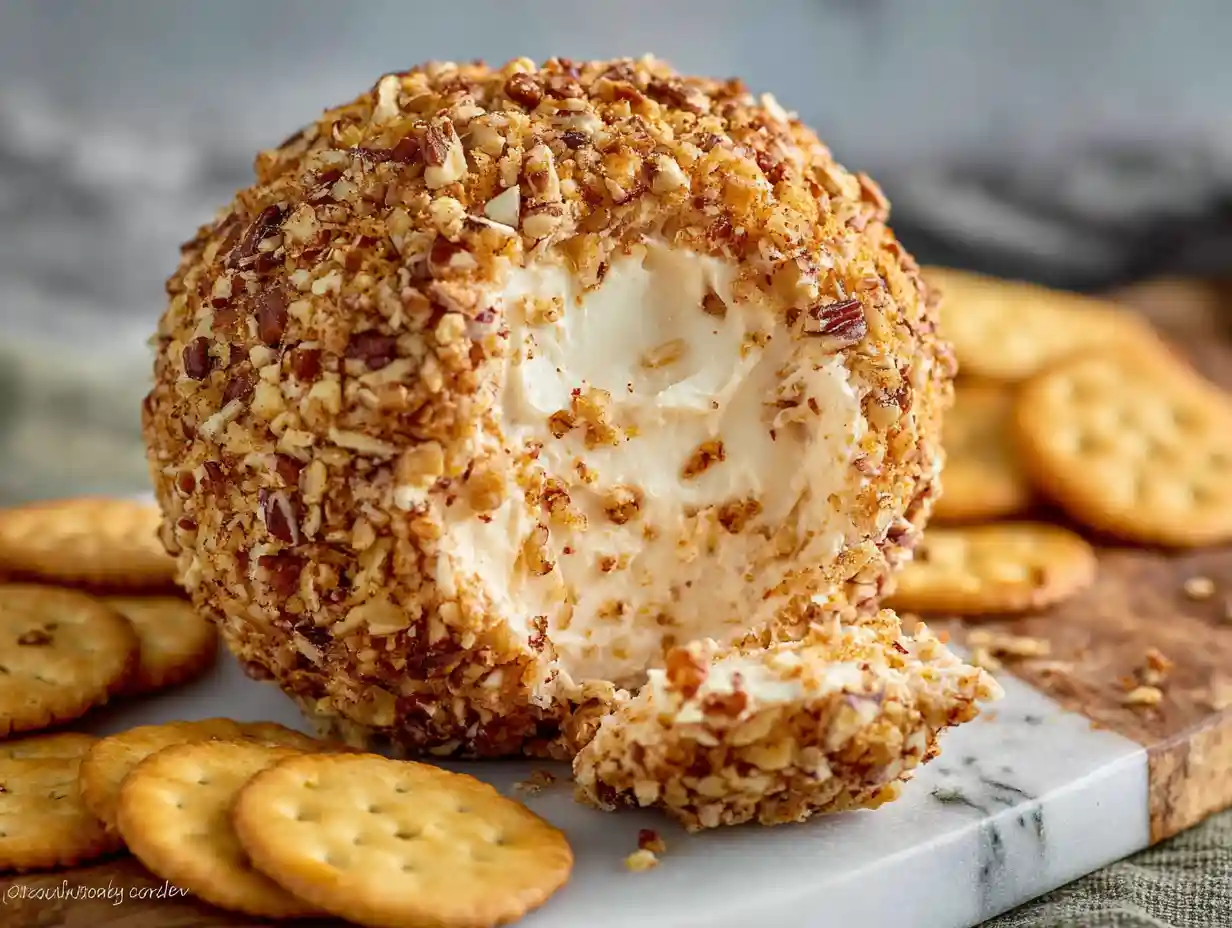
- Coat with nuts: Place the pecans on a plate. Hold the cheese ball in one hand and use the other hand to scoop the pecans onto the outside of the ball, pressing them in gently and turning the ball to coat all sides.
- Chill and serve: Cover the cheeseball in cling wrap and refrigerate for about 1 hour to allow it to firm up. Remove from fridge about 20 minutes before serving to allow it to soften just slightly. Serve with crackers, pretzels, vegetables or anything else you’d love to dip in cheese!
Nutrition
Notes
Tried this recipe?
Let us know how it was!Why You’ll Love This Easy Cheese Ball Recipe
I find myself making this recipe again and again, and I know you’ll love it just as much as I do. It’s a staple in my kitchen for so many good reasons.
- Effortlessly Simple: With just a few common ingredients and about 15 minutes of active prep time, you can create a truly spectacular appetizer without any stress.
- Perfect for Making Ahead: This is the ultimate make-ahead party dish. You can prepare it a few days in advance, which frees you up to enjoy your own party.
- Endlessly Customizable: While the classic pecan coating is fantastic, you can easily swap the coatings or mix-ins to match your taste or the theme of your gathering.
- Always a Crowd-Pleaser: I have never served this cheese ball without getting rave reviews. It’s a nostalgic, comforting classic that everyone loves, right up there with other party staples like a classic Southern deviled eggs recipe.
Essential Ingredients
The magic of this recipe comes from a handful of simple, high-impact ingredients. Using quality components makes all the difference. For the best flavor and texture, I always recommend using softened, full-fat block cream cheese and grating your own cheddar.
- 16 ounces cream cheese (, softened)
- 2 cups freshly grated sharp cheddar cheese ((avoid pre-shredded cheese))
- 2 green onions (, chopped)
- 1 teaspoon Worcestershire sauce
- 1 teaspoon hot pepper sauce
- 1 teaspoon dried parsley flakes
- 1/2 teaspoon garlic powder
- 1/2 teaspoon Dried oregano
- dash freshly ground black pepper
- 2/3 cup pecans (, finely chopped)
How to Make the Perfect Cheese Ball Recipe Step-by-Step
This recipe comes together so quickly. Just follow these simple steps for a perfect cheese ball every single time.
- Mix cheeseball ingredients: Place cream cheese in a mixing bowl then mix until smooth. Add cheese, green onion, Worcestershire sauce, hot sauce, parsley, garlic powder, oregano. and pepper then mix well to combine.
- Form into ball: Use a rubber spatula to scrape the sides of the bowl and gather the mixture into one lump. Lightly grease your hands and form the mixture into a round ball.
- Coat with nuts: Place the pecans on a plate. Hold the cheese ball in one hand and use the other hand to scoop the pecans onto the outside of the ball, pressing them in gently and turning the ball to coat all sides.
- Chill and serve: Cover the cheeseball in cling wrap and refrigerate for about 1 hour to allow it to firm up. Remove from fridge about 20 minutes before serving to allow it to soften just slightly. Serve with crackers, pretzels, vegetables or anything else you’d love to dip in cheese!
Expert Tips for the Best Results
Over the years, I’ve picked up a few tricks that take this cheese ball from good to absolutely great. These small details make a big difference in the final result.
- Start with Softened Cream Cheese: Make sure your cream cheese is at room temperature before you begin. This is the key to a super smooth, creamy, and lump-free texture.
- Grate Your Own Cheese: Pre-shredded cheese is often coated with anti-caking agents that can give the cheese ball a slightly grainy texture. Grating a block of sharp cheddar by hand ensures the best flavor and melt-in-your-mouth creaminess.
- Chill Before Shaping: If your cheese mixture feels a bit too soft to handle, don’t worry. Just cover the bowl and chill it in the refrigerator for 15-20 minutes. This will help it firm up, making it much easier to shape into a perfect ball.
The Ultimate Guide to Cheese Ball Coatings
While classic chopped pecans are delicious, changing the coating is a fun and easy way to customize your cheese ball. Here are some of my favorite alternative ideas.
- Other Chopped Nuts: Finely chopped walnuts or toasted almonds add a rich, nutty crunch that’s a wonderful alternative to pecans.
- Fresh Herbs: A coating of finely chopped fresh parsley, chives, or dill gives the cheese ball a vibrant color and a fresh, bright flavor.
- Seeds: A mix of toasted sesame seeds, poppy seeds, or sunflower seeds provides a delightful texture and a savory, earthy taste.
- Spices: For a pop of color and flavor, try rolling the ball in paprika or a generous sprinkle of everything bagel seasoning.
- Savory Crumbles: For a truly decadent treat, coat your cheese ball in crispy, crumbled bacon or crunchy fried onions.
Endless Variations for Your Cheese Ball Recipe
This base recipe is the perfect canvas for your creativity. You can add all sorts of delicious mix-ins to create entirely new flavor profiles. Here are some of my favorite variations to get you started.
| Variation Name | Key Ingredients to Add/Swap | Perfect For… |
|---|---|---|
| Spicy Jalapeño Popper | 1-2 finely diced jalapeños (deseeded), 4 slices crumbled bacon | Game day gatherings and spicy food lovers. |
| Mediterranean Herb & Feta | 1/2 cup crumbled feta, 1 tbsp chopped sun-dried tomatoes, 1 tsp dried dill | A sophisticated appetizer for a wine night. |
| Sweet Cranberry Orange | 1/2 cup dried cranberries, 1 tbsp orange zest, swap pecans for walnuts | Holiday parties and festive occasions. |
| Classic Bacon Ranch | 4 slices crumbled bacon, 1 tbsp dry ranch seasoning | A guaranteed hit for family get-togethers. |
| Italian Herb & Pesto | 1 tbsp basil pesto, 1 tbsp chopped sun-dried tomatoes | Serving alongside a charcuterie board on a budget. |
| Everything Bagel | 2 tbsp everything bagel seasoning mixed in, more for coating | A delicious brunch or breakfast party treat. |
| Smoky Gouda & Chive | Swap cheddar for smoked Gouda, add 2 tbsp fresh chives | A cozy appetizer for a chilly evening. |
| Blue Cheese & Walnut | 1/2 cup crumbled blue cheese, swap pecans for walnuts | Pairing with a glass of bold red wine. |
What to Serve with Your Cheese Ball (Beyond Crackers)
A great cheese ball deserves a fantastic selection of dippers. I like to offer a variety of shapes, textures, and flavors for my guests to choose from.
- Classic Crackers & Breads: Buttery crackers like Ritz, sturdy wheat crackers, bagel chips, thin slices of toasted baguette, and even fresh no-knead sourdough focaccia for dipping.
- Crisp Vegetables: Celery sticks, thick bell pepper strips, crisp cucumber rounds, and carrot sticks offer a fresh, healthy crunch.
- Sweet & Savory Fruits: Slices of crisp apple (like Granny Smith) or pear, and sturdy grapes are a delicious sweet and savory combination.
- Salty Snacks: Mini pretzels, sturdy pita chips, and bagel crisps are perfect for scooping up every last bite.
Perfect Pairings: What to Drink
Choosing the right beverage can elevate your appetizer experience. This cheese ball is wonderfully versatile and pairs well with a variety of drinks.
- Non-Alcoholic: A sparkling apple cider is a wonderful choice, as is a festive, fruity punch that everyone can enjoy.
Storage and Make-Ahead Instructions
One of the best things about this recipe is how easy it is to prepare in advance. To make it ahead, prepare the cheese ball as directed but wait to add the nut coating. Wrap it tightly in plastic wrap, and it will keep in the refrigerator for up to 3 days.
When you’re ready to serve, simply unwrap it, roll it in your desired coating, and let it sit at room temperature for about 20 minutes to soften slightly. For food safety, a cheese ball shouldn’t sit out for more than 2 hours. To transport it, keep it chilled in a small, airtight container until you reach your destination.
FAQs about this Cheese Ball Recipe
Here are answers to a few common questions I get about making the perfect cheese ball.
How do I prevent my cheese ball from being too soft?
The key is to start with block-style cream cheese, not the whipped kind in a tub. If the mixture still feels too soft after mixing, cover and chill it for 20-30 minutes before you try to shape it. This will help it firm up considerably.
Can I make mini cheese balls?
Absolutely! Mini cheese balls are a fantastic idea for individual servings. Simply divide the mixture and roll it into smaller, bite-sized balls. You can roll each one in a different coating for a beautiful and varied presentation.
Can I make a vegan or dairy-free cheese ball?
Yes, you can adapt this recipe. Look for high-quality vegan cream cheese and dairy-free cheddar-style shreds at your local grocery store. The results will depend on the brand you choose, but it’s definitely possible to make a delicious plant-based version.
Can you bake a cheese ball?
This recipe is designed to be served as a cold appetizer, and baking it would cause it to melt into a dip. If you’re looking for a hot appetizer, you could place the cheese ball mixture in an oven-safe dish, top with extra cheese, and bake until hot and bubbly to serve as a warm dip.
Conclusion
This classic cheese ball recipe is more than just an appetizer; it’s a reliable, delicious, and stress-free way to bring people together. It’s a must-have in my hosting playbook, and I hope it becomes one in yours too.
I would love to hear how it turns out for you! Please leave a comment below with your favorite flavor variations or any questions you might have. It’s always a joy to see how you make my recipes your own in the Delish Map community.
Printable Recipe Card
Want just the essential recipe details without scrolling through the article? Get our printable recipe card with just the ingredients and instructions.