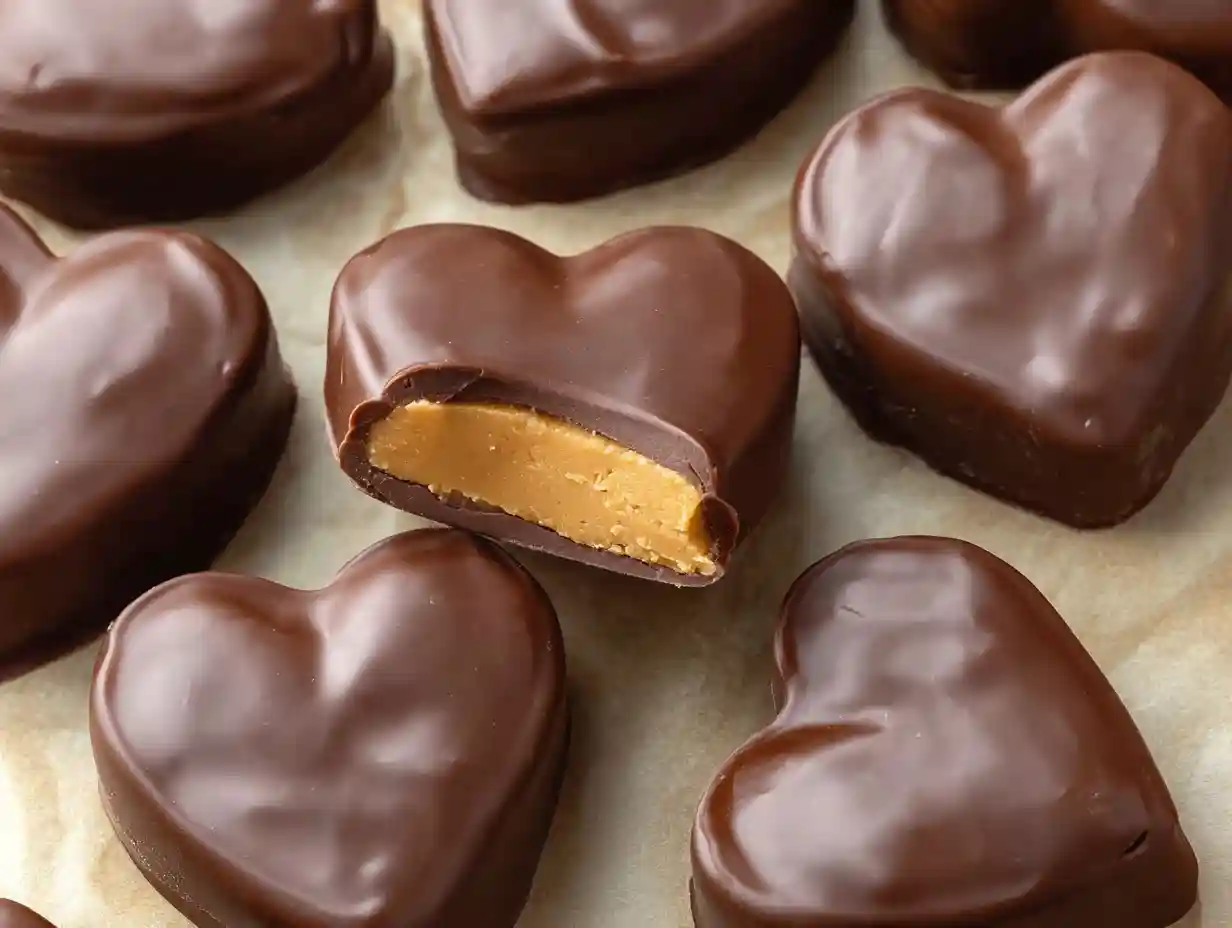
Hi, Valentine’s Day has always been one of my favorite times of the year, filled with sweet memories and even sweeter treats. One of my absolute favorites to make and share are these Chocolate Peanut Butter Valentine’s Hearts. The total time to create these delightful treats is approximately 60 minutes, including chilling time.
Let me guide you through crafting these adorable Chocolate Peanut Butter Hearts that are sure to spread love and smiles.
Table of Contents

Amazing Chocolate Peanut Butter Valentine’s Heart Recipe
Ingredients
Method
- Line an 8 x 8 inch dish with parchment paper, leaving the paper hanging over the sides so you can easily lift it later. I find this makes removing the peanut butter layer a breeze!
- In a mixing bowl, stir together peanut butter, melted butter, brown sugar, vanilla, and salt until the sugar dissolves. This ensures a smooth, even flavor throughout the filling.
- Gradually mix in powdered sugar. Make sure it’s well combined so there are no lumps!
- Press the mixture into the prepared dish. Smooth the top with a spatula or simply press it with your palms to flatten it into about a ½ inch thick layer.
- Place it in the freezer until firm enough for cutting. This is crucial! You want the mixture to be solid enough to hold its shape.
- Line a tray with parchment paper and set aside.
- Once firm, use a small cookie cutter in the shape of a heart to cut out the hearts and place them on the tray. Don’t waste any batter! Pick up leftovers, knead, press with your palms, and you will be able to cut out at least a few more hearts.
- Place them in the freezer until firm. This helps the chocolate adhere better.
- Melt the chocolate (or candy coating) and line another tray with parchment paper.
- Pro-Tip: Melt chocolate using one of the methods detailed in the “Melting Chocolate Like a Pro” section below for best results.
- Working Efficiently: Since the peanut butter mixture softens really fast at room temperature, I suggest you take just a few hearts at a time from the freezer. It’s easier to work with the firm hearts!
- Dip each frozen heart into melted chocolate to cover completely, using a fork. Gently tap the fork to drip off the excess chocolate.
- Place chocolate-covered hearts on the parchment paper-lined tray.
- Refrigerate until chocolate has set. This usually takes about 30 minutes.
Nutrition
Tried this recipe?
Let us know how it was!Why You’ll Love This Chocolate Peanut Butter Valentine’s Heart Recipe
I truly believe my recipe is the best! Why? Let me tell you:
- These hearts are incredibly easy to make, even if you’re new to the kitchen.
- They’re the perfect homemade gift, showing someone you care with a personal touch.
- The combination of chocolate and peanut butter is a classic that everyone adores.
- You can customize the decorations to make them extra special and unique.
Ingredients: Crafting the Perfect Chocolate Peanut Butter Heart
Here’s what you’ll need to create these irresistible treats:
- 1 cup creamy peanut butter, room temperature: Using creamy peanut butter ensures a smooth, melt-in-your-mouth texture. Room temperature makes it easier to mix.
- ¼ cup unsalted butter, melted: The melted butter adds richness and helps bind the ingredients. Unsalted is best, so you control the saltiness.
- 2 Tablespoons brown sugar: Brown sugar adds a hint of molasses flavor and contributes to a slightly chewy texture.
- 2 teaspoon vanilla extract: Vanilla extract enhances all the other flavors and adds a warm, comforting note.
- ¼ teaspoon salt: Salt balances the sweetness and brings out the peanut butter flavor.
- 2 cups powdered sugar: Powdered sugar is essential for creating the right consistency in the peanut butter filling.
- 10-12 oz. chocolate, chopped in small pieces: Now, let’s talk chocolate! You have options:
- Chocolate Chips (Semi-sweet and Milk): I love using a mix of semi-sweet and milk chocolate chips. It creates a balanced flavor that’s not too bitter or too sweet.
- Candy Coating (Melting Wafers): If you’re a beginner, I highly recommend using candy coating or melting wafers. They melt smoothly and are much less likely to seize than real chocolate, making the whole process easier and less stressful!
- Tempering Chocolate: For those who want a professional finish, tempering chocolate is the way to go. Tempering is a process of heating and cooling chocolate to stabilize the cocoa butter, resulting in a glossy, snap-when-you-break-it finish. It’s not strictly necessary if you’re using candy melts, but it’s a fun skill to learn!
Step-by-Step Instructions for Your Chocolate Peanut Butter Valentine’s Hearts
Follow these simple steps, and you’ll be enjoying these sweet treats in no time!
- Line an 8 x 8 inch dish with parchment paper, leaving the paper hanging over the sides so you can easily lift it later. I find this makes removing the peanut butter layer a breeze!
- In a mixing bowl, stir together peanut butter, melted butter, brown sugar, vanilla, and salt until the sugar dissolves. This ensures a smooth, even flavor throughout the filling.
- Gradually mix in powdered sugar. Make sure it’s well combined so there are no lumps!
- Press the mixture into the prepared dish. Smooth the top with a spatula or simply press it with your palms to flatten it into about a ½ inch thick layer.
- Place it in the freezer until firm enough for cutting. This is crucial! You want the mixture to be solid enough to hold its shape.
- Line a tray with parchment paper and set aside.
- Once firm, use a small cookie cutter in the shape of a heart to cut out the hearts and place them on the tray. Don’t waste any batter! Pick up leftovers, knead, press with your palms, and you will be able to cut out at least a few more hearts.
- Place them in the freezer until firm. This helps the chocolate adhere better.
- Melt the chocolate (or candy coating) and line another tray with parchment paper.
- Pro-Tip: Melt chocolate using one of the methods detailed in the “Melting Chocolate Like a Pro” section below for best results.
- Working Efficiently: Since the peanut butter mixture softens really fast at room temperature, I suggest you take just a few hearts at a time from the freezer. It’s easier to work with the firm hearts!
- Dip each frozen heart into melted chocolate to cover completely, using a fork. Gently tap the fork to drip off the excess chocolate.
- Place chocolate-covered hearts on the parchment paper-lined tray.
- Refrigerate until chocolate has set. This usually takes about 30 minutes.
Troubleshooting Common Chocolate Peanut Butter Heart Problems
Sometimes, things don’t go exactly as planned. Here are a few common issues and how to fix them:
- Peanut Butter Mixture is Crumbly: If your peanut butter mixture is too crumbly, add a tiny bit more melted butter or peanut butter, one teaspoon at a time, until it binds together.
- Chocolate Won’t Stick: Ensure your hearts are completely frozen before dipping them in chocolate. This helps the chocolate set quickly.
- Chocolate Seizing (for real chocolate): If you’re using real chocolate and it seizes (becomes grainy and thick), refer to the detailed explanation in the “Melting Chocolate Like a Pro” section.
- Hearts Breaking When Cutting: Make sure the peanut butter mixture is firm enough from freezing. If it’s still too soft, return it to the freezer for a bit longer.
Melting Chocolate Like a Pro
Melting chocolate can be tricky, but here are a few techniques that can help:
- Microwave Method: Place chopped chocolate or candy melts in a microwave-safe bowl. Microwave in 30-second intervals, stirring well after each interval, until melted and smooth. Be careful not to overheat, or the chocolate will burn.
- Double Boiler Method: Fill a saucepan with about an inch of water and bring to a simmer. Place a heat-safe bowl on top of the saucepan, ensuring the bottom of the bowl doesn’t touch the water. Add the chocolate to the bowl and stir occasionally until melted and smooth.
- Candy Coating (Melting Wafers): These are the easiest to work with! Simply microwave in short intervals, stirring until smooth.
Creative Decoration Ideas for Your Valentine’s Hearts
Let your creativity shine with these fun decoration ideas!
- Simple Drizzle: Drizzle melted white chocolate over the milk chocolate for a beautiful contrast.
- Sprinkles: Use Valentine’s Day-themed sprinkles like hearts, red, pink, and white.
- Edible Glitter or Dust: Add a touch of sparkle with edible glitter or dust.
- Piping Designs: Use a piping bag with a fine tip to create intricate designs.
- Coloring Chocolate: Use oil-based candy colors to tint white chocolate for custom designs.
Gifting and Packaging Your Chocolate Peanut Butter Valentine’s Hearts
These hearts make wonderful gifts! Here are some charming packaging ideas:
- Individual Wrapping: Wrap each heart in a cellophane bag tied with a ribbon.
- Small Boxes: Use heart-shaped boxes or clear treat boxes.
- Gift Tags: Add personalized tags or simple “Happy Valentine’s Day” tags.
- Layering in a Larger Box: Use parchment paper or crinkle paper between layers to prevent sticking.
Allergy and Dietary Considerations
Here’s how to adapt the recipe for dietary needs:
- Nut-Free: This recipe relies heavily on peanut butter. If a reader needs to avoid nuts entirely, sunflower seed butter could be used as a potential alternative, but keep in mind it will change the flavor.
- Dairy-Free/Vegan:
- Butter: Use a vegan butter alternative.
- Chocolate: Use dairy-free/vegan chocolate chips or candy melts. For another easy to make treat, check out this Amazing Christmas Puppy Chow: An Easy Holiday Treat.
Ingredient Variations for Your Chocolate Peanut Butter Valentine’s Heart
Experiment with these ingredient variations:
- Peanut Butter: Natural peanut butter can be oilier, so you might need more powdered sugar. Other nut butters like almond or cashew, or even seed butters, can create unique flavor profiles.
- Sweeteners: While brown sugar is traditional, other fine sugars might work, but could alter the texture.
- Chocolate: Dark, milk, white, and semi-sweet chocolate all offer different flavor experiences. Again, candy melts are the easiest option. If you’re looking for a simpler option, consider these Quick & Easy No-Bake Christmas Cheesecake Bites.
Storage Instructions: Keeping Your Hearts Fresh
Here’s how to store your valentine’s hearts to maintain their deliciousness:
- Refrigeration: This is the best method for keeping the chocolate set and the filling firm. Store in an airtight container for up to 2 weeks.
- Freezing: For longer storage, freeze them in an airtight container, perhaps with parchment paper between layers, for up to 2 months. Thaw gently in the refrigerator.
- Room Temperature: Generally not recommended, as the chocolate may soften. To ensure your other treats stay fresh, explore our treats & drinks category for additional tips.
FAQs About Chocolate Peanut Butter Hearts
Here are some common questions I get asked:
Can I use crunchy peanut butter?
Yes, but it will change the texture of the filling.
Why did my chocolate seize up?
This usually happens when water gets into the chocolate or it’s overheated. Refer to the “Melting Chocolate Like a Pro” section for tips.
How do I get the chocolate to be smooth and shiny?
Tempering chocolate will give you the best results.
Can I make these ahead of time?
Absolutely! They store well in the refrigerator or freezer.
What’s the best way to store them?
In an airtight container in the refrigerator.
I hope you enjoy making and sharing these Chocolate Peanut Butter Valentine’s Hearts as much as I do! They’re a little bundle of love in every bite. Please leave a comment below to share your experience, ask questions, or post photos of your creations. I can’t wait to see your beautiful hearts!
For more recipes, follow us on Pinterest.
Printable Recipe Card
Want just the essential recipe details without scrolling through the article? Get our printable recipe card with just the ingredients and instructions.