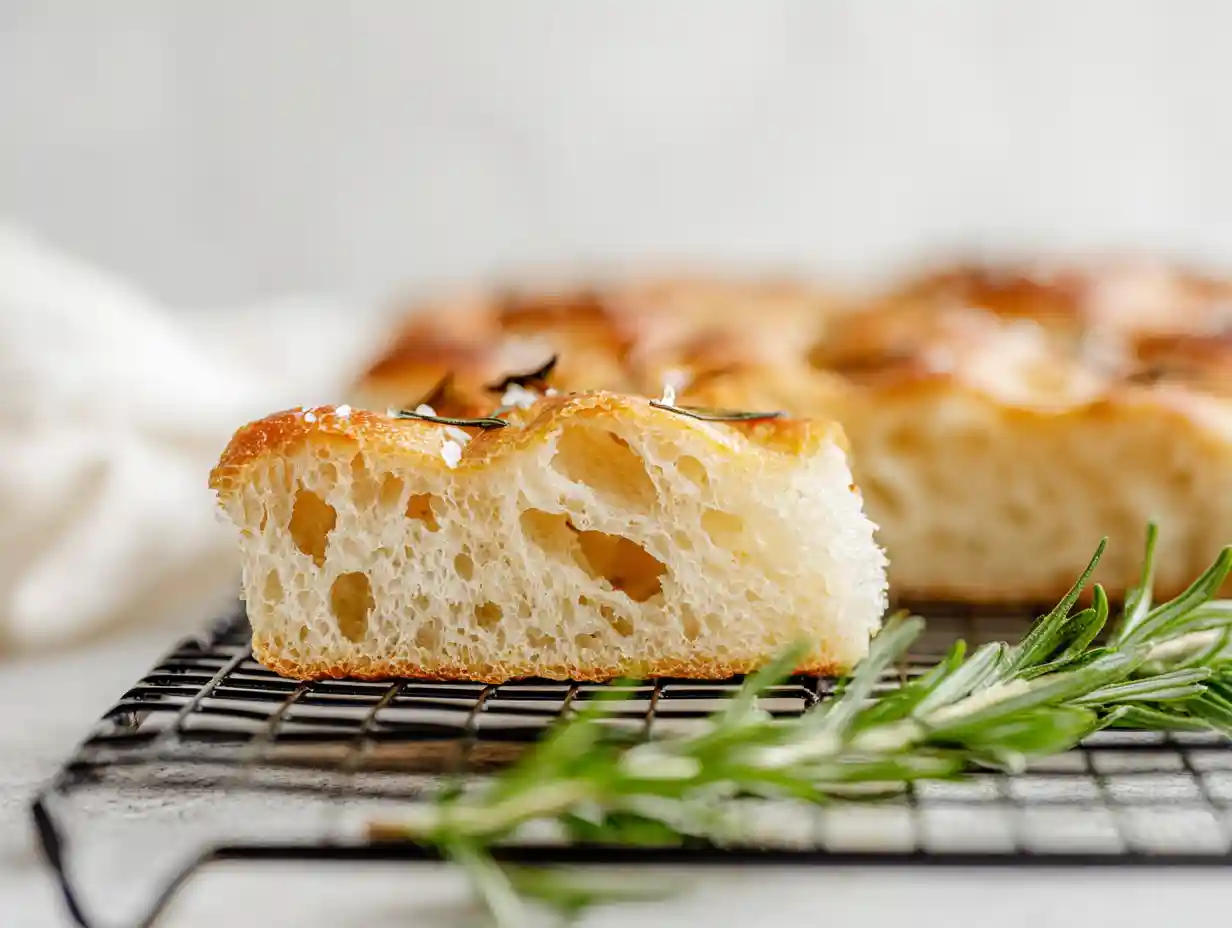
There’s something magical about pulling a golden, bubbly loaf of focaccia from the oven. The smell of baked bread and olive oil fills the kitchen, and you know you’ve created something truly special. If you’ve ever felt intimidated by sourdough, I’m here to tell you this is the recipe that will change everything. This Sourdough Focaccia Recipe yields a bread that is incredibly pillowy on the inside with an addictively crispy, olive oil-infused crust.
I designed this recipe to be as forgiving and flexible as possible. It’s perfect for anyone just starting their sourdough journey or for seasoned bakers looking for a reliable, no-fuss method. The process is simple, relies more on time than effort, and the results are consistently spectacular. I can’t wait for you to try it.
Table of Contents

No-Knead Sourdough Focaccia Recipe
Ingredients
Equipment
Method
- Place the starter, salt, and water in a large bowl. Stir with a spatula to combine — it doesn’t have to be uniformly mixed. Add the flour. Mix again until the flour is completely incorporated.
- If time permits, perform one “fold”: 30 minutes after you mix the dough, reach into the bowl and pull the dough up and into the center. Turn the bowl quarter turns and continue this pulling 8 to 10 times.
- Drizzle with a splash of olive oil and rub to coat. Cover bowl with a tea towel or bowl cover and set aside to rise at room temperature (70ºF/21ºC) for 4 to 18 hours (the time will vary depending on the time of year, the strength of your starter, and the temperature of your kitchen — in summer, for instance, my sourdoughs double in 6 hours; in winter, they double in 18 hours. Do not use an oven with the light on for the bulk fermentation — it will be too warm. It is best to rely on visual cues (doubling in volume) as opposed to time to determine when the bulk fermentation is done. A straight-sided vessel makes monitoring the bulk fermentation especially easy because it allows you to see when your dough has truly doubled.).
- When dough has doubled, place 2 tablespoons of olive oil into a 9×13-inch pan. (If you are using a glass pan, you may, as a precaution, want to butter it it first — I have had disasters with bread sticking when I’ve used oil alone with other baking vessels.)
- Drizzle dough with a tablespoon of olive oil. Use your hand to gently deflate the dough and release it from the sides of the bowl. Gently scoop the dough into the center of the pool of oil in your prepared pan. Fold dough envelope style from top to bottom and side to side to create a rough rectangle. Turn dough over so seam-side is down.
- Rub top of dough with oil. Leave alone for 4 to 6 hours, uncovered, or until puffy and nearly doubled.
- Heat oven to 425ºF. Rub hands lightly with oil, and using all ten fingers, press gently into the dough to dimple and stretch the dough to nearly fit the pan. Sprinkle generously with sea salt. Transfer pan to the oven and bake for about 25 minutes or until golden all around. Remove pan from oven and transfer bread to a cooling rack. Cool at least 20 minutes before slicing.
Notes
Tried this recipe?
Let us know how it was!Why You’ll Love This Sourdough Focaccia Recipe
- Amazingly Flexible Schedule: This recipe works around your life. With a bulk fermentation time ranging from 4 to 18 hours, you can mix it in the morning for a same-day bake or in the evening for an overnight rise.
- No Kneading Required: Forget intensive kneading. A simple series of “folds” at the beginning is all you need to develop strength in the dough, making this a wonderfully low-effort bread.
- Foolproof for Beginners: I’ve packed this guide with tips to help you understand the process through visual cues, not just the clock. This approach helps you learn what the dough should look and feel like, building your baker’s intuition.
- The Perfect Texture Guaranteed: Following my method will give you that classic open, airy crumb and a golden, crunchy bottom crust that makes focaccia so irresistible.
Understanding Your Ingredients
The beauty of this recipe lies in its simplicity. We’re working with just a few core ingredients, so understanding their role is key.
Sourdough Starter: This is the heart of your bread, providing all the leavening. This recipe assumes you’re using a 100% hydration starter, which means it’s fed with equal weights of flour and water. If your starter has a different hydration, you may need to adjust the water in the recipe slightly. For a thicker starter, add a little more water; for a thinner one, use a little less.
Bread Flour: I recommend bread flour for its higher protein content. This helps create a strong gluten network, which is essential for that chewy, airy texture we’re after.
Water: The temperature of your water can affect fermentation speed. Room temperature is perfect, but on a cold day, you might use slightly warmer water to give your dough a head start.
Kosher Salt & Olive Oil: Kosher salt is best for flavor without being overpowering. A good quality extra-virgin olive oil is non-negotiable here, as it adds incredible flavor and creates that signature crispy crust.
Essential Equipment for Your Focaccia
You don’t need much fancy equipment, but the right pan makes a huge difference. For this sourdough focaccia recipe, the pan material directly impacts the crispiness of your crust. A 9×13-inch pan is the ideal size for this amount of dough.
Metal pans, particularly light-colored aluminum ones like the USA Pan I use, are fantastic conductors of heat. They will give you a reliably golden and crispy bottom crust. If you use a darker metal pan, keep an eye on it, as it may bake a little faster.
Glass or ceramic dishes work, but they don’t conduct heat as efficiently. This can sometimes result in a less crispy bottom. If you’re using a glass pan, I highly recommend greasing it with butter before adding the olive oil as a precaution against sticking.
The Complete Sourdough Focaccia Recipe (Step-by-Step)
Here is my step-by-step guide to creating the most delicious, pillowy sourdough focaccia right in your own kitchen.
Ingredients
- 50 g – 100 g (1/4 to 1/2 cup) active starter, see notes above
- 10 g (about 2.5 teaspoons) kosher salt
- 430 – 440 g water (1.75 cups – 1.75 cups + 2 tablespoons), room temperature, see notes above*
- 512 g (about 4 cups) bread flour, see notes above
- 3 tablespoons extra-virgin olive oil, divided, plus more for drizzling
- Nice, flaky sea salt, such as Maldon
Instructions
- Place the starter, salt, and water in a large bowl. Stir with a spatula to combine, it doesn’t have to be uniformly mixed. Add the flour. Mix again until the flour is completely incorporated.
- If time permits, perform one “fold”: 30 minutes after you mix the dough, reach into the bowl and pull the dough up and into the center. Turn the bowl quarter turns and continue this pulling 8 to 10 times. See video for guidance.
- Drizzle with a splash of olive oil and rub to coat. Cover bowl with a tea towel or bowl cover and set aside to rise at room temperature (70ºF/21ºC) for 4 to 18 hours (the time will vary depending on the time of year, the strength of your starter, and the temperature of your kitchen — in summer, for instance, my sourdoughs double in 6 hours; in winter, they double in 18 hours. Do not use an oven with the light on for the bulk fermentation, it will be too warm. It is best to rely on visual cues (doubling in volume) as opposed to time to determine when the bulk fermentation is done. A straight-sided vessel makes monitoring the bulk fermentation especially easy because it allows you to see when your dough has truly doubled.).
- When dough has doubled, place 2 tablespoons of olive oil into a 9×13-inch pan. (I have been using this USA Pan, which I love. I have had no sticking issues. If you are using a glass pan, you may, as a precaution, want to butter it it first, I have had disasters with bread sticking when I’ve used oil alone with other baking vessels.)
- Drizzle dough with a tablespoon of olive oil. Use your hand to gently deflate the dough and release it from the sides of the bowl. Gently scoop the dough into the center of the pool of oil in your prepared pan. Fold dough envelope style from top to bottom and side to side to create a rough rectangle. Turn dough over so seam-side is down. Video guidance here.
- Rub top of dough with oil. Leave alone for 4 to 6 hours, uncovered, or until puffy and nearly doubled.
- Heat oven to 425ºF. Rub hands lightly with oil, and using all ten fingers, press gently into the dough to dimple and stretch the dough to nearly fit the pan. Sprinkle generously with sea salt. Transfer pan to the oven and bake for about 25 minutes or until golden all around. Remove pan from oven and transfer bread to a cooling rack. Cool at least 20 minutes before slicing.
Baker’s Schedule: Planning Your Bake
This recipe is incredibly flexible. Here are two sample schedules to help you plan your bake based on the season and your schedule.
Overnight Method (Great for Fall/Winter)
- Day 1, 9:00 PM: Mix the dough, perform the fold, and cover for bulk fermentation on the counter overnight (10-14 hours).
- Day 2, 9:00 AM: Transfer dough to the oiled pan, fold, and let it rest for its second rise (4-6 hours).
- Day 2, 2:00 PM: Dimple the dough, add toppings, and bake.
Same-Day Method (Great for Spring/Summer)
- Day 1, 8:00 AM: Mix the dough, perform the fold, and cover for bulk fermentation (5-7 hours).
- Day 1, 2:00 PM: Transfer dough to the oiled pan, fold, and let it rest for its second rise (4-6 hours).
- Day 1, 7:00 PM: Dimple the dough, add toppings, and bake just in time for dinner.
Expert Tips for the Perfect Sourdough Focaccia
Over many bakes, I’ve learned a few things that really help ensure success every single time. Here are my best tips for you.
Visual Cues for Fermentation
Don’t just watch the clock, watch your dough! When properly fermented, your dough will have doubled in volume, look puffy, and have a few bubbles on the surface. It should jiggle a bit if you gently shake the bowl. If it looks dense and hasn’t grown much, it’s under-fermented and needs more time. If it looks soupy and has collapsed, it has likely gone too far and is over-fermented.
Mastering the Dimpling Technique
Dimpling is what creates those signature pools of olive oil and prevents the focaccia from puffing up into a giant pita bread in the oven. The trick is to be gentle but firm. Coat your fingers in olive oil, then press all ten fingertips straight down into the dough until you touch the bottom of the pan. This creates little valleys and hills for a wonderful texture.
The Importance of Dough Temperature
Fermentation is driven by temperature. The ideal temperature for your dough during its first rise is around 75-78°F. If your kitchen is cool, you can use slightly warmer water (around 85°F) when mixing to help get it into that sweet spot. If your kitchen is very warm, using cooler, room-temperature water is perfectly fine.
High-Altitude Adjustments
If you’re baking above 3,000 feet, the lower air pressure can cause your dough to rise much faster. To compensate, you may want to slightly decrease the water by about 15-20 grams to create a stronger dough. Most importantly, watch your dough closely, as both the first and second rise times will likely be shorter.
Topping Variations & Serving Suggestions
Plain sea salt is classic, but focaccia is a wonderful canvas for all sorts of flavors. Here are some of my favorite combinations.
| Category | Topping Ideas |
|---|---|
| Mediterranean | Sliced Kalamata olives, sun-dried tomatoes, feta |
| Herby & Fresh | Fresh rosemary, sliced garlic, thyme, lemon zest |
| Sweet & Savory | Thinly sliced pears, gorgonzola, walnuts, honey drizzle |
| Garden Veggie | Sliced cherry tomatoes, red onion, bell peppers |
Beyond serving with a simple bowl of dipping oil, I love using this focaccia for sandwiches. The airy crumb is perfect for soaking up spreads and juices. It’s also a fantastic side for a hearty soup, stew, or an ultimate Gordon Ramsay meatloaf recipe, or you can cut it into small squares to use as a base for appetizers when you create a charcuterie board on a budget.
How to Store and Freeze
To store your baked focaccia, let it cool completely and then keep it in a paper bag or bread box at room temperature for up to 2 days. Storing it in plastic can make the crust soft.
This bread also freezes beautifully. Once completely cool, slice it into your desired portions. Wrap each portion tightly in plastic wrap and then place them in a freezer-safe bag or container. It will keep well for up to 3 months. To reheat, simply pop a frozen slice into a 375°F oven for 5-10 minutes until warmed through and crispy.
Troubleshooting Your Sourdough Focaccia Recipe
Even seasoned bakers have an off day. If your focaccia doesn’t turn out quite right, here are some common issues and how to fix them.
| Problem | Potential Cause | Solution |
|---|---|---|
| My focaccia is gummy | Under-baked or cut while still too hot. | Ensure it’s baked to a deep golden brown. Most importantly, allow it to cool on a wire rack for at least 20 minutes before slicing. |
| The bottom isn’t crispy | Pan material (glass/ceramic) or not enough oil. | Use a metal pan for better heat conduction. Ensure you use the full amount of olive oil in the bottom of the pan. |
| My focaccia is too dense | Under-fermented dough or an inactive starter. | Make sure your starter is bubbly and active before using. Rely on visual cues (doubled in size) for fermentation, not just time. |
| The toppings burned | Toppings were added too early or the oven was too hot. | Add delicate toppings like fresh herbs or garlic in the last 10 minutes of baking. Check your oven temperature with an oven thermometer. |
FAQs about Sourdough Focaccia
How do I know if my sourdough starter is ready to use?
Your starter is ready when it’s bubbly, active, and has at least doubled in size a few hours after feeding. A great test is to drop a small spoonful into a glass of water. If it floats, it’s ready to go!
Can I make this recipe in a different sized pan?
Yes, you can. A round 10-inch cast iron skillet will work well for a thicker focaccia. For a thinner, crispier version, you could use a larger half-sheet pan, but you’ll need to reduce the baking time.
Can I use all-purpose flour instead of bread flour?
You can, but the texture will be slightly different. All-purpose flour has less protein, which will result in a slightly less chewy and more tender crumb. It will still be absolutely delicious.
Conclusion
I truly hope this Sourdough Focaccia Recipe brings as much joy to your kitchen as it does to mine. There is nothing more satisfying than sharing a warm, homemade loaf with people you love. It’s a simple, comforting food that feels like a hug.
Now I’d love to hear from you! Please leave a comment below and let me know how your focaccia turns out. What are your favorite toppings? If you have any questions along the way, don’t hesitate to ask. Happy baking
Printable Recipe Card
Want just the essential recipe details without scrolling through the article? Get our printable recipe card with just the ingredients and instructions.