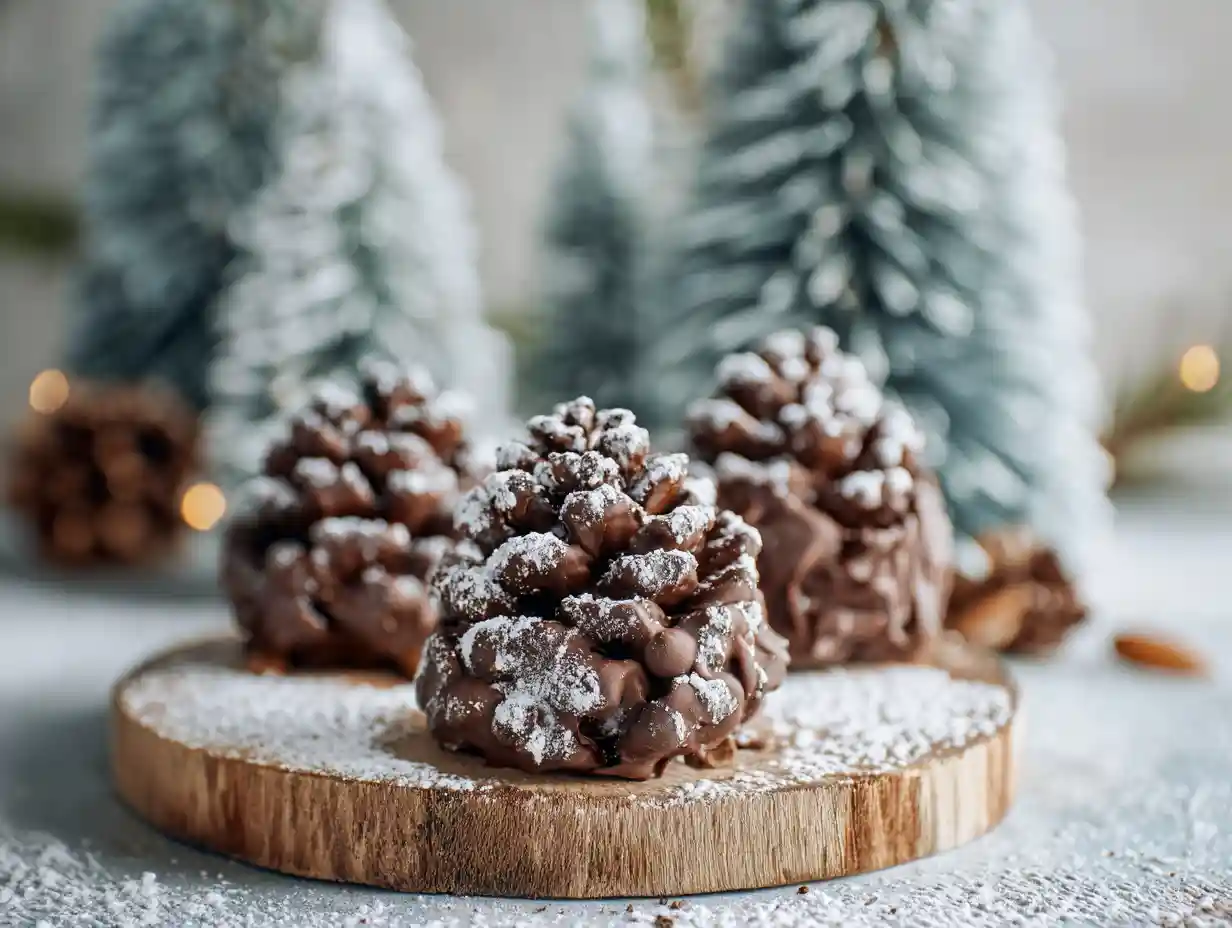
Hello there, fellow food lover! Emily here from Delish Map. As the holiday season twinkles into view, or even just when I’m looking for a special treat to brighten a regular week, I find myself drawn to those recipes that deliver a big “wow” factor with surprising ease. Today, I’m absolutely thrilled to share a recipe that perfectly fits that description: my unique Pinecone Truffles.
These aren’t just any truffles; they are delightful, edible works of art that are both impressive to look at and incredibly simple to create. Imagine presenting a platter of these at your next gathering or tying up a small box of them as a heartfelt homemade gift.
My almond-based recipe offers a sophisticated twist on the classic truffle, bringing a wonderful depth of flavor and texture that I know you’ll adore. From start to finish, you’re looking at approximately two hours, making this a truly perfect weekend project.
Table of Contents
Why You’ll Love This Pincone Truffles Recipe

I think you’re going to fall head over heels for this particular Pincone Truffles Recipe, and I can tell you exactly why. It goes far beyond just being an easy, no-bake treat; it’s an experience for your taste buds and eyes alike. I love how these truffles offer an elegant flavor profile that truly stands out.
First, the deep, rich chocolate is perfectly balanced, never overly sweet. Then, there’s the delightful, satisfying crunch and aroma of perfectly roasted almonds. This combination creates an incredible texture and a sophisticated taste that’s far more impressive than your average truffle. Plus, their impressive, intricate appearance always garners compliments, making them a showstopper for any occasion.
Essential Equipment for Perfect Truffles
To make these beautiful pinecone truffles, having the right tools makes all the difference. I find that a little preparation with equipment ensures a smooth and enjoyable cooking experience. Here are the essentials I always have on hand:
- Lipped Baking Sheets: You’ll need two of these to roast your whole and sliced almonds evenly. The lips prevent any almonds from rolling off into your oven.
- Blender or Food Processor: This is crucial for grinding the roasted whole almonds to the perfect consistency, somewhere between a flour and a butter.
- Double Boiler: I use this for gently melting the chocolate and cream. If you don’t have one, a heatproof bowl set over a small saucepan of simmering water works perfectly to prevent scorching.
- Measuring Cups and Spoons: Precision is key in baking, even for truffles! I always level off my ingredients for consistent results.
- Sturdy Spoon for Scooping: You’ll need this for portioning out the truffle mixture before shaping. A regular tablespoon works wonderfully.
- Parchment Paper or Silicone Mat (Optional but Recommended): While not strictly essential, I love lining my baking sheets with parchment paper for easier cleanup after roasting and for chilling the truffles without sticking.
Ingredients for Our Delicious Pincone Truffles Recipe
Gathering my ingredients before I begin is a habit that always saves me time and stress. Here is exactly what you’ll need to create these wonderful Pincone Truffles:
- 1/2 cup whole raw almonds
- 1 1/2 cups sliced raw almonds
- 10 ounces dark chocolate chips (about 60% cacao)
- 1/2 cup heavy cream
- 1 tablespoon honey
- 1/2 teaspoon pure vanilla extract
- 1/4 teaspoon salt
- 1/3 cup Dutch process cocoa powder
Step-by-Step Instructions: Crafting Your Pincone Truffles
Making these pinecone truffles is a fun and rewarding process, especially when you break it down into manageable steps. I’ve laid out the instructions just as I follow them in my kitchen.
Roasting the Almonds
The first step, roasting the almonds, is absolutely crucial for bringing out their deepest flavor and achieving that perfect texture in your truffles. I always preheat my oven to 350 degrees Fahrenheit. Then, I evenly spread out the whole raw almonds on one lipped baking sheet and the sliced raw almonds on another. I roast them until they’re very lightly deepened in color and wonderfully fragrant; this usually takes about 6-8 minutes for the sliced almonds and 10-12 minutes for the whole almonds.
Preparing the Almond Truffle Mixture
Once the almonds are roasted and cooled slightly, I grind the roasted whole almonds in a blender or food processor until they reach a stage halfway between almond flour and almond butter. I then set them aside. In the top of a double boiler, I melt together the chocolate and cream until smooth, stirring constantly to ensure it doesn’t seize.
After it’s perfectly smooth, I remove it from the heat and stir in the ground roasted almond mixture, honey, vanilla, and salt until everything is beautifully combined. I then cover the mixture and place it in the refrigerator for 90 minutes.
Chilling and Shaping Your Pincone Truffles
After the truffle mixture has chilled for 90 minutes and is firm enough to handle, it’s time for the fun part: shaping! I use a spoon to scoop out a roughly 2×1-inch cylinder of the truffle mixture. Then, I gently form it into an egg shape that’s slightly skinnier than an actual egg, giving it that perfect pinecone silhouette. I lightly roll this shape in the cocoa powder to make the exterior less sticky and easier to handle.
Finally, I insert the roasted sliced almonds into the truffle at a low angle, overlapping them slightly to mimic the scales of a pinecone. I repeat this process until I’ve used all the truffle mixture and sliced almonds, which typically makes about 18 pinecone truffles.
Tips and Tricks for Flawless Pincone Truffles
I’ve made these pinecone truffles countless times, and I’ve picked up a few insider tips that I’m excited to share with you. These little pointers will help ensure your truffles turn out beautifully every single time.
First, the consistency of your truffle mixture before shaping is paramount; it should be firm enough to hold its shape but pliable. If it feels too soft, simply pop it back into the refrigerator for another 15-30 minutes. When inserting the sliced almond “scales,” I find it helps to make a slight indentation with my finger where I want to place each almond, then press gently but firmly. This helps them adhere securely.
For the cocoa powder dusting, I like to put the powder in a small, shallow bowl and gently roll the truffle in it, using my fingertips to ensure an even coating without over-handling. Finally, always handle your shaped truffles gently; their beauty lies in those delicate almond scales, and a soft touch keeps them pristine.
Creative Variations & Flavor Additions
While my original Pincone Truffles Recipe is a beloved classic, I adore experimenting with different flavors and textures. Here are some creative variations and additions you might like to try to customize your truffles!
Alternative Truffle Bases
Sometimes, I crave a different starting point for my truffles. Here are some popular alternative bases you could consider, though they would require different “scales” than almonds to still maintain the pinecone look.
| Alternative Base | High-Level Guidance |
|---|---|
| Oreo-Based | Crush about 30 Oreo cookies (about 1 package) very finely, then mix with 4-6 ounces of softened cream cheese until well combined and formable. |
| Cake-Based | Crumble about 2 cups of finely crumbled baked cake (any flavor) very finely. Mix with 3-4 ounces of frosting until a cohesive dough forms. |
Flavor Boosters & Coatings
To elevate the flavor profile of your almond truffle mixture, I love adding a few extra touches. A tiny splash of almond extract enhances the nutty notes beautifully. For a touch of warmth, a pinch of cinnamon or even a bit of espresso powder can deepen the chocolate flavor wonderfully. Beyond the classic cocoa powder, I’ve had fun experimenting with other coatings.
A drizzle of melted white chocolate offers a lovely contrast, or you could roll them in finely crushed pistachios for a vibrant green and nutty crunch. For an extra festive sparkle, a dusting of edible glitter can be truly magical.
“Pinecone Scale” Alternatives
If you’re looking for different visual or textural elements, there are some fantastic alternatives to sliced almonds for creating those iconic “scales.” I’ve tried chocolate shavings for a more monochromatic and intensely chocolatey look. Toasted coconut flakes can provide a lighter, more tropical feel and a wonderful chewiness.
For a playful touch, mini chocolate chips can be carefully pressed in, giving a cute, textured effect that kids especially love. Each option creates a distinct appearance and contributes to the overall experience.
Dietary Alternatives for Your Pincone Truffles
I believe delicious treats should be accessible to everyone, so I’m happy to share how I adapt this Pincone Truffles Recipe for various dietary needs. It’s all about thoughtful substitutions!
To make these truffles gluten-free, you’ll primarily need to ensure any variations you choose, like an Oreo or cake base, use certified gluten-free products. My original recipe, being almond-based, is naturally gluten-free.
For dairy-free truffles, I recommend substituting the heavy cream with full-fat coconut cream; just make sure to chill the can of coconut cream overnight and only scoop out the thick cream from the top. Of course, you’ll also need to use high-quality dairy-free dark chocolate chips. Combining these two substitutions makes the recipe completely vegan as well, since honey is the only other animal product, which can be easily swapped for maple syrup or agave nectar.
Troubleshooting Common Truffle Mishaps
Even seasoned home cooks like me encounter a hiccup now and then! Here are some common truffle issues and my go-to solutions to help you achieve perfect pinecone truffles every time.
If your mixture is too crumbly, I suggest adding a tiny bit more liquid binder, such as a splash of extra heavy cream (or coconut cream for dairy-free) or a small amount of melted chocolate. Mix it in thoroughly until it reaches a more cohesive consistency. If your mixture is too sticky, the most common culprit is not enough chilling time.
Pop it back into the refrigerator for another 30 minutes to an hour. Alternatively, I sometimes lightly grease my hands with a neutral oil before shaping, or add a bit more cocoa powder to the mixture itself. When placing the scales, if they’re not sticking, try making a very slight indentation with your fingertip where each almond will go, then press gently but firmly. Ensuring the truffle mixture is cold enough also helps with adhesion.
Scaling Your Pincone Truffles Recipe
Whether I’m making a small batch for a cozy evening or a larger quantity for a festive party, scaling this Pincone Truffles Recipe is quite simple. The key is maintaining the proper ingredient ratios.
For larger gatherings, I simply double or triple all the ingredients. I find that the proportions hold up perfectly. When scaling down for a smaller batch, I just halve each ingredient. The chilling times generally remain the same, regardless of quantity, as the goal is for the mixture to firm up completely. However, if you’re making a very large batch, I might divide the mixture into two containers for chilling to ensure it cools evenly and efficiently in the refrigerator.
Make-Ahead Strategy for Stress-Free Holidays
Holidays can be busy, so I’m all about make-ahead strategies to keep things stress-free in my kitchen! This Pincone Truffles Recipe is wonderfully adaptable for advance preparation.
I find that the truffle mixture itself is the perfect component to make ahead. You can prepare it through the chilling step and keep it covered tightly in the refrigerator for up to 3-4 days. The roasted almonds can also be prepared in advance; once cooled, I store them in an airtight container at room temperature for up to a week.
Then, when I’m ready for final assembly, all I need to do is bring out the mixture, shape, and decorate. This method spreads out the workload, allowing you to enjoy the creative process without feeling rushed.
Kid-Friendly Fun: Get the Little Chefs Involved!
Making these Pincone Truffles is such a joyful activity, and I love getting little hands involved in the kitchen! It’s a wonderful way to create memories and teach some basic cooking skills in a safe environment.
Children can safely participate in several steps. If you’re doing a variation with cookies, they can have a blast crushing them in a sealed bag with a rolling pin. They can also help mix the ingredients once they’re off the heat, or even gently dust the shaped truffles with cocoa powder.
My favorite part for them is carefully placing the sliced almond scales onto the truffle shapes. It’s like a fun puzzle, and their delicate touch can be surprisingly good! Always ensure proper supervision, and focus on the fun rather than perfection.
Storing Your Beautiful Pincone Truffles
Once you’ve crafted your beautiful Pincone Truffles, proper storage is key to keeping them fresh and delicious. I want you to enjoy every single bite!
I always store my finished Pincone Truffles in an airtight container in the refrigerator. They will stay wonderfully fresh and firm for up to 1-2 weeks this way. If you want them to last even longer, these truffles freeze beautifully! I arrange them in a single layer on a parchment-lined baking sheet and freeze until solid, then transfer them to an airtight freezer-safe container or bag.
They can be frozen for up to 1 month. When you’re ready to enjoy them, simply transfer them to the refrigerator to thaw overnight, or let them sit at room temperature for about 30 minutes before serving.
Gift-Giving Ideas: Sharing the Pincone Truffle Love
I truly believe that homemade gifts are the most heartfelt, and these Pincone Truffles are absolutely perfect for sharing. Their impressive appearance and delicious taste make them an unforgettable present.
For packaging, I love small, festive gift boxes lined with parchment paper; they cradle the truffles beautifully. Clear cello bags tied with a pretty ribbon and a personalized tag also work wonderfully, showcasing the truffles’ intricate details.
For a larger gift, you could arrange them artfully on a small platter with edible garnishes like a few fresh cranberries or a sprig of rosemary, then wrap the whole platter in cellophane. Whichever way you choose, presenting these truffles with love will surely make someone’s day extra special.
FAQs About Pincone Truffles
I often get questions about my recipes, so I’ve put together some common inquiries about these Pincone Truffles to help you out!
Can I use milk chocolate instead of dark chocolate?
Yes, you certainly can! The flavor will be sweeter and less intense, but it will still be delicious. I just recommend using a good quality milk chocolate for the best results.
How long do pinecone truffles last?
When stored properly in an airtight container in the refrigerator, they will last for 1 to 2 weeks. They also freeze well for up to a month!
Can I omit the honey?
You can, but the honey adds a lovely depth of flavor and helps with the truffle’s texture and binding. If you omit it, the mixture might be slightly less pliable, and the flavor slightly less complex. You could replace it with an equal amount of maple syrup or agave nectar for similar results.
What if I don’t have a double boiler?
No problem at all! I often use a heatproof bowl set directly over a small saucepan of simmering water. Just make sure the bottom of the bowl doesn’t touch the water, and stir constantly to melt the chocolate evenly and prevent it from scorching.
Conclusion
There you have it, my friends! I truly hope you feel inspired to try your hand at these beautiful and delicious Pincone Truffles. I’ve poured my heart into this recipe, and I know its unique almond-chocolate flavor and charming festive look will bring so much joy to your kitchen and your table. They are surprisingly easy to make and offer such versatility, whether you’re gifting them, serving them at a gathering, or simply enjoying a sweet moment for yourself.
I absolutely adore hearing from you, so please don’t hesitate to leave a comment below with your thoughts or any questions you might have. If you make these truffles, I would be overjoyed if you’d share a picture of your creations on social media! Just tag me @DelishMap and use the hashtag #DelishMapTruffles so I can see your wonderful work. Happy cooking, and thank you, as always, for being here!
Love festive no-bake desserts like these? Follow us on Pinterest for more creative holiday sweets!
Ultimate Pincone Truffles Recipe: Easy to Make!
Ingredients
Equipment
Method
- Preheat your oven to 350 degrees Fahrenheit. Spread the whole raw almonds on one lipped baking sheet and the sliced raw almonds on another. Roast until lightly deepened in color and fragrant, about 6-8 minutes for the sliced almonds and 10-12 minutes for the whole almonds.
- Once cooled slightly, grind the roasted whole almonds in a blender or food processor until they reach a consistency between almond flour and almond butter. Set aside.
- In the top of a double boiler, melt together the chocolate and cream until smooth, stirring constantly. Remove from the heat and stir in the ground roasted almond mixture, honey, vanilla, and salt until combined.
- Cover the mixture and place it in the refrigerator for 90 minutes.
- Once the mixture is firm, use a spoon to scoop out a roughly 2×1-inch cylinder. Gently form it into an egg shape that’s slightly skinnier than an actual egg to create a pinecone silhouette.
- Lightly roll the shape in the cocoa powder to make the exterior less sticky. Insert the roasted sliced almonds into the truffle at a low angle, overlapping them slightly to mimic the scales of a pinecone.
- Repeat the process until all the truffle mixture and sliced almonds are used. This should make about 18 pinecone truffles.
Notes
Tried this recipe?
Let us know how it was!Printable Recipe Card
Want just the essential recipe details without scrolling through the article? Get our printable recipe card with just the ingredients and instructions.