Hi there, lovely friends! Today, I’m absolutely thrilled to share a recipe that brings pure joy and a touch of French elegance right into your kitchen: my homemade Vanilla French Beignets. Baking these delightful treats takes about 2 hours and 30 minutes, including those crucial rise times, but every moment is worth it.
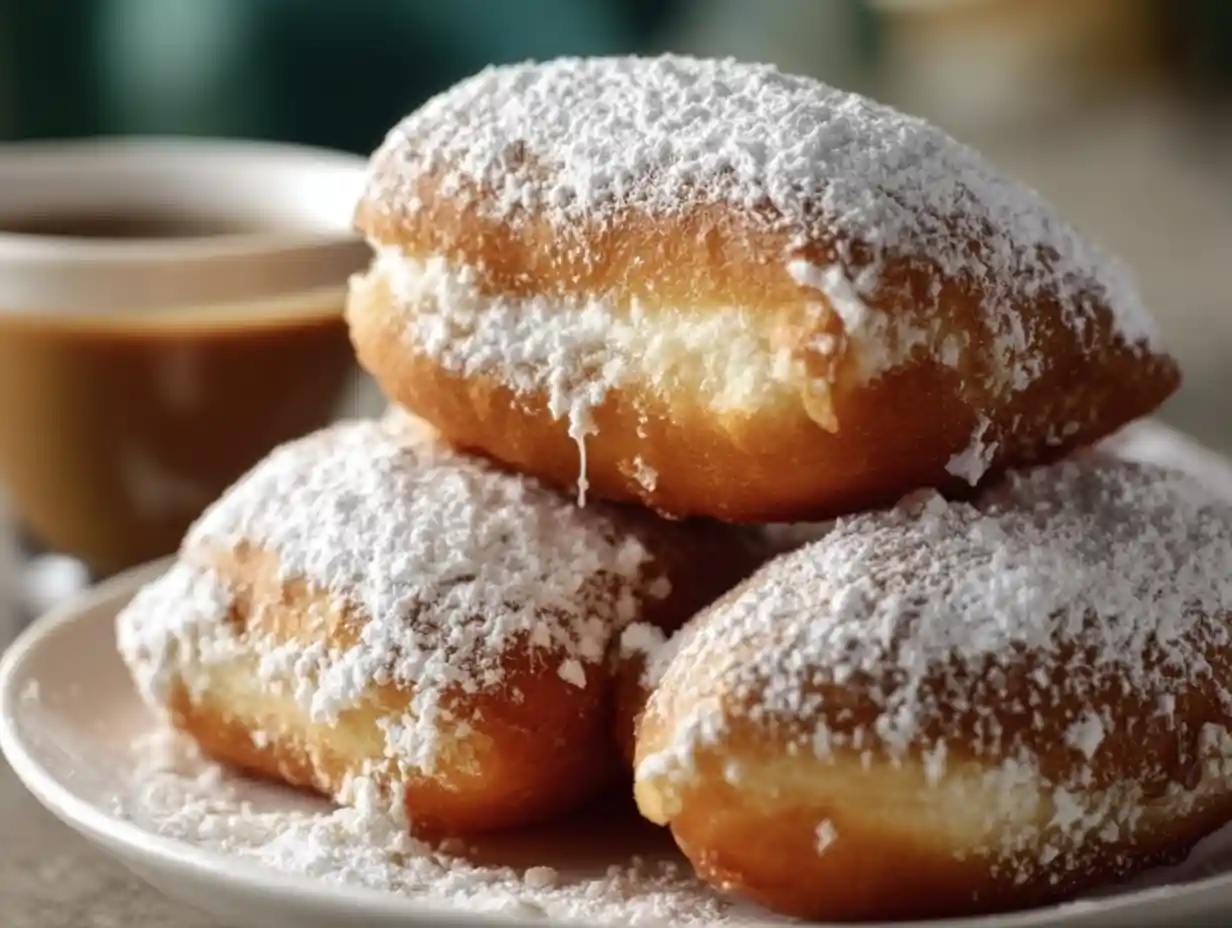
You know, there’s something truly magical about a warm, pillowy beignet, fresh from the oil and dusted with powdered sugar. My French beignets are distinct; they are wonderfully dense, cake-like, and incredibly soft, a delightful contrast to other beignet types you might encounter. They are a little cloud of vanilla-scented happiness, and I just know you’re going to adore them.

Jump To
Why You’ll Adore These Vanilla French Beignets
I have a feeling these Vanilla French Beignets will become a new favorite in your home for so many reasons:
- Rich Vanilla Flavor: I infuse these beignets with plenty of vanilla, ensuring every bite is fragrant and comforting. It’s a classic flavor that truly sings.
- Pillowy, Dense Texture: Unlike some beignets that are airy, mine are wonderfully substantial, offering a satisfying, cake-like softness that simply melts in your mouth.
- The Joy of Homemade: There’s nothing quite like the pride and warmth that comes from making a special treat from scratch. You’ll love the process as much as the result.
- Easier Than You Think: While they sound fancy, I promise you, with my step-by-step guidance, these beignets are very approachable for any home cook.
Unveiling the Charm of Vanilla French Beignets
When I talk about “Vanilla French Beignets,” I’m referring to a very specific kind of pastry that I’ve fallen head over heels for. These aren’t the square, often hollow beignets you might associate with New Orleans, though I love those too! My French beignets are typically round, often resembling boules de Berlin or German doughnuts.
What truly sets them apart is their incredible texture; I find them to be beautifully dense, almost like a rich, pillowy cake, rather than crispy or airy.
Vanilla plays a starring role in the flavor profile, weaving through the dough to create a wonderfully aromatic and comforting treat that feels both decadent and familiar. It’s a delightful journey for your tastebuds! Vanilla is often used as a flavor enhancer, complementing and mellowing the sharper notes, while also contributing a sweet and floral flavor.
For another vanilla treat, consider this Vanilla Magic Custard Cake: An Amazing Recipe.
Your Kitchen Toolkit: Essential Equipment for Vanilla French Beignets
To make these heavenly beignets, I rely on a few key pieces of equipment that make the process smooth and enjoyable. Here’s what I find essential:
- Stand Mixer: This is a true helper for making dough. I use it to combine ingredients thoroughly and knead the dough until it’s perfectly smooth without much effort on my part.
- Deep Heavy-Bottomed Pot: Essential for safe and even frying. A sturdy pot maintains oil temperature better, which is crucial for perfectly cooked beignets.
- Candy Thermometer: I absolutely recommend this for precise oil temperature control. It helps prevent greasy beignets or ones that are burnt on the outside and raw inside.
- 3-Inch Biscuit Cutter: This gives me uniform, beautifully round beignets, ensuring they cook evenly and look lovely when served.
- Parchment Paper: I use this to prevent the cut dough rounds from sticking to the baking sheet during their second rise and before frying.
Ingredients for Heavenly Vanilla French Beignets
Here are the ingredients I use to create these delightful beignets. I’ve carefully measured everything to ensure the best results for you.
- 2.25 tsp active dry yeast
- 3/4 cup milk, warmed to 105°F
- 1 whole egg
- 1 egg yolk
- 3/4 cup granulated sugar
- 2 tbsp unsalted butter, softened
- 1.5 tsp vanilla extract
- 1/2 tsp kosher salt
- 3 cups all-purpose flour, plus more for dusting
- 2 cups vegetable oil, for frying
- powdered sugar, for sprinkling on top
Mastering Your Vanilla French Beignets: Step-by-Step Instructions
I’m so excited to walk you through each step of making these incredible beignets. My goal is to make this process easy and fun for you!
Activating the Yeast for a Lively Dough
I always start by giving my yeast a little wake-up call.
- In a small bowl, add the dry yeast and the warm milk. Give it a light stir, then let the mixture rest for 10 minutes.
During this time, I look for a foamy layer to appear on top. This tells me the yeast is active and ready to work its magic, giving us beautifully light and airy (yet dense!) beignets. If it doesn’t foam, your milk might have been too hot or too cold, or the yeast might be expired, and I would recommend starting with a fresh batch.
Crafting Your Vanilla Beignet Dough
This is where the stand mixer really shines; it does all the hard work for me!
- In the bowl of a stand mixer fitted with the paddle attachment, beat the softened butter and sugar together until light and fluffy – about 2 minutes. I’m looking for a pale, creamy mixture that has a bit of volume.
- Add the yeast mixture, the egg and egg yolk, salt, and vanilla extract. Turn the mixer onto to low to combine. I let it mix until everything is just incorporated.
- While the mixer is running, slowly add the flour in. Mix until you get a smooth dough. I aim for a dough that pulls away from the sides of the bowl, feels soft and slightly tacky, but isn’t overly sticky. It should be elastic and cohesive.
The First Rise: Patience for Perfection
Rising is such an important part of developing flavor and texture in dough. I like to give it plenty of time.
- Grab the dough and shape it into a smooth round. Place the dough in a large, greased bowl and cover with a sheet of plastic wrap. Let the dough rest in a warm place for approximately 1 hour, until it’s slightly expanded in size.
I often put my bowl in a slightly warm oven (turned off, of course!) or a sunny spot on the counter. While the dough won’t double in size like some bread doughs, I look for a noticeable increase in volume and a softer, more relaxed feel.
Shaping Your Beignets for Frying
Now for the fun part: shaping! I love seeing the beignets take form.
- Turn the dough out onto a lightly floured surface and roll the dough out into a 1/4″ thick oval or rectangle. I use just enough flour to prevent sticking, but not so much that the dough becomes dry.
- Use a 3″ biscuit cutter to cut out rounds from the dough. Place these rounds on a parchment paper-covered baking sheet. Cover them loosely with a sheet of plastic wrap and let the rounds rest for 30 minutes.
This second, shorter rise is crucial. It gives the beignets a final chance to proof slightly, resulting in that wonderful pillowy texture when fried.
Frying to Golden-Brown Bliss
Frying can feel a bit intimidating, but with the right temperature, it’s a breeze.
- Heat the oil in a saucepan until its either 350°F, or a scrap of dough dropped in the oil immediately starts to bubble. I always use my candy thermometer for accuracy, but the dough scrap trick works well in a pinch; the scrap should sizzle and float to the top right away.
- Add the dough rounds in, 2 or 3 at a time max, and fry each side until it’s golden brown. I watch them carefully; it usually takes 1-2 minutes per side. I’m looking for a beautiful, even golden-brown color. Overcrowding the pot will drop the oil temperature, leading to greasy beignets, so I fry in small batches.
- Transfer the fried beignets to a paper towel-lined plate. This helps absorb any excess oil, keeping them deliciously light.
The Final Touch: Dusting and Serving
This is the crowning moment! The powdered sugar makes them look as good as they taste.
- Once they’re no longer hot but instead just warm, dust with powdered sugar and serve immediately. I find that dusting them when they’re warm, but not piping hot, allows the sugar to adhere beautifully without melting away completely. Freshly fried beignets are always the best! Also, be sure to check out this Remarkable Cinnamon Sugar Blondies: A Delicious Recipe.
Pro Tips for Vanilla French Beignet Perfection
I’ve made these beignets countless times, and I’ve picked up a few tricks along the way that I’m excited to share with you. These tips will help ensure your beignets are absolutely perfect every single time.
- Vanilla Varieties: I truly believe vanilla is worth investing in! While good quality vanilla extract works wonderfully, for an even deeper flavor, I sometimes use vanilla bean paste or even scrape the seeds from half a vanilla bean directly into the dough. The tiny specks of vanilla seed are a beautiful visual cue that these are truly special. Pure vanilla extract gets its flavor from the vanilla bean.
- Oil Temperature Management: Maintaining a consistent oil temperature is key to avoiding greasy or raw-centered beignets. I keep my candy thermometer clipped to the pot and adjust the heat as needed. If the oil gets too hot, I temporarily remove the pot from the burner for a minute. If it cools down too much after adding beignets, I give it a moment to recover before adding more. Frying in small batches really helps keep the temperature stable.
- Dough Consistency: Your dough should feel soft, smooth, and slightly tacky, but not sticky enough to cling to your fingers persistently. If I find my dough is too sticky after mixing, I’ll add a tablespoon of flour at a time until it reaches the right consistency. If it’s too dry, a tiny bit of milk can help. A well-kneaded dough will be elastic and bounce back when I gently poke it.
- Optimal Rising Environment: Dough loves warmth! Beyond a sunny spot or a turned-off oven, I sometimes turn on my oven to its lowest setting for 5 minutes, then turn it off and let the dough rise inside. Another trick is to place the covered bowl in a microwave (turned off!) with a cup of very hot water; the steam creates a lovely warm, moist environment.
For more treats & drinks recipes, check out our category.
Elevate Your Beignets: Flavor Variations & Traditional French Fillings
While my classic Vanilla French Beignets are perfect as is, I also love playing around with flavors and fillings. You can easily make them your own or dive into some traditional French additions!
Vanilla: Beyond the Extract
If you’re as much of a vanilla enthusiast as I am, you can take the vanilla flavor even further. I sometimes make my own vanilla sugar by burying a spent vanilla bean pod in a jar of granulated sugar for a few weeks; then I use that for dusting. For an intensely vanilla-flavored dough, I always recommend scraping the seeds from a whole vanilla bean directly into the wet ingredients. It adds an incredible depth and aroma that makes these truly gourmet.
Creative Flavor Twists
Here are some fun ways I like to experiment with the basic beignet recipe:
| Flavor Variation | How to Incorporate |
|---|---|
| Citrus Zest | Add lemon, orange, or lime zest to the dough. |
| Spiced | Incorporate cinnamon, nutmeg, or cardamom into the dry ingredients. |
| Glazed | Create a simple vanilla or lemon glaze instead of (or in addition to) powdered sugar. |
| Chocolate Dust | Mix cocoa powder with powdered sugar for dusting. |
Traditional French Fillings & How to Fill Them
In France, beignets are often filled, and it’s a delightful experience! I love classic fillings like a rich pastry cream, a dollop of luscious chocolate hazelnut spread (like Nutella), or various bright fruit jams such as raspberry or apricot.
To fill your beignets after they’ve cooled to just warm, I use a piping bag fitted with a long, thin nozzle (a bismarck tip works perfectly!). First, I gently poke a hole into the side of the beignet. Then, I insert the nozzle and slowly pipe the filling until I feel the beignet become slightly heavier and plump. I find it’s best to do this just before serving for the freshest taste and best texture.
Perfect Pairings: Serving Your Vanilla French Beignets
I believe that a delicious treat is even better when served with the right accompaniment. These Vanilla French Beignets are wonderfully versatile, and I have a few favorite pairings I love to share.
For drinks, I think a strong, hot cup of coffee, a creamy latte, or a rich hot chocolate makes a cozy companion. A fragrant herbal tea or a delicate Earl Grey also pairs beautifully, especially if you’re enjoying them for an afternoon treat. For a more festive occasion, a crisp sparkling wine or even a Prosecco can be a surprising and delightful match, cutting through the sweetness of the beignets.
I also love serving them alongside fresh fruit, like a bowl of mixed berries or sliced peaches, to add a bright, fresh contrast. Sometimes, I’ll even offer a small scoop of vanilla bean ice cream on the side, creating a warm-and-cold dessert experience that’s utterly decadent.
Make-Ahead, Storage, and Reheating for Freshness
I know that sometimes life gets busy, and you might want to prepare these in advance or enjoy leftovers. Here’s how I manage my beignets to keep them as fresh as possible.
You can definitely make the dough ahead of time! After its first rise, I gently punch it down, place it back in the greased bowl, cover it tightly with plastic wrap, and refrigerate it for up to 24 hours. Just take it out about an hour before you plan to roll and cut to let it come closer to room temperature.
For longer storage, I sometimes freeze raw dough rounds. After cutting, I place them on a parchment-lined baking sheet and freeze until solid, then transfer them to an airtight freezer bag for up to 2 weeks. When I’m ready to fry, I let them thaw and rise on a parchment-lined sheet at room temperature for about an hour before frying as usual.
Fried beignets are truly best enjoyed warm and fresh. If you happen to have any leftovers, I store them in an airtight container at room temperature for up to 2 days. To bring back some of their freshness, I have a few reheating methods I prefer:
- Oven: My top choice for reheating! I preheat my oven to 300°F (150°C) and warm the beignets for about 5-7 minutes. This gently re-crisps the exterior and warms them through without drying them out.
- Air Fryer: A quick option! I place them in a single layer in the air fryer basket at 300°F (150°C) for 3-4 minutes. They get wonderfully crisp this way.
- Microwave: While quick, this is my least preferred method as it can make them a bit chewy. If I’m really in a rush, I’ll microwave them for 10-15 seconds, just until warm. I dust with fresh powdered sugar after reheating, no matter the method!
Troubleshooting Common Beignet Blunders
Even the most experienced home cooks run into little challenges sometimes, and that’s perfectly okay! I’ve put together this quick guide to help you troubleshoot any common beignet blunders you might encounter.
| Problem | Cause | Solution |
|---|---|---|
| Greasy Beignets | Oil not hot enough; too many beignets in the pot. | Ensure oil is at 350°F; fry in small batches. |
| Flat Beignets | Yeast inactive; dough under-proofed; dough over-worked. | Check yeast activity; allow proper rise time; don’t over-knead. |
| Burnt Outside, Raw Inside | Oil too hot. | Lower oil temperature; fry for longer at a lower temp. |
| Beignets Don’t Puff | Yeast issue; oil temperature; dough not rolled thick enough. | Check yeast; verify oil temp; ensure dough is 1/4″ thick before cutting. |
FAQs About Vanilla French Beignets
I often get wonderful questions from fellow home cooks, and I love answering them! Here are some common queries about these delightful Vanilla French Beignets.
What’s the difference between a French beignet and a New Orleans beignet?
I find the main difference is in their texture and shape. French beignets, like the ones I’ve shared, are typically round, dense, and cake-like, often filled. New Orleans beignets are usually square, often crispier on the outside, and can be more hollow inside, traditionally served simply with a generous dusting of powdered sugar.
Can I use instant yeast instead of active dry?
Yes, I’ve had success with instant yeast! You can generally use the same amount. The main difference is that with instant yeast, you don’t have to proof it in warm milk first; you can just add it directly with the dry ingredients. However, I still like to proof it to ensure it’s active and lively.
Why didn’t my beignets puff up?
There are a few reasons I’ve seen this happen. The most common culprits are inactive yeast (make sure it foams up in the milk!), oil that isn’t hot enough, or dough that hasn’t risen sufficiently during its proofing times. Also, if your dough was rolled too thin before cutting, they might not have enough “body” to puff.
Can I make the dough ahead of time?
Absolutely! As I mentioned earlier, I often refrigerate the dough for up to 24 hours after its first rise. Just cover it well and let it come closer to room temperature before rolling and cutting.
What’s the best way to reheat beignets?
In my experience, the oven or an air fryer works best to bring them back to life. A quick few minutes at 300°F (150°C) will warm them through and restore a lovely texture. I always give them a fresh dusting of powdered sugar afterward!
Can I use a deep fryer instead of a saucepan?
Yes, you certainly can! A deep fryer is excellent for maintaining a consistent oil temperature, which is a huge bonus. Just be sure to still fry in small batches to avoid overcrowding.
Can I make these gluten-free?
I haven’t personally tested this recipe with gluten-free flour, so I can’t guarantee the results. Gluten-free baking can be tricky with yeast doughs, as gluten is what gives the dough its structure. If you experiment, I would suggest a good quality 1:1 gluten-free baking flour blend that contains xanthan gum.
Conclusion
Oh, what a delight it is to share this recipe with you! There’s something truly heartwarming about creating these Vanilla French Beignets from scratch, filling your kitchen with their sweet, comforting aroma. Their pillowy, dense texture and rich vanilla flavor make them such a unique and satisfying treat. I truly believe that every homemade bite carries a little extra love.
I hope you feel inspired to try these in your own kitchen! If you do, I would absolutely love to hear from you. Please leave a comment below with your questions, your baking results, or even just to say hello. You can also share your beautiful creations on social media. And if there’s a cozy, comforting recipe you’d love to see me tackle next, please let me know!
Happy baking, sweet friends!
Love creating cozy, elegant treats like these? Follow us on Pinterest for more French-inspired desserts and sweet indulgences straight from the heart of the kitchen!
Vanilla French Beignets Recipe For Home Bakers
Ingredients
Equipment
Method
- In a small bowl, add the dry yeast and the warm milk. Give it a light stir, then let the mixture rest for 10 minutes.
- In the bowl of a stand mixer fitted with the paddle attachment, beat the softened butter and sugar together until light and fluffy – about 2 minutes.
- Add the yeast mixture, the egg and egg yolk, salt, and vanilla extract. Turn the mixer onto to low to combine.
- While the mixer is running, slowly add the flour in. Mix until you get a smooth dough. Grab the dough and shape it into a smooth round. Place the dough in a large, greased bowl and cover with a sheet of plastic wrap. Let the dough rest in a warm place for approximately 1 hour, until it’s slightly expanded in size.
- Turn the dough out onto a lightly floured surface and roll the dough out into a 1/4″ thick oval or rectangle. Use a 3″ biscuit cutter to cut out rounds from the dough. Place these rounds on a parchment paper-covered baking sheet. Cover them loosely with a sheet of plastic wrap and let the rounds rest for 30 minutes.
- Heat the oil in a saucepan until its either 350°F, or a scrap of dough dropped in the oil immediately starts to bubble. Add the dough rounds in, 2 or 3 at a time max, and fry each side until it’s golden brown. Transfer the fried beignets to a paper towel-lined plate.
- Once they’re no longer hot but instead just warm, dust with powdered sugar and serve immediately.
Nutrition
Notes
Tried this recipe?
Let us know how it was!Printable Recipe Card
Want just the essential recipe details without scrolling through the article? Get our printable recipe card with just the ingredients and instructions.