Hello, beautiful people! I’m Emily, and I am absolutely thrilled you’ve landed here at Delish Map. Today, I am taking you on an exciting journey into the world of homemade Salmon Sashimi. I know what you might be thinking, “Sashimi at home? Isn’t that super difficult?” But I am here to tell you it’s not only achievable, but it’s also incredibly rewarding.
With the right guidance and a little bit of confidence, you can create elegant, restaurant-quality salmon sashimi right in your own kitchen. Let’s dive in!
Table of Contents
Why You’ll Love This Homemade Salmon Sashimi

I truly believe that making salmon sashimi at home is one of the most satisfying culinary experiences. It offers so many incredible benefits that you simply can’t get when dining out. Here are a few reasons why you are going to fall in love with this recipe:
- Unbeatable Freshness and Flavor: When you make sashimi at home, you have complete control over the quality and freshness of your ingredients. This means you get to enjoy the most vibrant, pure flavors of the salmon, often surpassing what you might find at many restaurants.
- Cost-Effective Elegance: Dining out for sashimi can be quite expensive. Preparing it yourself allows you to enjoy this luxurious main dish far more often, without breaking the bank, making it a sustainable indulgence.
- Ultimate Control Over Quality and Safety: I will guide you through selecting the best “sushi-grade” salmon and the essential steps for safe preparation. You’ll gain peace of mind knowing exactly where your food comes from and how it has been handled.
- Impressive Presentation: Trust me, presenting a platter of beautifully sliced, homemade salmon sashimi will utterly impress your guests. It’s a show-stopping dish that looks complex but is surprisingly simple to master.
Is It Safe to Make Salmon Sashimi at Home? Your Guide to Sushi-Grade Salmon
I know that food safety is always a top concern, especially when it comes to raw fish. This is why I want to empower you with all the knowledge you need to feel confident and safe when preparing homemade salmon sashimi.
What “Sushi-Grade” Really Means
When you hear the term “sushi-grade” salmon, it’s actually more of a marketing term than an official FDA designation. What it truly implies is that the fish has been handled with the utmost care from the moment it was caught or harvested, ensuring its freshness and suitability for raw consumption. It usually means the fish was immediately bled, gutted, and flash-frozen on the boat or shortly after, to specific temperatures that kill parasites.
Asking Your Fishmonger: Key Questions
Building a good relationship with a knowledgeable fishmonger is incredibly valuable. When I am looking for salmon for sashimi, I always ask specific questions to ensure I am getting the best quality.
Here are the questions I recommend asking:
- “Is this salmon safe to eat raw?”
- “Has this salmon been previously frozen to FDA guidelines for parasite destruction?”
- “When was this fish caught or harvested?”
- “How has it been handled since then?”
You can also look for certifications like ASC (Aquaculture Stewardship Council) or check the Monterey Bay Aquarium Seafood Watch program for sustainable choices. These can give you an extra layer of confidence in your selection.
Farmed vs. Wild Salmon for Sashimi
The choice between farmed and wild salmon for sashimi is a topic I get asked about often! Both have their pros and cons.
Farmed Salmon:
- Pros: Often has a higher fat content, which can result in a buttery texture perfect for sashimi. It is usually raised in controlled environments, making it easier to manage for parasite elimination through flash-freezing.
- Cons: Some concerns exist regarding environmental impact and feed quality.
Wild Salmon:
- Pros: Boasts a distinct, richer flavor and leaner texture. It is often celebrated for its natural diet and sustainable fishing practices.
- Cons: Wild salmon is more likely to contain parasites. Therefore, it absolutely must be frozen according to FDA guidelines before being eaten raw.
For sashimi, I often lean towards high-quality, sustainably farmed salmon that I know has been properly handled and frozen, as it generally offers a consistently buttery texture. If I choose wild, I ensure it meets the strict freezing requirements.
FDA Guidelines for Freezing Salmon
The FDA guidelines for freezing salmon are absolutely crucial for eliminating parasites, which can be present in both wild and, less commonly, farmed fish. These guidelines specify that fish intended for raw consumption must be frozen to specific temperatures for a certain duration.
Generally, this means:
- Freezing at -4°F (-20°C) or below for at least 7 days.
- Or, freezing at -31°F (-35°C) or below until solid, and then storing at -31°F (-35°C) or below for 15 hours.
It’s important to understand that standard home freezers typically don’t reach these extremely low temperatures consistently enough to guarantee parasite elimination. This is why I always recommend sourcing “sushi-grade” salmon from a reputable fishmonger who can confirm their fish has been commercially frozen to these standards.
Essential Ingredients for Perfect Salmon Sashimi
Crafting delicious salmon sashimi is all about starting with the very best ingredients. I find that focusing on quality here truly makes all the difference.
The Star: Sushi-Grade Salmon
As I mentioned, the foundation of exceptional sashimi is properly sourced, “sushi-grade” salmon. This isn’t just about freshness, it’s about the entire journey of the fish, from catch to your kitchen, ensuring it’s safe and perfect for raw consumption. I always prioritize finding a reputable supplier.
Dipping Sauces & Accompaniments
While the salmon is the star, the supporting cast of dipping sauces and accompaniments truly elevate the experience. I love how these elements add layers of flavor and texture. Later on, I will share some of my favorite simple combinations like classic soy sauce and wasabi, and a bright, zesty homemade ponzu. You can also explore traditional garnishes like thinly sliced pickled ginger, fresh lemon wedges, microgreens, or shiso leaf, and even a tiny sprinkle of Espelette pepper for a touch of warmth.
How to Prepare Your Salmon Fillet for Sashimi
Once you have your beautiful piece of salmon, proper preparation is key to achieving that perfect sashimi texture. I always take my time with these steps.
Cleaning & Inspecting Your Fillet
Before I even think about slicing, I give my salmon fillet a thorough inspection. First, I check for any pin bones. You can usually feel them by running your fingers along the length of the fillet. If I find any, I use a pair of clean needle-nose pliers or special fish tweezers to gently pull them out, always pulling in the direction of the grain. I also trim away any dark brown or grey flesh, which can sometimes have a stronger, less desirable flavor for sashimi. I aim for that beautiful, consistent orange-pink color.
Mastering Moisture Removal
Removing excess moisture from your salmon is a step I never skip, as it significantly improves the texture and helps concentrate the flavor. After rinsing, I always pat the salmon thoroughly dry with a paper towel. For an even better result, I like to apply a light salting, as outlined in my recipe, and let it sit. You’ll actually see water starting to be drawn out, which I then rinse off. This process helps firm up the flesh and ensures a cleaner, more pristine taste. For advanced home cooks, pichit sheets are another fantastic option for drawing out moisture over a longer period, resulting in a super firm texture.
Defrosting (If Applicable)
If you’re using salmon that was previously frozen (which is often the case for sushi-grade fish), safe defrosting is crucial. I always plan ahead and transfer my frozen salmon from the freezer to the refrigerator the night before I plan to use it. This allows it to thaw slowly and evenly, which helps maintain its texture and prevents any quality degradation. Never defrost at room temperature, as this can be a breeding ground for bacteria.
The Art of Slicing Salmon Sashimi
This is where the magic really happens, and I promise you, with a little practice, you can achieve beautiful, precise slices. The goal is clean cuts that preserve the delicate texture of the salmon.
Your Essential Tool: A Sharp Knife
I cannot overstate this enough: a very sharp knife is absolutely essential for cutting sashimi. A dull knife will tear the delicate flesh, resulting in jagged edges and a less pleasant texture. I prefer using a long, single-beveled sushi knife, like a yanagiba, but a very sharp chef’s knife can work too. Maintaining its sharpness with regular honing and occasional sharpening is key. A clean cut allows the salmon’s natural oils and flavors to shine.
Mastering the Hira-Zukuri Cut (Standard Rectangular)
The hira-zukuri is the most common and classic sashimi cut. This is how I achieve those beautiful, rectangular slices:
- Position Your Fillet: Place your salmon fillet skin-side down (if present, though usually removed for sashimi) or the flatter side down on a clean cutting board. Position it so the narrow end is facing you.
- Angle Your Knife: Hold your sharp knife at about a 45-degree angle to the cutting board and slightly angled towards you, creating a larger surface area for a clean cut.
- The Single Drawing Motion: Start your cut by placing the heel of your knife at the far edge of the salmon. In one fluid, single drawing motion, pull the knife towards you, slicing through the salmon completely. Avoid a back-and-forth sawing motion, as this will damage the cells and create a messy edge.
- Desired Thickness: Aim for slices that are about 1/4 inch thick. This thickness provides the best mouthfeel, allowing you to appreciate both the texture and flavor.
Other Sashimi Cuts for Inspiration
While hira-zukuri is my go-to, exploring other cuts can add variety to your presentation and culinary applications:
- ***Usu-Zukuri* (Paper-Thin):** This technique involves slicing the fish incredibly thin, almost transparent, often for delicate white fish, but also beautiful for salmon. It’s perfect for serving with a light citrus dressing or as part of a carpaccio.
- ***Kakugiri* (Dice/Cubes for Tartare):** For this cut, I simply dice the salmon into small, uniform cubes. This is ideal for making salmon tartare, poké bowls, or adding to salads, offering a different textural experience.
Delish Map’s Homemade Salmon Sashimi Recipe
Here it is, my tried-and-true method for making absolutely divine homemade salmon sashimi. This is a recipe I return to again and again.
Ingredients
- 1 pound salmon
- 1 teaspoon salt
Instructions
- Get fresh salmon from your local market. I am using 1 pound salmon fillet.
- Pat the salmon dry with a paper towel. Add 1 teaspoon salt (per pound) and let it sit for 20 minutes. You will see that water will start coming out.
- Rinse salmon with running water.
- Pay salmon dry with a paper towel, and store in a freezer bag.
- Freeze salmon for at least 7 days at 4°F (-20°C) to a month to kill parasites.
- When you’re ready to eat the salmon, defrost in the refrigerator the night before.
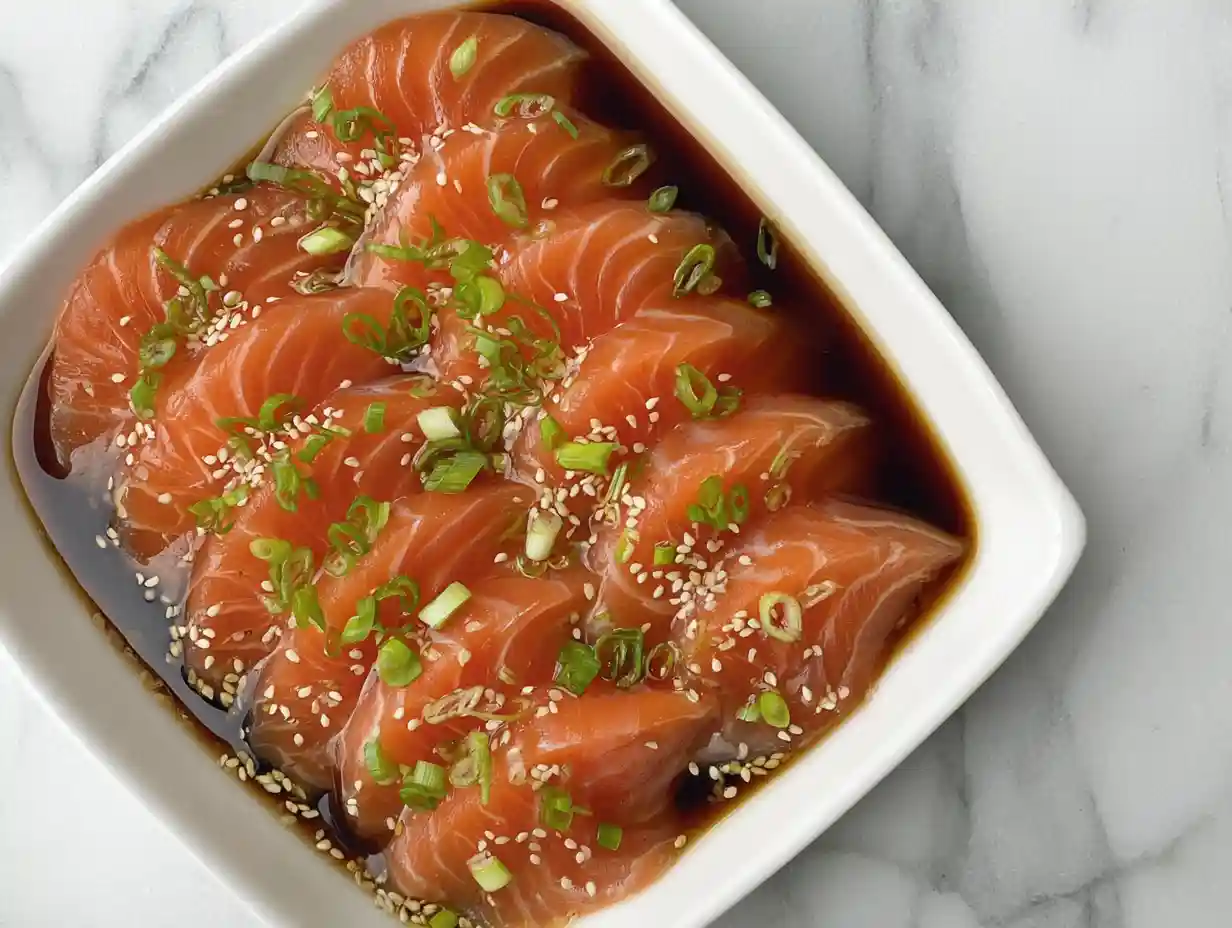
- Take salmon out of the refrigerator before eating and pat dry with a paper towel. Slice and serve. I like to eat with sushi rice and dip with wasabi & soy sauce. If you have salmon skin left, don’t throw it away. Fry in some oil for 5-7 minutes until crispy. It tastes like chips!
- Optional: I served the salmon sashimi with yuzu aioli for a slight citrus note. You can also serve the sashimi with lemon, cucumbers, and avocado.
Homemade Dipping Sauces & Traditional Pairings
Elevating your sashimi experience often comes down to the perfect accompaniments. I love experimenting with different flavors that complement the rich salmon.
Classic Wasabi & Soy Sauce
This is my absolute go-to. I simply put a dollop of wasabi next to a small dish of good quality soy sauce. I like to mix a tiny bit of wasabi directly into my soy sauce with the tip of my chopstick, creating a slightly spicy, savory dip. Remember, a little goes a long way with wasabi!
Bright & Zesty Yuzu Ponzu (Homemade)
Homemade ponzu is a game-changer! Its bright, zesty flavor is fantastic with salmon.
My Simple Yuzu Ponzu Recipe:
- 1/4 cup soy sauce
- 2 tablespoons yuzu juice (fresh or bottled)
- 1 tablespoon mirin
- 1 teaspoon rice vinegar
Instructions: Whisk all ingredients together in a small bowl until well combined. Taste and adjust to your preference.
Substitutions for Yuzu Juice: If yuzu is difficult to find, I often substitute it with a mix of fresh lemon and lime juice. For every 2 tablespoons of yuzu, I use 1 tablespoon lemon juice and 1 tablespoon lime juice.
The Purpose of Pickled Ginger, Daikon, and Shiso
These traditional accompaniments aren’t just for show; they each play a crucial role in enhancing your sashimi experience:
- Pickled Ginger (Gari): I love pickled ginger as a palate cleanser between different types of fish, or even between pieces of the same fish. Its sweet and tangy flavor resets your taste buds.
- Daikon Radish: Thinly sliced or grated daikon radish provides a refreshing crunch and a subtle peppery bite. It’s fantastic for adding textural contrast. To prepare daikon for garnish, I simply peel it and slice it into very thin rounds or julienne it into matchsticks.
- Shiso Leaf: This aromatic herb offers a unique, complex flavor, often described as a mix of mint, basil, and cumin. I love to wrap a piece of salmon sashimi in a shiso leaf for an extra layer of freshness and aroma.
Serving and Presentation Tips for Salmon Sashimi
You’ve put in the effort to create amazing sashimi, now let’s make it look as incredible as it tastes! Presentation is something I truly enjoy.
Plating Your Perfect Sashimi
Plating salmon sashimi beautifully is easier than you think. I like to arrange the slices on a chilled platter or plate, fanning them out slightly or creating a gentle curve. Garnishes like finely shredded daikon radish, a sprig of shiso, a few vibrant microgreens, or thin lemon slices add a pop of color and freshness. A small bowl of soy sauce and a dollop of wasabi on the side complete the restaurant-worthy look.
Optimal Serving Temperature
I always serve my salmon sashimi slightly chilled, not ice-cold. If it’s too cold, the flavors can be muted, and the texture can become a bit tough. I usually take it out of the refrigerator about 10-15 minutes before serving, letting it come just slightly closer to room temperature. This allows the delicate oils and flavors of the salmon to truly shine.
Beverage Pairings
Pairing the right beverage with sashimi can truly elevate the meal. I often enjoy:
- Sake: A crisp, dry sake is a classic pairing that complements the delicate flavors of the salmon beautifully.
- White Wine: A light, unoaked Sauvignon Blanc or a dry Riesling works wonderfully with its bright acidity.
- Green Tea: For a non-alcoholic option, a good quality Japanese green tea, like sencha, is refreshing and helps cleanse the palate.
- Sparkling Water: With a squeeze of lemon or lime, sparkling water is another excellent non-alcoholic choice that refreshes between bites.
Common Mistakes to Avoid When Making Salmon Sashimi
I believe that learning from common pitfalls is just as important as knowing the right steps. Here are a few mistakes I want you to avoid when making your homemade salmon sashimi:
- Using the Wrong Type of Salmon: This is probably the biggest mistake. Never use regular grocery store salmon for sashimi unless it’s explicitly labeled “sushi-grade” and confirmed to be properly frozen. Food safety comes first!
- Dull Knives: As I emphasized, a dull knife will shred the delicate salmon, ruining its texture and presentation. Always use a very sharp blade.
- Improper Freezing/Defrosting: Home freezers usually aren’t cold enough to kill parasites, so rely on commercially frozen sushi-grade fish. And always defrost slowly in the refrigerator, never at room temperature.
- Incorrect Cutting Technique: Sawing back and forth or pressing down too hard will damage the fish. Remember that single, fluid drawing motion.
- “Fishy” Tasting Salmon: If your salmon tastes strongly “fishy,” it likely isn’t fresh enough for sashimi. Fresh, high-quality salmon should have a mild, clean aroma, not a strong fishy smell. Trust your nose and your instincts; when in doubt, cook it!
Health Benefits of Salmon Sashimi
Beyond being incredibly delicious, I love that salmon sashimi is also packed with wonderful health benefits. It’s truly a feel-good food!
- Rich in Omega-3 Fatty Acids: Salmon is renowned for its high content of EPA and DHA, essential omega-3 fatty acids. These are fantastic for heart health, reducing inflammation, and supporting brain function.
- Excellent Source of Protein: It provides a significant amount of high-quality protein, which is vital for muscle repair, growth, and overall body function, keeping me feeling full and energized.
- Vitamins and Minerals: Salmon is also a good source of several important vitamins and minerals, including Vitamin D, Vitamin B12, selenium, and potassium, all contributing to overall well-being.
FAQs About Salmon Sashimi
I get a lot of great questions about making and enjoying sashimi at home. Here are some of the most common ones I hear:
Calories in salmon sashimi?
A typical 3-ounce (around 85g) serving of salmon sashimi usually contains about 120-170 calories, depending on the fat content of the specific salmon.
Is salmon sashimi healthy for weight loss?
Yes, salmon sashimi can be an excellent addition to a weight loss diet. It’s high in protein, which helps with satiety, and rich in healthy fats, making it a very nutritious and satisfying option.
Can you eat Costco salmon raw? (or similar generic grocery store salmon)
I strongly advise against eating generic grocery store salmon, including most Costco salmon, raw unless it is explicitly labeled as “sushi-grade” and you can confirm it has been properly frozen to FDA standards for parasite destruction. When in doubt, always cook it.
Can I freeze salmon at home for sashimi?
While you can freeze salmon at home, most standard home freezers do not reach the extremely low temperatures (-4°F or -20°C for 7 days, or -31°F or -35°C for 15 hours) required by the FDA to reliably kill parasites. For sashimi, I always recommend buying salmon that has been commercially frozen to these specific guidelines.
I truly hope I’ve inspired you to try this elegant and surprisingly simple dish in your own kitchen. There’s nothing quite like the pride and joy of preparing something so exquisite with your own hands.
I am so eager to hear about your sashimi adventures! Please, leave a comment below and let me know if you have any questions, share your experience making this recipe, or tell me what other sashimi or sushi recipes you’d love to see on Delish Map. I can’t wait to connect with you!
Love stunning sashimi at home? Follow us on Pinterest for more sushi & sashimi ideas!
Ultimate Homemade Salmon Sashimi Recipe
Ingredients
Equipment
Method
- Get fresh salmon from your local market. I am using 1 pound salmon fillet.
- Pat the salmon dry with a paper towel. Add 1 teaspoon salt (per pound) and let it sit for 20 minutes. You will see that water will start coming out.
- Rinse salmon with running water.
- Pat salmon dry with a paper towel, and store in a freezer bag.
- Freeze salmon for at least 7 days at 4°F (-20°C) to a month to kill parasites.
- When you’re ready to eat the salmon, defrost in the refrigerator the night before.
- Take salmon out of the refrigerator before eating and pat dry with a paper towel. Slice and serve. I like to eat with sushi rice and dip with wasabi & soy sauce.
- Optional: I served the salmon sashimi with yuzu aioli for a slight citrus note. You can also serve the sashimi with lemon, cucumbers, and avocado.
- Whisk all ingredients together in a small bowl until well combined. Taste and adjust to your preference.
Nutrition
Notes
Tried this recipe?
Let us know how it was!Printable Recipe Card
Want just the essential recipe details without scrolling through the article? Get our printable recipe card with just the ingredients and instructions.