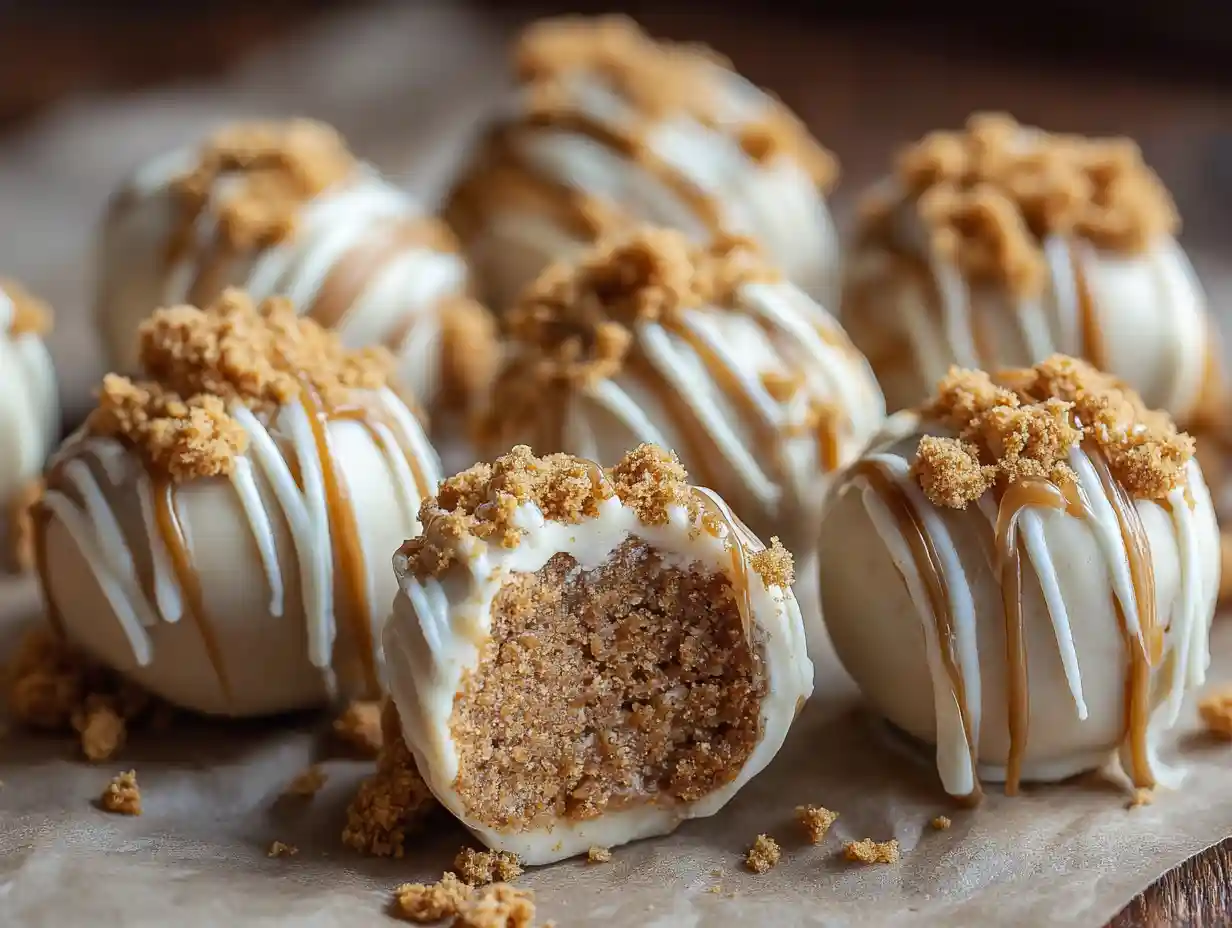
Hi there, food lovers! I’m absolutely thrilled to share a recipe with you today that’s quickly become a new obsession in my kitchen. If you’re anything like me, you love a good treat, especially one that feels indulgent but also gives you a little boost. That’s exactly what my latest creation, Biscoff Cheesecake Protein Balls, delivers.
This no-bake wonder is perfect for when you need a quick, high-protein snack or a delightful mini-dessert without turning on the oven. I just know you’re going to adore these for their convenience and unbelievably delicious flavor!
Table of Contents

Biscoff Cheesecake Protein Balls
Ingredients
Equipment
Method
- First, I mix all ingredients together in a bowl, except for the white chocolate. I really get in there and knead everything until a cohesive dough forms. If my dough feels too soft, I add a little more coconut flour, about a teaspoon at a time. If it’s too thick or dry, I’ll add a teaspoon or more of water or almond milk until it reaches the perfect consistency.
- Next, I roll the batter into tablespoon-sized balls. I try to roll them gently but firmly to ensure they hold their shape. Once all the balls are formed, I refrigerate them for about 15 minutes to help them set. This step is key for a firm texture.
- This step is optional, but it really elevates the experience! I melt the white chocolate chips in the microwave in 20-second bursts, stirring well in between each burst until it’s completely smooth and glossy. Then, I dip each protein ball into the melted chocolate, coating it evenly. I place the chocolate-dipped balls on a clean parchment paper-lined surface and immediately sprinkle the reserved cookie crumbs on top before the chocolate sets.
Nutrition
Notes
Tried this recipe?
Let us know how it was!Why You’ll Love These No-Bake Biscoff Cheesecake Protein Balls
I always get excited about recipes that simplify my life while still delivering on flavor, and these protein balls hit all the right notes. I think you’ll find them absolutely irresistible for a few key reasons.
First, the no-bake convenience is a total game-changer. Whether I’m having a super busy week or it’s just too hot to fire up the oven, I can whip these up in no time. They are perfect for preparing ahead and grabbing whenever a craving strikes.
Next, I love that they offer a true cheesecake indulgence with protein power. You get that wonderfully creamy, rich cheesecake flavor I adore, perfectly paired with a satisfying boost of protein. It’s the best of both worlds, truly.
Then there’s the irresistible Biscoff flavor. Oh my goodness, Biscoff! Those caramelized, spiced notes are simply magical, and they elevate these protein balls into something truly special. The distinct taste of Biscoff makes every bite feel like a gourmet treat.
Finally, I find these incredibly easy to customize. I appreciate being able to tweak recipes to fit various dietary needs or personal preferences, and these Biscoff Cheesecake Protein Balls are wonderfully versatile.
What Makes Them “Cheesecake” & “Protein Balls”?
I often get asked how I achieve that rich, decadent cheesecake flavor and texture in a no-bake treat, especially one packed with protein. It’s all thanks to a clever combination of ingredients. The star of the show for the “cheesecake” aspect is definitely the cream cheese. It provides that signature tangy richness and a beautifully smooth, dense texture that mimics a baked cheesecake filling, all without any baking!
For the “protein balls” part, the protein powder does double duty. It not only boosts the nutritional profile, making these a fantastic high-protein snack, but it also acts as a binder. The protein powder helps hold all the ingredients together, giving the balls their structure. While traditional cheesecake bites often involve a crust and baking, my no-bake approach simplifies the process, offering that beloved flavor and texture in a convenient, portable form.
Ingredients for Your Delicious Biscoff Cheesecake Protein Balls
Creating these scrumptious protein balls starts with a few simple ingredients I always keep on hand. Here is exactly what I use:
- 1/4 cup vanilla protein powder\*
- 2 Tbsp coconut flour
- 1 1/2 Tbsp granulated sugar of choice\\ (can use granulated monk fruit sweetener)
- 3 Tbsp cream cheese of choice\\\* ((about 1.5 oz))
- 2 biscoff cookies, crushed
- 1/4 cup white chocolate chips, melted
Allow me to explain the role of a few key ingredients:
\*The vanilla protein powder is crucial for both the nutritional boost and for helping bind the dough, providing structure. I find vanilla complements the Biscoff perfectly.
\\Your granulated sugar of choice adds just the right amount of sweetness. I sometimes opt for granulated monk fruit sweetener when I want to reduce the sugar content without sacrificing flavor.
\\\*The cream cheese of choice is what truly gives these balls their cheesecake-like richness and creamy texture. It’s essential for that authentic, indulgent taste.
Step-by-Step: How to Make Biscoff Cheesecake Protein Balls
Making these protein balls is wonderfully straightforward. Just follow these simple steps, and you’ll have a delicious batch ready in no time!
- First, I mix all ingredients together in a bowl, except for the white chocolate. I really get in there and knead everything until a cohesive dough forms. If my dough feels too soft, I add a little more coconut flour, about a teaspoon at a time. If it’s too thick or dry, I’ll add a teaspoon or more of water or almond milk until it reaches the perfect consistency.
- Next, I roll the batter into tablespoon-sized balls. I try to roll them gently but firmly to ensure they hold their shape. Once all the balls are formed, I refrigerate them for about 15 minutes to help them set. This step is key for a firm texture.
- This step is optional, but it really elevates the experience! I melt the white chocolate chips in the microwave in 20-second bursts, stirring well in between each burst until it’s completely smooth and glossy. Then, I dip each protein ball into the melted chocolate, coating it evenly. I place the chocolate-dipped balls on a clean parchment paper-lined surface and immediately sprinkle the reserved cookie crumbs on top before the chocolate sets.
Tips for Perfect Biscoff Cheesecake Protein Balls Every Time
I’ve learned a few tricks along the way to ensure my protein balls turn out perfectly. Here are some of my best tips for you:
- Consistency Control: The dough’s texture is key. If your dough feels too sticky, add more coconut flour sparingly, about a teaspoon at a time. If it’s too dry and crumbly, add a tiny bit of water or almond milk. You want a dough that’s pliable and easy to roll.
- Binding Issues: If you find your balls are falling apart as you roll them, don’t worry! I usually apply a bit more pressure when shaping them. A brief extra chill in the refrigerator can also help them firm up and bind better.
- Flavor Boost: To really make the flavors pop, I sometimes add a tiny pinch of salt to the dough. A splash of vanilla extract can also deepen the overall flavor profile.
- Even Rolling: For uniform-sized balls, I like to use a small cookie scoop or a measuring spoon to portion out the dough. This ensures they all look lovely and consistent.
Customization & Variations for Your Dietary Needs
I love how adaptable these Biscoff Cheesecake Protein Balls are! You can easily tailor them to fit various dietary needs or simply experiment with different flavors. Here’s a quick guide to some common variations:
| Variation Category | Ingredient/Option | Impact/Notes |
|---|---|---|
| Protein Powder | Whey, Casein, Plant-Based (e.g., pea, soy) | Affects texture slightly; some plant proteins absorb more liquid. |
| Sweetener | Maple syrup, honey, liquid stevia | Adjust liquid content if using liquid sweeteners. |
| Cream Cheese | Vegan cream cheese (e.g., almond, cashew based), low-fat cream cheese | Vegan options work well; low-fat may alter richness slightly. |
| Gluten-Free | Ensure Biscoff cookies are certified GF (or use a GF substitute like gluten-free graham crackers) | Crucial for true gluten-free. |
| Dairy-Free | Use plant-based protein, vegan cream cheese, dairy-free white chocolate | Ensures fully dairy-free. |
| Keto-Friendly | Use granulated monk fruit/erythritol sweetener, keto-friendly cookies, sugar-free white chocolate | Significantly reduces carb count. |
| Add-ins | Mini chocolate chips, chopped nuts, spices (cinnamon, nutmeg) | Adds extra flavor and texture. |
| Toppings | Melted Biscoff spread drizzle, crushed nuts, cocoa powder | Enhances presentation and flavor. |
Storage & Serving Suggestions
Once you’ve made a batch of these delightful Biscoff Cheesecake Protein Balls, I always recommend storing them properly to keep them fresh and delicious. I place them in an airtight container in the refrigerator, where they will stay good for about 3 to 5 days. They are perfect for meal prepping and grabbing throughout the week!
I love serving these in so many ways. They make an excellent post-workout snack to refuel your body. I also enjoy them as a satisfying treat with my morning coffee or a cozy cup of tea. For a fancier touch, I arrange them on a mini dessert platter when I have guests over; they always disappear quickly!
Nutritional Information
I find these Biscoff Cheesecake Protein Balls to be a fantastic way to enjoy a sweet treat while still getting a good dose of protein. While the exact nutritional values can vary quite a bit depending on the specific brands of protein powder, cream cheese, and sweetener you choose, I can offer some general estimates.
Each serving typically provides a good balance of calories, with a notable emphasis on protein, making them a very satisfying and energy-boosting snack. They are certainly much higher in protein compared to a traditional cookie or cheesecake bite! I encourage you to calculate the precise macros using your chosen ingredients if you’re tracking your intake closely.
FAQs about Biscoff Cheesecake Protein Balls
I always anticipate what questions might pop up in your mind, so I’ve answered some common ones about these delicious protein balls here!
Can I use a different type of protein powder?
Yes, absolutely! I’ve experimented with whey, casein, and various plant-based proteins. Just be aware that some plant-based proteins can absorb more liquid, so you might need to adjust the amount of water or almond milk slightly to get the perfect dough consistency.
How long do these protein balls last?
When stored in an airtight container in the refrigerator, these Biscoff Cheesecake Protein Balls typically last for about 3 to 5 days. They’re best enjoyed fresh, but they keep well for a few days.
Can I freeze Biscoff Cheesecake Protein Balls?
Yes, you can! I often freeze them. Just place the finished protein balls in a single layer on a parchment-lined tray until firm, then transfer them to a freezer-safe bag or container. They can last for up to 1-2 months. Thaw them in the refrigerator before enjoying.
What if my dough is too sticky/crumbly?
This is a common question! If the dough is too sticky, I add a tiny bit more coconut flour, about half a teaspoon at a time, until it’s workable. If it’s too crumbly, I add a small splash of water or almond milk, again, half a teaspoon at a time, until it comes together. The goal is a pliable, rollable dough.
Are these genuinely “no-bake cheesecake” or just “protein balls”?
I truly believe they are both! The cream cheese gives them that distinct, rich, and tangy “cheesecake” flavor and creamy texture without any baking. And thanks to the protein powder, they pack a significant protein punch, making them ideal as a “protein ball” snack. It’s the perfect fusion!
Conclusion
I hope you’re as excited as I am to try these incredible Biscoff Cheesecake Protein Balls! They are truly a testament to how easy and delicious healthy treats can be, proving that you don’t need a lot of fuss or even an oven to create something truly special. I absolutely love that they offer that indulgent cheesecake flavor I adore, combined with the convenience of a high-protein, no-bake snack.
Give this recipe a try, and you’ll quickly see why they’ve become a favorite in my home. I’d love to hear how your Biscoff Cheesecake Protein Balls turn out! Drop a comment below with your favorite customization, or tag me on social media so I can see your delicious creations! Happy cooking!
Printable Recipe Card
Want just the essential recipe details without scrolling through the article? Get our printable recipe card with just the ingredients and instructions.