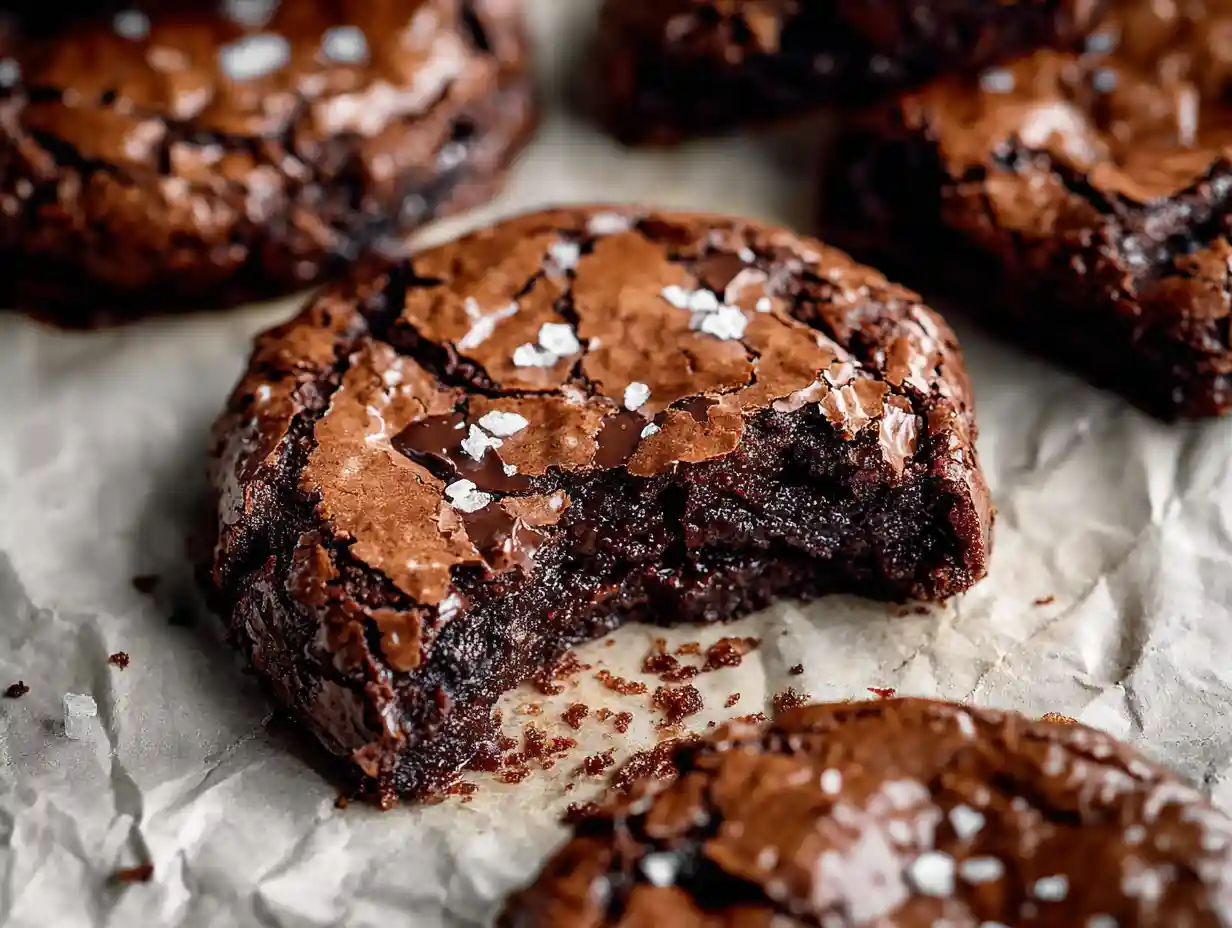
Oh, my friends, get ready for something truly special from my kitchen here at Delish Map! I’m bubbling with excitement to share this recipe for Fudgy Chewy Browkies (Brookies) with you. It’s the ultimate marriage of two of my absolute favorite desserts, and I know you’ll fall in love with them just as much as I have.
Imagine the rich, decadent chewiness of a brownie perfectly combined with the irresistible soft texture of a cookie. This recipe delivers exactly that, but in individual, perfectly portioned delights. I promise you, these Fudgy Chewy Browkies (Brookies) are simple to make and the outcome is nothing short of heavenly.
Jump To
What Exactly Are Fudgy Chewy Browkies (Brookies)?

At their heart, brookies are the dream hybrid of a brownie and a cookie. My recipe truly captures the best of both worlds, offering that deep, intense chocolate flavor of a brownie alongside the delightful chewiness of a cookie. It’s a textural masterpiece in every bite.
What makes these particularly special is that I’m showing you how to make individual Fudgy Chewy Browkies, not a traditional bar-style dessert. This means each piece has perfectly crispy, crackly edges and a wonderfully soft, fudgy center. You get that amazing contrast in every single morsel.
Why You’ll Love This Fudgy Chewy Brookies Recipe
I truly believe this recipe stands out from the rest, and I can’t wait for you to experience it. Here are just a few reasons why I know you’ll adore these Fudgy Chewy Brookies:
- Individual Perfection: No need to cut messy bars; these are perfectly portioned right from the baking tray, each with its own signature crackled top.
- Unrivaled Texture: My combination of ingredients and techniques ensures you get that ideal fudgy brownie core wrapped in a delightful chewy cookie shell. It’s truly the best of both worlds.
- Deep Chocolate Flavor: Using both dark chocolate and cocoa powder creates a rich, complex chocolate experience that isn’t overly sweet, letting the chocolate truly shine.
- Surprisingly Simple: Despite their gourmet appearance and incredible taste, these Fudgy Chewy Brookies are very straightforward to make, even for novice bakers.
The Science Behind Fudgy & Chewy Perfection
Baking, for me, is a beautiful blend of art and science, especially when it comes to textures. For these Fudgy Chewy Browkies, I’ve carefully balanced ingredients and techniques to achieve that perfect fudgy brownie and chewy cookie consistency. Every step plays a vital role in creating that irresistible texture I know you’ll love.
The Role of Chocolate: Choosing the Best for Your Brookies
The type of chocolate you choose significantly impacts the fudginess and overall flavor of your Fudgy Chewy Browkies. I always reach for high-quality dark chocolate, usually around 60-70% cocoa solids. This provides a deep, rich chocolate flavor that isn’t too bitter.
Dark chocolate contributes to that intensely fudgy texture once melted, helping create a dense, moist crumb. If you prefer a slightly sweeter brookie, you could use a combination of dark and semi-sweet chocolate, but I encourage you to try the dark for maximum depth. The chocolate chips also add little pockets of melty goodness throughout.
Sweeteners: Granulated vs. Demerara for Texture
In this recipe, I use a combination of two sugars, and it’s a game-changer for texture. The caster or granulated sugar dissolves easily and contributes to the tenderness and overall sweetness. It helps create that smooth, uniform texture you expect in a perfect baked good.
The Demerara or raw sugar, however, is key for that delightful chewiness and slight crisp. Its larger crystals don’t fully dissolve during baking, which creates a slight caramelization and a wonderfully chewy texture. This dual-sugar approach is my secret for achieving truly Fudgy Chewy Browkies.
The Magic of Eggs and Their Whip
Whipping the eggs with the sugars until they are very light, thick, and fluffy is one of the most crucial steps for these Fudgy Chewy Browkies. This process incorporates air into the mixture, creating a stable base that contributes to the final texture. It’s what gives them that lovely lift and keeps them from being too dense.
This aeration also helps create the signature crackly top, which I absolutely adore. It’s a sign that you’ve got a beautifully baked brookie, promising a fudgy interior. Don’t skip this whipping step; it makes all the difference.
Essential Tools for Baking Fudgy Chewy Brookies
Having the right tools makes all the difference in the kitchen, and these Fudgy Chewy Brookies are no exception. Here are the essentials I use to ensure a smooth baking process and perfect results:
- Electric Hand Whisk: This is indispensable for whipping the eggs and sugars to that light, fluffy consistency. It truly makes the task effortless and ensures proper aeration.
- Heatproof Bowls: You’ll need one for melting the chocolate and butter over simmering water, and another for whisking the eggs. Glass or stainless steel bowls work wonderfully here.
- Saucepan: For creating a double boiler setup, ensuring your chocolate melts gently without scorching.
- Spatula: Essential for gently folding in the dry ingredients and melted chocolate mixture, preserving the air you’ve whipped into the eggs.
- Baking Tray & Parchment Paper: These ensure your Fudgy Chewy Brookies bake evenly and don’t stick. Parchment paper also makes for easy cleanup, which is always a bonus.
Ingredients for Your Fudgy Chewy Brookies
Here’s exactly what you’ll need to create these irresistible Fudgy Chewy Brookies in your kitchen:
- 95 g plain (all-purpose) flour
- 2 tablespoons cocoa powder
- 1 teaspoon baking powder
- 1/4 teaspoon salt
- 225 g dark chocolate (chopped)
- 56 g butter (salted or unsalted)
- 2 eggs \*room temperature
- 100 g caster or granulated sugar
- 90 g Demerara or raw sugar \*see notes
- 1 teaspoon vanilla
- 85 g dark or milk chocolate chips
Quick Notes on Key Ingredients
I always say that good ingredients make for good food, and these Fudgy Chewy Brookies are no exception. For the dark chocolate, choose a brand you love to eat on its own, around 60-70% cacao, as it will be the star of the show. Using high-quality chocolate makes a significant difference in flavor and fudginess.
Ensure your eggs are at room temperature. This helps them whip up beautifully with the sugars, creating a more stable emulsion and a better texture in the final brookies. If you forget, a quick warm water bath for a few minutes will do the trick.
Finally, that blend of caster/granulated sugar and Demerara/raw sugar is intentional. The Demerara sugar, with its larger crystals, adds a lovely chewiness and depth of flavor. If you can’t find Demerara, light brown sugar can be a substitute, though the texture will be slightly different.
How to Make Fudgy Chewy Brookies: Step-by-Step Instructions
Get ready, because making these Fudgy Chewy Brookies is a delightful process that yields amazing results! Follow these steps carefully, and you’ll have perfect brookies every time.
Step 1: Preheat Oven & Prepare Tray
Set your oven to 160ºC (320ºF) with a fan or 170ºC (338ºF) for conventional heating. Prepare a baking tray by lining it with parchment paper.
Step 2: Melt Chocolate & Butter
In a heatproof bowl, combine the chopped dark chocolate and butter. Place this bowl over a pan of simmering water, making sure the bottom of the bowl does not touch the water. Stir occasionally until the chocolate and butter are fully melted and combined. Stir in the vanilla extract.
Step 3: Whip Eggs & Sugars
In a separate medium bowl, use an electric hand whisk on high speed to beat the caster sugar, demerara sugar, and eggs. Continue whisking until the mixture becomes very light, thick, and fluffy, about 5 minutes.
Step 4: Combine Dry Ingredients & Chocolate Chips
In another bowl, sift together the flour, cocoa powder, baking powder, and salt, then add the chocolate chips. This will help ensure there are no lumps and that the dry ingredients are evenly mixed.
Step 5: Integrate Melted Chocolate Mixture
Gradually fold the melted chocolate and butter mixture into the whipped eggs and sugars. Stir gently to maintain the airiness of the whipped eggs.
Step 6: Fold in Dry Ingredients
Carefully fold the dry ingredients into the wet mixture using a spatula, ensuring not to deflate the mixture. Mix only until just combined to keep the batter light.
Step 7: Bake Your Brookies
Scoop tablespoons of batter onto the prepared baking tray, spacing them well apart to allow for spreading. Bake in the preheated oven for 12-14 minutes, or until the brookies are set and crackly on top.
Step 8: Cool & Finish
Remove from the oven and sprinkle with sea salt immediately, if desired. Let them cool on the baking tray for about 10 minutes before transferring them to a cooling rack to cool completely.
Emily’s Expert Tips for the Best Fudgy Chewy Brookies
After countless batches in my kitchen, I’ve gathered some insights that I know will help you achieve the absolute best Fudgy Chewy Brookies. These little details can make a big difference in your baking journey.
Don’t Overmix!
This is one of the most critical rules in baking, especially for these brookies. Once you add the dry ingredients, mix only until just combined. Overmixing develops the gluten in the flour, which leads to tough, dry brookies, and we definitely don’t want that. A gentle hand is key here.
Room Temperature Eggs are Key
I mention this in the ingredients section, but it bears repeating because it’s so important. Room temperature eggs emulsify much better with the sugars and fats, creating a smoother, more uniform batter. This leads to a more consistent and tender texture in your final Fudgy Chewy Brookies. Plan ahead, or give them a quick warm bath!
High-Quality Chocolate Matters
Invest in good quality dark chocolate; you won’t regret it. The flavor depth and richness it brings to these brookies are incomparable. It directly contributes to that luscious, fudgy texture and delicious chocolatey taste that makes these so irresistible.
Perfect Doneness Cues
Knowing when your Fudgy Chewy Brookies are perfectly baked is crucial for that fudgy center and chewy edge. Look for edges that are set and a beautiful, crackly top. The center might still look a tiny bit soft, but it will continue to set as it cools. If you overbake, they’ll lose that desired fudginess and become drier.
Creative Variations & Delicious Add-ins
One of the joys of baking is personalizing a recipe to your taste, and these Fudgy Chewy Browkies are incredibly adaptable. While I adore the classic version, I encourage you to get creative and try some delicious add-ins.
You could swap out some of the dark chocolate chips for milk or white chocolate chips for different flavor profiles. For a nutty crunch, consider folding in chopped walnuts or pecans. A swirl of caramel sauce gently folded into the batter before baking would add a sweet, gooey surprise.
For an even deeper chocolate flavor, I sometimes add a teaspoon of instant espresso powder to the melted chocolate mixture. And if you’re feeling extra playful, mini marshmallows swirled in just before baking create a delightful s’mores-like twist.
I’ve also heard of a brownie base with brown butter for a nutty twist, which sounds incredible, and I might just experiment with that for my next batch of Fudgy Chewy Browkies!
From Individual Brookies to Bar-Style: Making a Pan of Fudgy Chewy Brookies (Variation)
While I love the individual portion sizes of these Fudgy Chewy Browkies, I know sometimes you might prefer a large pan for easy slicing. You can absolutely adapt this recipe to a bar format!
To do so, I recommend using an 8×8 or 9×9 inch baking pan, lined with parchment paper. You’ll simply pour the entire batter into the prepared pan. The baking time will increase; I’d suggest starting at around 25-30 minutes and checking for doneness.
The edges should be set, and a toothpick inserted into the center should come out with moist crumbs, not wet batter. Remember, it will continue to set as it cools, so err on the side of slightly underbaking for maximum fudginess in your slab of Fudgy Chewy Browkies.
Troubleshooting: Common Fudgy Chewy Brookie Hiccups & Solutions
Even experienced bakers run into little challenges, and I’m here to help you navigate any that might come up with your Fudgy Chewy Browkies. Don’t worry, there’s almost always a simple fix!
Why are my brookies dry?
A dry brookie is usually a sign of overbaking. Keep a close eye on your oven and start checking for doneness at the lower end of the baking time I provide. Too much flour can also contribute to dryness, so make sure you’re measuring your flour accurately, ideally by weight.
Why are they too flat/spread too much?
If your brookies spread too much, it could be a few things. Ensure your butter isn’t too warm when melted; it should be just combined with the chocolate. Also, check that your baking powder isn’t expired, as old leavening agents won’t work effectively. Oven temperature can also play a role; a slightly cooler oven might cause more spreading, so consider investing in an oven thermometer.
Why did they sink in the middle?
Brookies sinking in the middle can sometimes happen if they’re underbaked. Ensure they have that slightly crackly top and the edges are set before taking them out. Overmixing the batter, especially after adding the dry ingredients, can also lead to a weaker structure that might collapse. Remember, gently fold!
Storing & Enjoying Your Fudgy Chewy Brookies
Once you’ve baked a batch of these glorious Fudgy Chewy Brookies, you’ll want to enjoy them at their best! I store them in an airtight container at room temperature for up to 3-4 days. They actually get even fudgier and chewier the next day, as the flavors meld and the moisture distributes evenly.
If you want them to last longer, you can store them in the refrigerator for up to a week. Just be sure to bring them back to room temperature, or even warm them gently in the microwave for 10-15 seconds, to restore their wonderful fudgy texture. That little warmth brings out all the incredible chocolate flavor again.
Can You Make Fudgy Chewy Brookies Ahead?
Absolutely, you can make these Fudgy Chewy Brookies ahead of time, which is perfect for planning parties or just having a treat ready. You can prepare the entire batter, scoop it onto a parchment-lined tray, and freeze the individual scoops until solid. Once frozen, transfer them to an airtight freezer-safe bag.
When you’re ready to bake, you can bake them directly from frozen. Just add a few extra minutes to the baking time, perhaps 3-5 minutes, and keep an eye on them until they’re perfectly set and crackly. This way, you can have fresh-baked Fudgy Chewy Brookies whenever the craving strikes!
Serving Suggestions & Perfect Pairings
These Fudgy Chewy Brookies are already a star on their own, but a few simple additions can elevate the experience even further. I love to dust them with a little powdered sugar for an elegant touch, or for a contrasting flavor, a sprinkle of flaky sea salt immediately after they come out of the oven is divine.
For a truly decadent treat, serve your warm brookies with a scoop of vanilla bean ice cream. The warm brookie melting into cold ice cream is pure bliss. A drizzle of homemade caramel or a dollop of whipped cream also makes a fantastic addition. To drink, I find a tall glass of cold milk, a rich coffee, or even a dark stout beer to be perfect companions for these chocolatey delights.
Gifting Your Homemade Fudgy Chewy Brookies
Fudgy Chewy Brookies make the most wonderful homemade gift! They’re personal, delicious, and show you truly care. For packaging, I like to layer them in a decorative tin or a small box lined with parchment paper. You can separate layers with parchment to prevent sticking.
Tie the box with a beautiful ribbon, and perhaps add a small handwritten tag with a sweet message. They travel well and are usually a hit at any gathering, making them an ideal treat to share with friends, family, or neighbors. Who wouldn’t love a delicious homemade gift like that?
FAQs About Fudgy Chewy Brookies
I often get questions about adapting recipes, so I’ve put together some answers for common queries about these delightful Fudgy Chewy Brookies.
Can I substitute ingredients?
Yes, with caution. While I recommend sticking to the recipe for the best results, you can swap dark chocolate chips for milk or white chocolate chips. For sugars, while Demerara is key for chewiness, light brown sugar can be used for a slightly softer texture.
Can I make them gluten-free?
I haven’t tested a gluten-free version myself, but generally, you could try substituting the plain flour with a 1:1 gluten-free baking blend that contains xanthan gum. Textures may vary slightly, but it’s often a successful modification for baked goods like these Fudgy Chewy Brookies.
Are there dairy-free options?
You could substitute the butter with a good quality dairy-free butter alternative (like Miyoko’s Kitchen or Earth Balance sticks) and ensure your dark chocolate and chocolate chips are dairy-free. Again, I haven’t specifically tested this version, so results may differ slightly.
Can I freeze baked brookies?
Absolutely! Once completely cooled, place your baked Fudgy Chewy Brookies in a single layer on a baking sheet and freeze until solid. Then transfer them to a freezer-safe bag or airtight container for up to 2-3 months. Thaw at room temperature or warm gently in the microwave.
How do I get perfect crackly tops?
The key to crackly tops lies in thoroughly whipping the eggs and sugars until light and fluffy. This incorporates air, which helps create that delicate, beautiful crackle on top as the brookies bake and cool. Using room temperature eggs also aids in this process.
Conclusion
There you have it, my friends! These Fudgy Chewy Browkies (Brookies) are a true delight, combining everything I love about brownies and cookies into one perfect bite. I hope you feel inspired to get into your kitchen and whip up a batch. The aroma alone is enough to bring a smile to your face, and the taste is pure comfort.
I absolutely adore hearing from you! Please, if you make these Fudgy Chewy Brookies, leave a comment below to let me know how they turned out. Happy baking, everyone!
Love decadent chocolate treats? Follow us on Pinterest for more irresistible dessert recipes!
Fudgy Chewy Browkies (Brookies)
Ingredients
Equipment
Method
- Preheat Oven & Prepare Tray: Set your oven to 160ºC (320ºF) with a fan or 170ºC (338ºF) for conventional heating. Prepare a baking tray by lining it with parchment paper.
- Melt Chocolate & Butter: In a heatproof bowl, combine the chopped dark chocolate and butter. Place this bowl over a pan of simmering water, making sure the bottom of the bowl does not touch the water. Stir occasionally until the chocolate and butter are fully melted and combined. Stir in the vanilla extract.
- Whip Eggs & Sugars: In a separate medium bowl, use an electric hand whisk on high speed to beat the caster sugar, demerara sugar, and eggs. Continue whisking until the mixture becomes very light, thick, and fluffy, about 5 minutes.
- Combine Dry Ingredients & Chocolate Chips: In another bowl, sift together the flour, cocoa powder, baking powder, and salt, then add the chocolate chips. This will help ensure there are no lumps and that the dry ingredients are evenly mixed.
- Integrate Melted Chocolate Mixture: Gradually fold the melted chocolate and butter mixture into the whipped eggs and sugars. Stir gently to maintain the airiness of the whipped eggs.
- Fold in Dry Ingredients: Carefully fold the dry ingredients into the wet mixture using a spatula, ensuring not to deflate the mixture. Mix only until just combined to keep the batter light.
- Bake Your Brookies: Scoop tablespoons of batter onto the prepared baking tray, spacing them well apart to allow for spreading. Bake in the preheated oven for 12-14 minutes, or until the brookies are set and crackly on top.
- Cool & Finish: Remove from the oven and sprinkle with sea salt immediately, if desired. Let them cool on the baking tray for about 10 minutes before transferring them to a cooling rack to cool completely.
Nutrition
Notes
Tried this recipe?
Let us know how it was!Printable Recipe Card
Want just the essential recipe details without scrolling through the article? Get our printable recipe card with just the ingredients and instructions.