Crème brûlée and cheesecake, two of my all-time favorite desserts, have always held a special place in my heart. I’ve always been captivated by the creamy, rich custard and that satisfying crack of perfectly caramelized sugar.
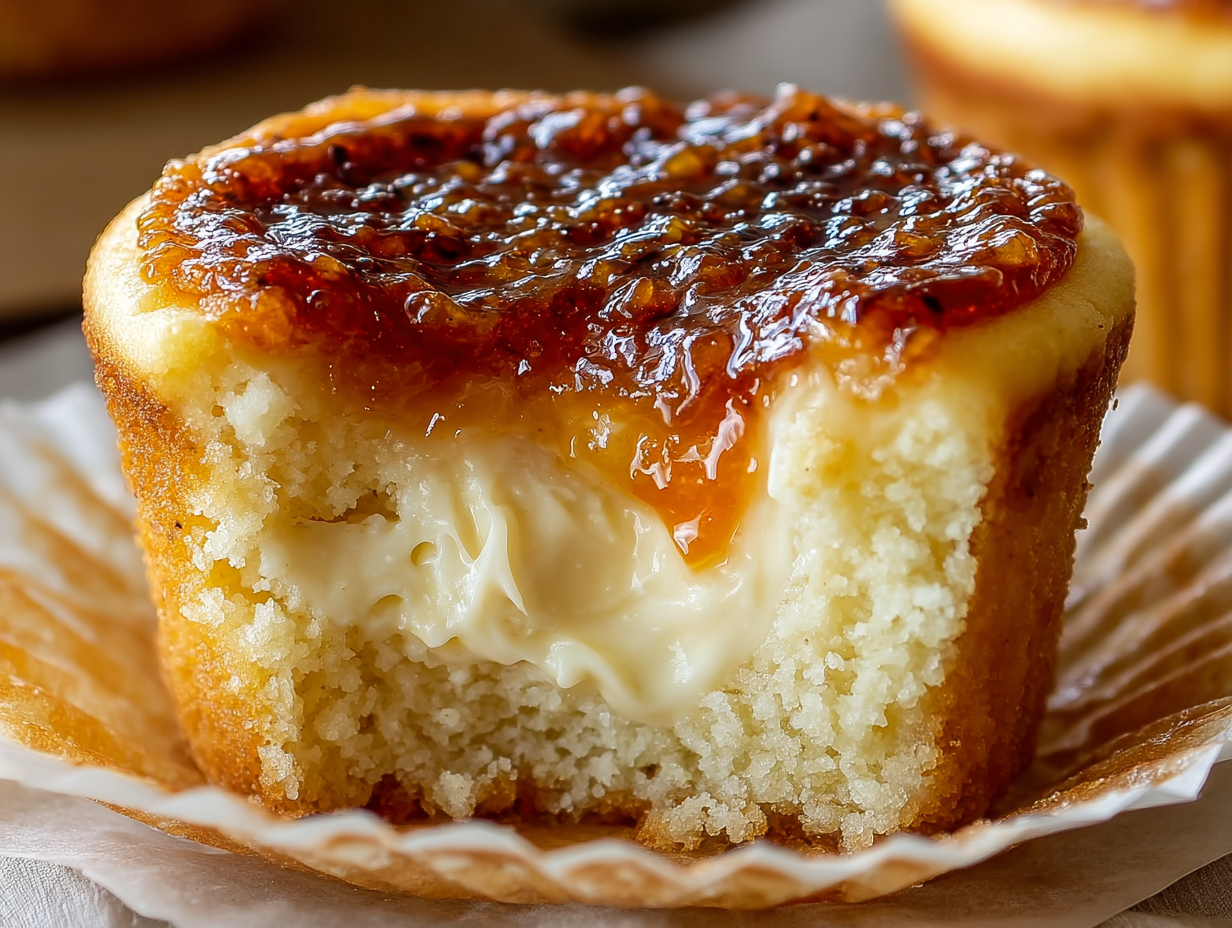
That’s why I’m beyond excited to share my Vanilla Bean Crème Brûlée Cheesecake Cupcakes recipe with you! It combines the best of both worlds into adorable, individual servings.
Get ready to indulge in a delightful treat that’s sure to impress. The total time to create this dreamy dessert is approximately 3 hours.

Jump To
Table of Contents
Why You’ll Love This Vanilla Bean Crème Brûlée Cheesecake Cupcakes Recipe
This isn’t just another cupcake recipe; it’s a mini masterpiece. I’ve put my heart into creating something truly special. Here’s why I think you’ll adore these Vanilla Bean Crème Brûlée Cheesecake Cupcakes:
- Perfectly Portioned: Individual servings mean no slicing, no mess, and everyone gets their own perfect crème brûlée experience.
- Texture and Flavor Harmony: The creamy cheesecake filling, the crisp caramelized sugar topping, and the soft cupcake base create a symphony of textures and flavors.
- Impressive Presentation: These cupcakes look like they came straight from a fancy bakery, but you made them in your own kitchen!
Equipment You’ll Need
To ensure your Vanilla Bean Crème Brûlée Cheesecake Cupcakes turn out perfectly, here’s the equipment I recommend:
- Kitchen Torch: A reliable kitchen torch is essential for achieving that beautiful, caramelized sugar crust. I’ve had success with the Iwatani torch, known for its consistent flame and ease of use. Look for one with adjustable flame settings.
- Cupcake Liners: I prefer using parchment paper liners because they prevent the cupcakes from sticking and give them a clean, professional look. Standard-sized liners work best.
- Mixing Bowls: A set of sturdy mixing bowls in various sizes is crucial. I love stainless steel bowls for their durability and ease of cleaning.
- Electric Stand Mixer: While you can use a hand mixer, an electric stand mixer with a paddle attachment makes creaming the shortening and sugar much easier and more efficient.
- Fine Mesh Strainer: This is key for achieving a silky smooth pastry cream, removing any lumps or cooked egg pieces.
Ingredients for Vanilla Bean Crème Brûlée Cheesecake Cupcakes
Here’s everything you’ll need to create these delightful cupcakes:
- 1 cup heavy cream
- 2/3 cup milk
- 1/2 cup granulated sugar (divided)
- 1/8 teaspoon salt
- 1/2 vanilla bean
- 4 large egg yolks
- 3 tablespoons cornstarch
- 1 tablespoon vegetable shortening
- 1 1/2 cups all-purpose flour
- 1 teaspoon baking powder
- 1/4 teaspoon salt
- 1/2 cup vegetable shortening (room temperature)
- 3/4 cup + 2 tablespoons granulated sugar
- 1 large egg (room temperature)
- 2 large egg whites (room temperature)
- 1 1/2 teaspoon vanilla extract
- 1/2 cup whole milk
- 1/3 cup granulated sugar
- whipped cream
- 12 fresh raspberries
Ingredient Notes: The Key to Perfect Crème Brûlée Cheesecake Cupcakes
Let’s talk vanilla! Using high-quality vanilla beans truly elevates the flavor of these cupcakes. Madagascar vanilla beans are my go-to, as they impart a rich, classic vanilla flavor.
Tahitian vanilla extract offers a more floral, fruity note, which can also be lovely.
I recommend sourcing your vanilla beans from a reputable spice shop or online retailer to ensure you’re getting the best quality.
Step-by-Step Instructions: Making Vanilla Bean Crème Brûlée Cheesecake Cupcakes

Follow these steps carefully, and you’ll be rewarded with the most amazing cupcakes!
- Heat heavy cream, milk, 6 tablespoons sugar, salt, and vanilla bean with half of the seeds in a medium saucepan over medium heat. Bring to a gentle simmer, stirring occasionally. Remove from heat as necessary if it starts to boil.
- In a mixing bowl, whisk together egg yolks and 2 tablespoons sugar until well blended. Add cornstarch and mix until very well combined and fluffy.
- Take about 1/2 cup hot cream mixture and slowly pour hot cream mixture while vigorously whisking into the egg yolk mixture. Replace back on heat and reduce temp to medium-low. Whisk the remaining cream mixture and slowly pour in the egg yolk mixture.
- Cook mixture, whisking constantly until thickened. Allow it to boil for about 30 seconds after it has started to cook out the starchy flavor. I had to go back and do this again after my cream did not reach desired consistency after refrigeration. NOTE: You can boil this mixture again after you have refrigerated it. I did and it still worked. Although it was a bit more like a custard than a cream.
- Immediately force mixture through a fine mesh strainer into a bowl. Mix in 1 tablespoon of vegetable shortening. Cover with plastic wrap pressing directly against surface of custard. Chill thoroughly, about 2 hours. To prevent food poisoning, it’s important to chill the custard properly and ensure safe handling and storing of food.
- Preheat oven to 350 degrees. In a mixing bowl, whisk together flour, baking powder, and salt for seconds, set aside.
- In the bowl of an electric stand mixer fitted with the paddle attachment whip vegetable shortening and granulated sugar until pale and fluffy.
- Mix in egg then blend in egg whites and vanilla. Add 1/2 of the flour mixture and blend just until combined, then add milk and blend just until combined and finish adding in remaining 1/2 flour mixture and blend just until combined.
- Divide batter among 12 paper-lined muffin cups, filling each cup about 2/3 full.
- Bake in preheated oven 21 – 24 minutes until toothpick inserted into center of cupcake comes out clean. Transfer to a wire rack to cool completely.
- Pipe or spread chilled pastry cream over cooled cupcakes into an even layer. Working with one cupcake at a time, sprinkle entirety of pastry cream with sugar then heat with a kitchen torch until sugar begins to melt and caramelize. While I torched one cupcake, I would keep the rest in the refrigerator.
- One of the best suggestions from this recipe was the coating of the sugar on the cream: First coat the edges of pastry cream while rotating the cupcake, then sprinkle tops. Torch it and add another layer of sugar, if you would like. I personally did 2 layers on all the cupcakes, using about 1 1/2 – 2 teaspoons of sugar per cupcake. Allow topping to cool.
- Garnish with whipped cream and a blackberry or raspberry if desired. Serve immediately or put in the refrigerator for 30 – 60 minutes before serving. I found that keeping them in the fridge helped the cream keeps it form and for the caramelized sugar to stay hardened. We didn’t test it past an hour…as we ate them all. These are wonderful ideas for delicious treats and drinks.
Make-Ahead Instructions for Vanilla Bean Crème Brûlée Cheesecake Cupcakes
To save time, you can make the pastry cream and cupcakes a day in advance. Store the pastry cream in an airtight container in the refrigerator for up to 24 hours. Keep the baked cupcakes in an airtight container at room temperature, also for up to 24 hours.
Expert Baking Tips for Perfect Vanilla Bean Crème Brûlée Cheesecake Cupcakes
Achieving that perfect crème brûlée topping is all about the sugar. I like to use about 1 1/2 – 2 teaspoons of sugar per cupcake for a generous, crackly layer. For even caramelization, keep the torch moving and hold it at a consistent distance from the sugar. Be patient and let the sugar melt slowly to prevent burning. You can have these with the delicious Quick & Easy Cinnamon Roll French Toast: The Ultimate Recipe.
Troubleshooting Your Vanilla Bean Crème Brûlée Cheesecake Cupcakes
Here are some common issues and how to fix them:
- Pastry cream is too thin: If your pastry cream is too thin, you can re-boil the mixture for a few seconds to help it thicken.
- Sugar doesn’t caramelize properly: Make sure your sugar is evenly distributed and your torch is hot enough. If it’s not caramelizing, try moving the torch closer to the sugar.
- Cupcakes sink in the middle: Ensure your oven temperature is accurate and avoid opening the oven door frequently during baking.
Serving Suggestions for Vanilla Bean Crème Brûlée Cheesecake Cupcakes
While whipped cream and fresh raspberries are classic garnishes, feel free to get creative! Try drizzling with chocolate or caramel sauce.
Chopped nuts or chocolate shavings would also add a delightful crunch. These cupcakes pair beautifully with a cup of strong coffee or a glass of dessert wine.
How to Store Vanilla Bean Crème Brûlée Cheesecake Cupcakes
Store the cupcakes in an airtight container in the refrigerator. This will help maintain their freshness and prevent the crème brûlée topping from becoming soggy. They are best enjoyed within 2-3 days.
Scaling the Recipe for Vanilla Bean Crème Brûlée Cheesecake Cupcakes
Need to make a larger batch? Simply double or triple the recipe, adjusting the ingredient quantities accordingly. No significant adjustments to the baking time should be necessary, but keep an eye on the cupcakes and bake until a toothpick inserted into the center comes out clean.
Crème brûlée without a torch: Baking Instructions
While the torch is essential for that traditional crème brûlée experience, you can try broiling the sugar topping as an alternative.
Place the cupcakes on a baking sheet and broil for a few seconds, watching closely to prevent burning.
Keep the oven door ajar and rotate the baking sheet for even caramelization.
FAQs about Vanilla Bean Crème Brûlée Cheesecake Cupcakes
Can I use a different type of sugar for the topping?
While granulated sugar works best for caramelizing, you can experiment with other sugars like brown sugar for a different flavor profile.
Can I add flavorings to the pastry cream?
Absolutely! Try adding a touch of citrus zest, a splash of liqueur, or even a pinch of spice to the pastry cream for a unique twist.
Can I freeze these cupcakes?
I don’t recommend freezing these cupcakes. Freezing them would cause the crème brûlée topping to become soggy.
Conclusion
These Vanilla Bean Crème Brûlée Cheesecake Cupcakes are more than just a dessert; they’re a celebration of flavor, texture, and the joy of baking. With their creamy filling, crackly topping, and adorable presentation, they’re sure to be a hit. I hope you enjoy making and sharing these cupcakes as much as I do!
I’d absolutely love to hear how your Crème Brûlée Cheesecake Cupcakes turn out! Please leave a comment below with any questions or share your results. Happy baking!
Follow us on Pinterest for more elegant dessert ideas, baking inspiration, and indulgent recipes like these Vanilla Bean Crème Brûlée Cheesecake Cupcakes, where classic meets creative!
Vanilla Bean Crème Brûlée Cheesecake Cupcakes Recipe
Ingredients
Equipment
Method
- Heat heavy cream, milk, 6 tablespoons sugar, salt, and vanilla bean with half of the seeds in a medium saucepan over medium heat. Bring to a gentle simmer, stirring occasionally. Remove from heat as necessary if it starts to boil.
- In a mixing bowl, whisk together egg yolks and 2 tablespoons sugar until well blended. Add cornstarch and mix until very well combined and fluffy.
- Take about 1/2 cup hot cream mixture and slowly pour hot cream mixture while vigorously whisking into the egg yolk mixture. Replace back on heat and reduce temp to medium-low. Whisk the remaining cream mixture and slowly pour in the egg yolk mixture.
- Cook mixture, whisking constantly until thickened. Allow it to boil for about 30 seconds after it has started to cook out the starchy flavor. I had to go back and do this again after my cream did not reach desired consistency after refrigeration. NOTE: You can boil this mixture again after you have refrigerated it. I did and it still worked. Although it was a bit more like a custard than a cream.
- Immediately force mixture through a fine mesh strainer into a bowl. Mix in 1 tablespoon of vegetable shortening. Cover with plastic wrap pressing directly against surface of custard. Chill thoroughly, about 2 hours.
- Preheat oven to 350 degrees. In a mixing bowl, whisk together flour, baking powder, and salt for seconds, set aside.
- In the bowl of an electric stand mixer fitted with the paddle attachment whip vegetable shortening and granulated sugar until pale and fluffy.
- Mix in egg then blend in egg whites and vanilla. Add 1/2 of the flour mixture and blend just until combined, then add milk and blend just until combined and finish adding in remaining 1/2 flour mixture and blend just until combined.
- Divide batter among 12 paper-lined muffin cups, filling each cup about 2/3 full.
- Bake in preheated oven 21 – 24 minutes until toothpick inserted into center of cupcake comes out clean. Transfer to a wire rack to cool completely.
- Pipe or spread chilled pastry cream over cooled cupcakes into an even layer. Working with one cupcake at a time, sprinkle entirety of pastry cream with sugar then heat with a kitchen torch until sugar begins to melt and caramelize. While I torched one cupcake, I would keep the rest in the refrigerator.
- One of the best suggestions from this recipe was the coating of the sugar on the cream: First coat the edges of pastry cream while rotating the cupcake, then sprinkle tops. Torch it and add another layer of sugar, if you would like. I personally did 2 layers on all the cupcakes, using about 1 1/2 – 2 teaspoons of sugar per cupcake. Allow topping to cool.
- Garnish with whipped cream and a blackberry or raspberry if desired. Serve immediately or put in the refrigerator for 30 – 60 minutes before serving. I found that keeping them in the fridge helped the cream keeps it form and for the caramelized sugar to stay hardened. We didn’t test it past an hour…as we ate them all.
Nutrition
Notes
Tried this recipe?
Let us know how it was!Printable Recipe Card
Want just the essential recipe details without scrolling through the article? Get our printable recipe card with just the ingredients and instructions.